This is lesson 5 in the ‘Marketing your Quicket Event’ course.
Click here to go back to the previous lesson or click here to go to the start of the course.
Welcome to lesson 5 of our our ‘Essentials for your Quicket Event’ course. At the end of this 5-part course you’ll be sure that you haven’t missed a crucial step and aren’t caught with unexpected challenges on the day of or after your event.
This lesson covers:
Your event’s done! Well done! Nothing more to do right? Not quite.
While the pressure of the event is enough to make anyone drop everything else and focus on it only to retreat from the world for a bit thereafter, it’s important to see a few things that happen after your event as part of your event itself.
This lesson walks you through these so that when you’re likely to have run out of steam after your event has happened, you‘ll have planned for these already.
Get in touch and say thank you
Lesson 5: After your event - Section 1
Don’t leave your guests hanging right after your event.
Make your attendees feel the love by sending them a short message to say thanks and how much you enjoyed bringing them this experience - without your guests, there wouldn’t be much of an event! Make them feel good about having attended, and remind them of what an excellent time they had.
Not only does this wrap up your dealings with them with a nice personal touch, but it reinforces their affinity for you and your events.
Take this opportunity to also do the following in addition to thanking your guests, but try to keep it brief!
- Thank any sponsors that were involved and tell everyone about any future events from you they should look out for.
- Ask for feedback from your guests - do not wait until later to do this. We’ll cover this in the next section.
- Share event content too! Some ideas include videos, notes, websites and social media links of speakers, artists and retail/food stands; photos for people to download, tag and share; a Twitter list of event goers; or a short blog article to continue the discussion.
You can do this thank you message by sending out an email or using MailChimp to send one. Quicket has an excellent feature that lets you integrate MailChimp with the platform seamlessly. To learn how to do this, click here to go to our course page and access our Event Marketing Course.
It’s also an effective idea to post a similar short thank you to your various social channels!
Ask for feedback
Lesson 5: After your event - Section 2
People are far more likely to give you feedback when an event is fresh in their minds as opposed to down the line when the memory of their experience of your event has faded.
In today’s social media age, online reviews are one of the most potent forms of social proof. Consumers are influenced by other people more than they realise — or are willing to admit.
Quicket has you covered
There’s a powerful feature* on Quicket that covers feedback on a basic level for you. When your event has ended, those that bought tickets to your event will automatically receive an email asking them to review your event. They’re asked a star rating, can leave a written comment for additional feedback and have 7 days from the end date of your event to submit this. You’ll also see an average rating of the event based on the reviews received.
These reviews are not public, and are collected on your behalf for you to use as you please - whether that’s to improve aspects of your event, or to display proudly on or in marketing your event. They give your ticket buyers the chance to tell you how to improve for the future, and help to keep criticism off social or public forums. We're building for a future where we leverage the power of reviews by allowing you to pick your best reviews to display on your upcoming events to build credibility and trust around your brand.
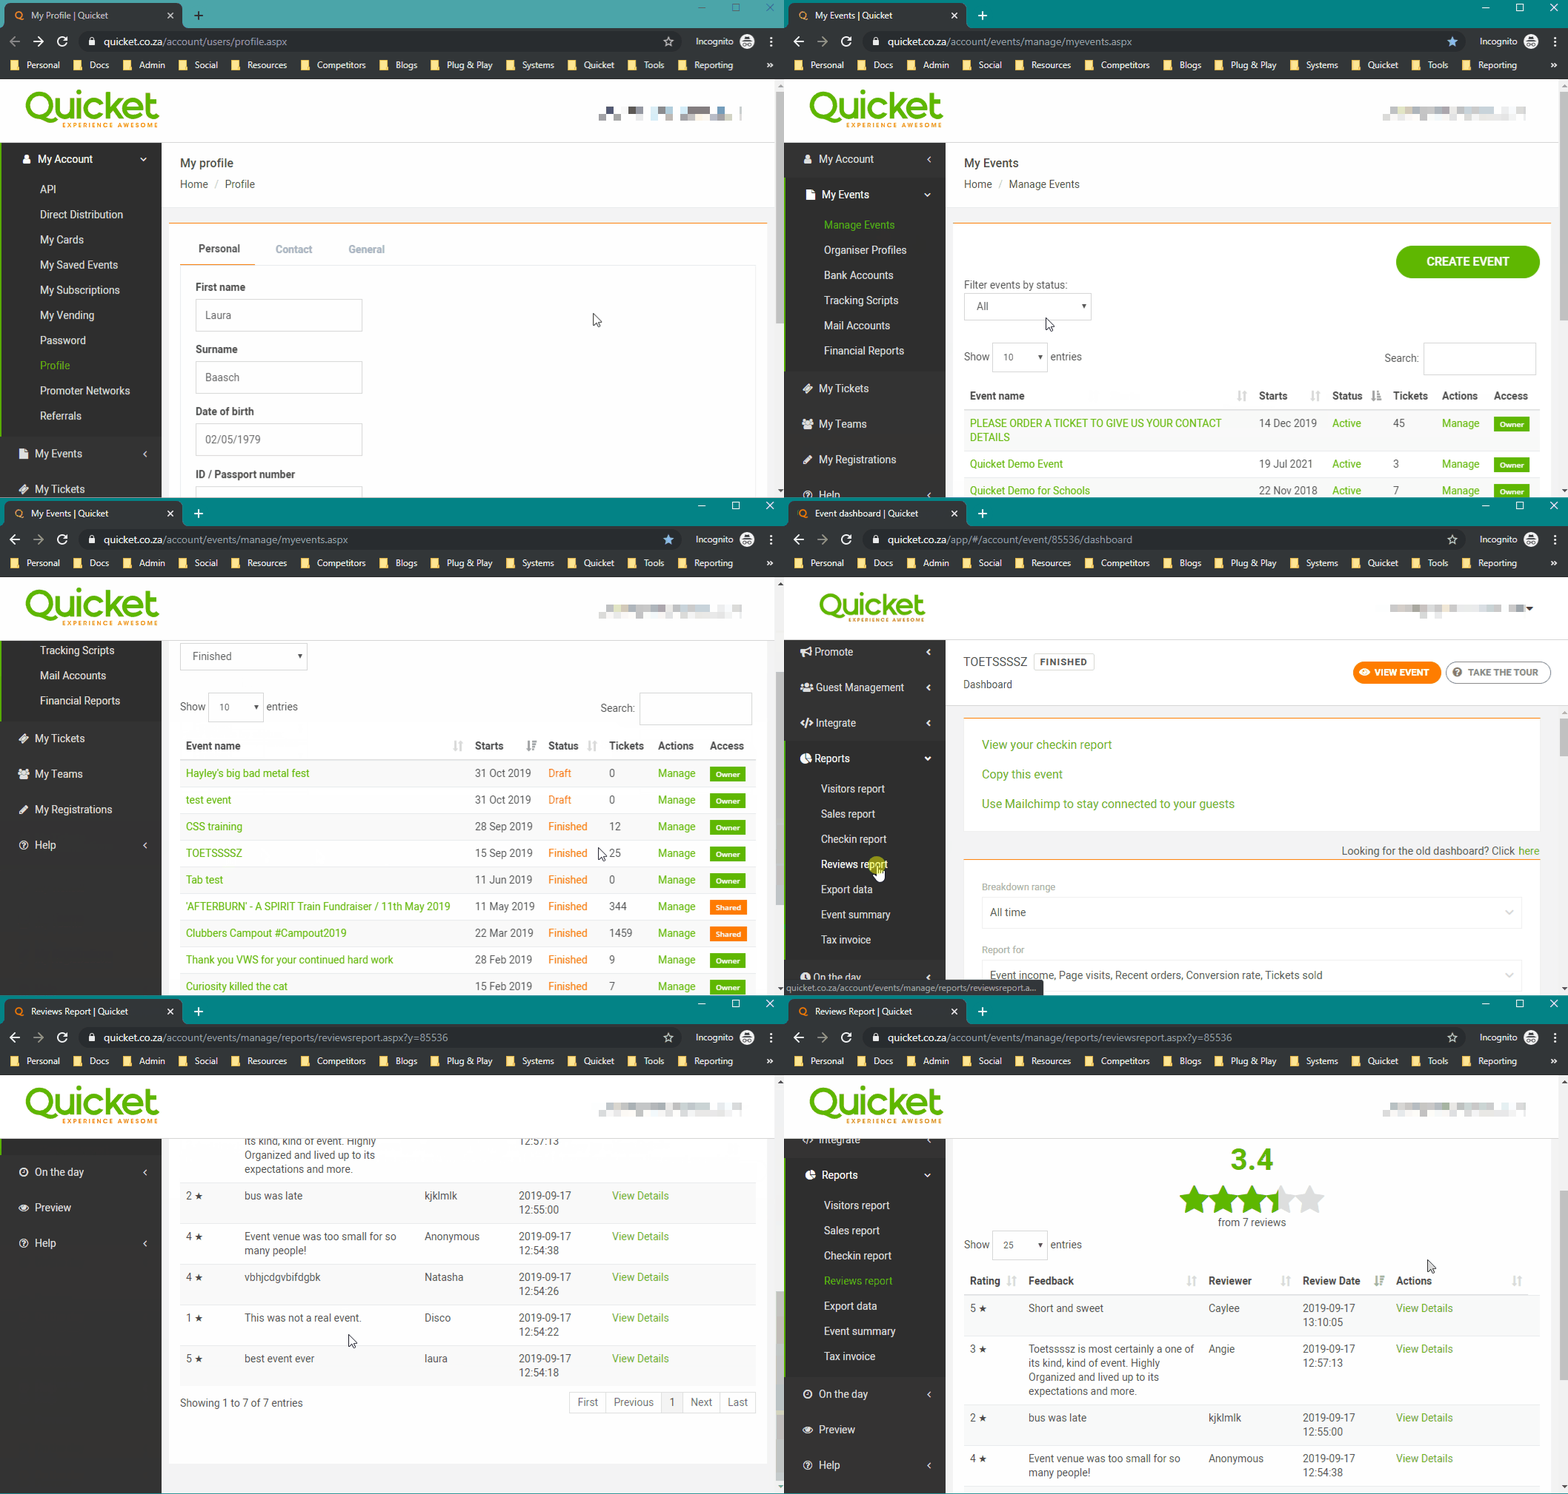
Here’s how to access these reviews:
- Log into your Quicket account.
- Under ‘My Events’ in the menu, select ‘Manage Events’.
- If you have many events in your account, you can filter your events by status by clicking the dropdown 'Filter events by status' and selecting ‘Finished’.
- Select ‘Manage event’ next to the event you’re focusing on to access the event dashboard.
- From the menu, select ‘Reports’, then from the drop-down menu that appears, select ‘Reviews report’.
- You’ll be able to see all the feedback left by your guests here. If your event has just ended and you have no reviews yet, wait a few days and come back to check! You’ll be able to access these reviews at any time during or after the 7 day window that your guests have for submitting their reviews has ended.
*Please note this feature was released on 12 October 2019 - any events prior to this will not have reviews. Reviews are collected for 7 days after your event has ended.
Click here for more info and the terms and conditions regarding event reviews on Quicket.
Custom feedback questions
If there are specific questions you’re wanting to ask your guests, you’ll need to set up your own feedback survey.
It’s a great way to learn about your attendees’ experience of your event and it also makes them feel like their opinion matters. It also helps if you’ve got something you’d like to try but want to test if your target market has an appetite for it.
There are services that make it really easy to set one one up. We recommend Survey Monkey, Google Forms or Typeform.
Here are a few survey question ideas:
- What do you think we can improve on?
- Was there something you felt was missing?
- What was the best part about the event for you?
- From 1-10, rate the following (food, toilets, bar facility, service).
Give us (and your suppliers) feedback
Lesson 5: After your event - Section 3
Just as feedback from your guests is incredibly important to you, so is feedback from you to your suppliers and to us!
Some of your suppliers may ask for feedback, and some may not. Regardless, be sure to give constructive feedback wherever you can to your various suppliers. This helps you build long-lasting a working relationship with them. They can only improve if they’re aware of issues, and the positive notes you have are really wonderful to hear and helpful to them as well!
After your event on Quicket ends, you’ll receive an email asking you to give us feedback on how your experience of using the platform and our services for your ticketing was. We read each and every single one of these reviews, so you can be sure we’ll take your feedback into account!
Take a look at your data
Lesson 5: After your event - Section 4
You can learn loads from Quicket as your ticketing platform, and can use the data captured to improve on your next event! For example, you can learn what marketing channels worked best, peak ticket sales dates and when attendees arrived - all important info that could help you in the future.
Here are a few things you’re able to learn from your event on Quicket:
1. Is your website or ticket price right?
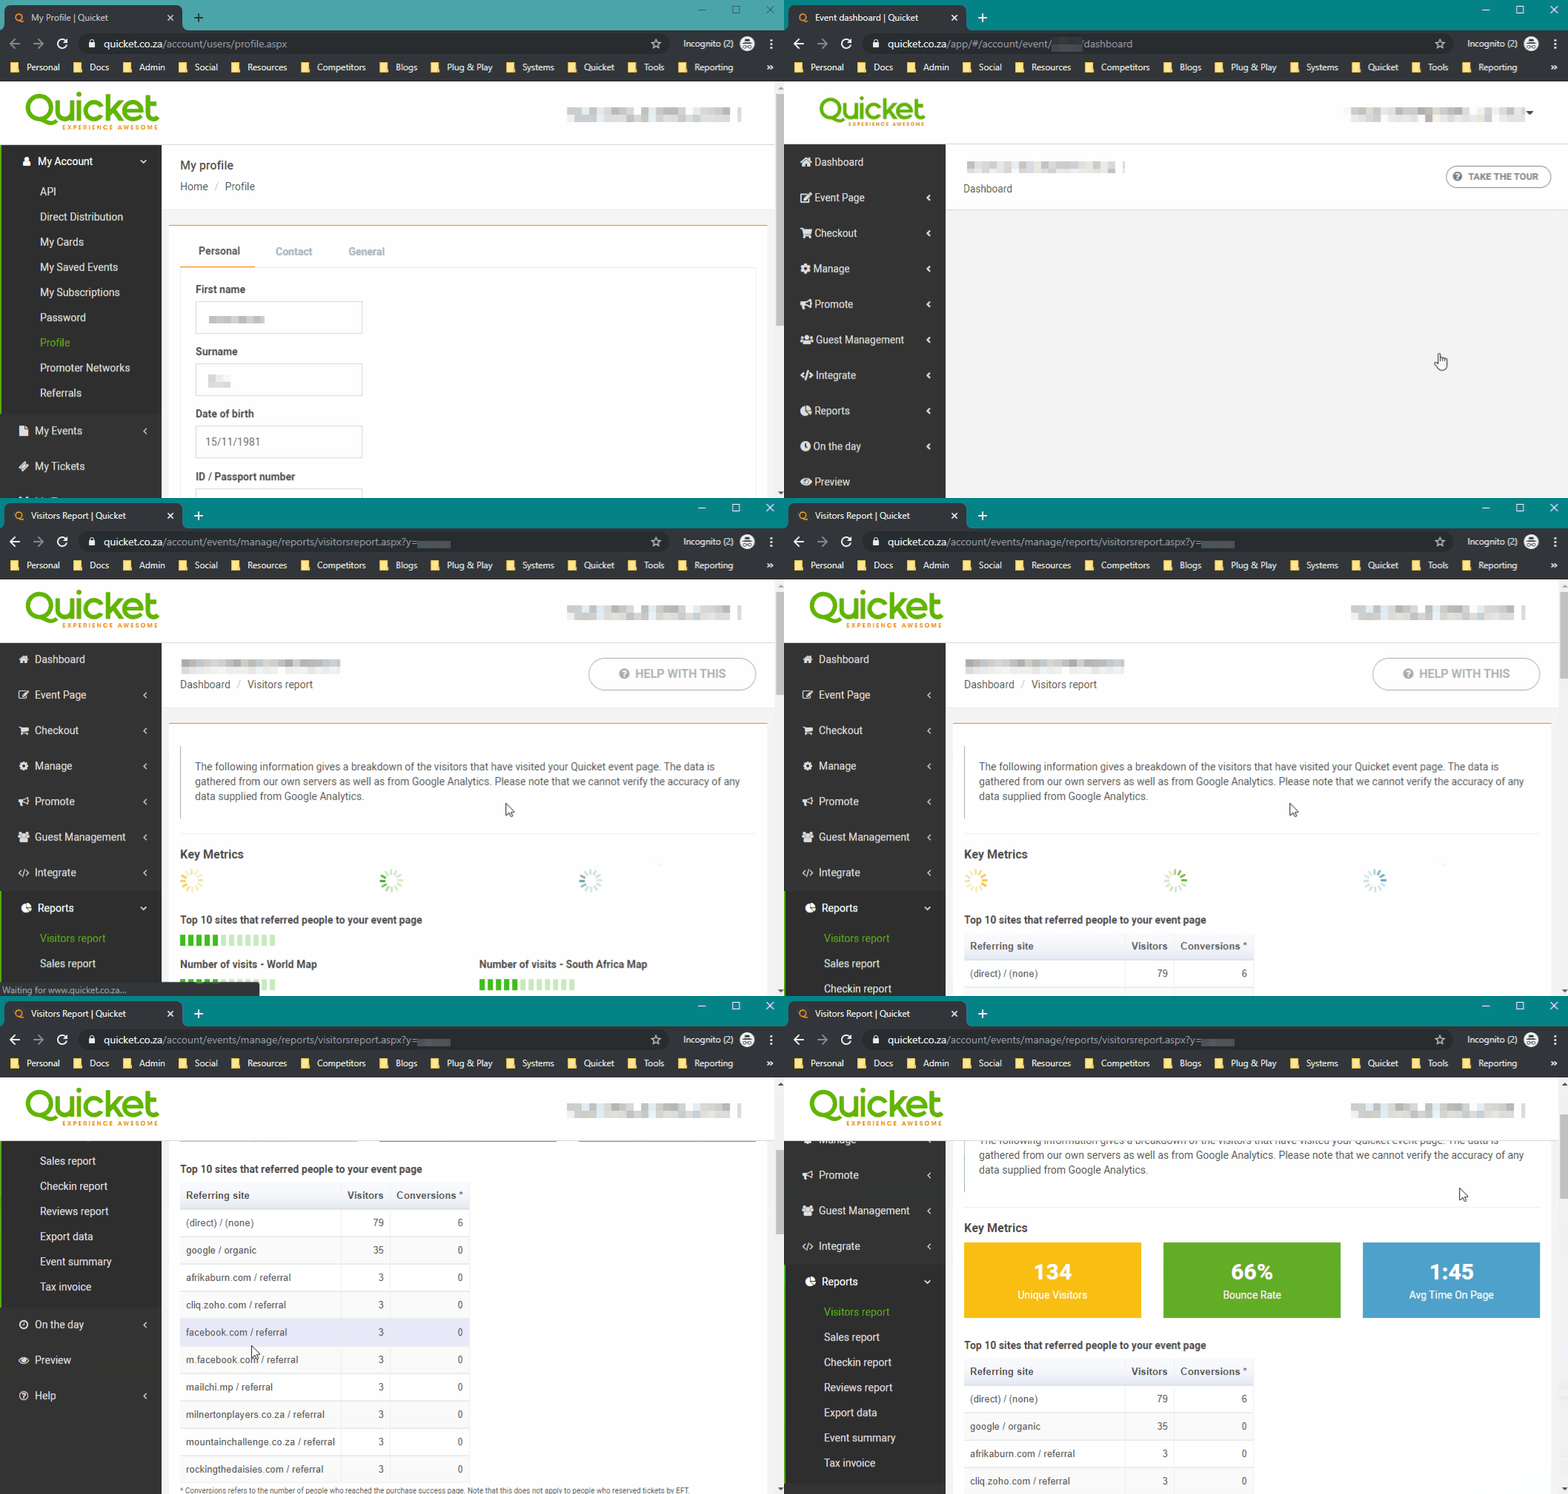
If your website or Quicket event page is not receiving a lot of visitors, you probably need to up your marketing efforts next time. Click here to find out more about your visitors report.
Alternatively, you may be getting a lot of visitors, but not ticket bookings, so you'll need to consider whether your ticket price is right and/or if the wording and imagery on your website or Quicket event page does your event justice. Perhaps your website isn’t mobile optimised?
Here are some resources to help you with these:
- Use your visitor's report to see where your traffic is coming from
- Marketing tips and tricks
- Ticketing with mobile
- “Why aren’t people booking tickets to my event?”
- The Seven Deadly Sins of creating a ticketing page
- Setting the right ticket price (find it as a bonus lesson of our Event Starter Course)
- Marketing your event (find it in our Event Starter Course)
2. Who’s coming to your event and when?
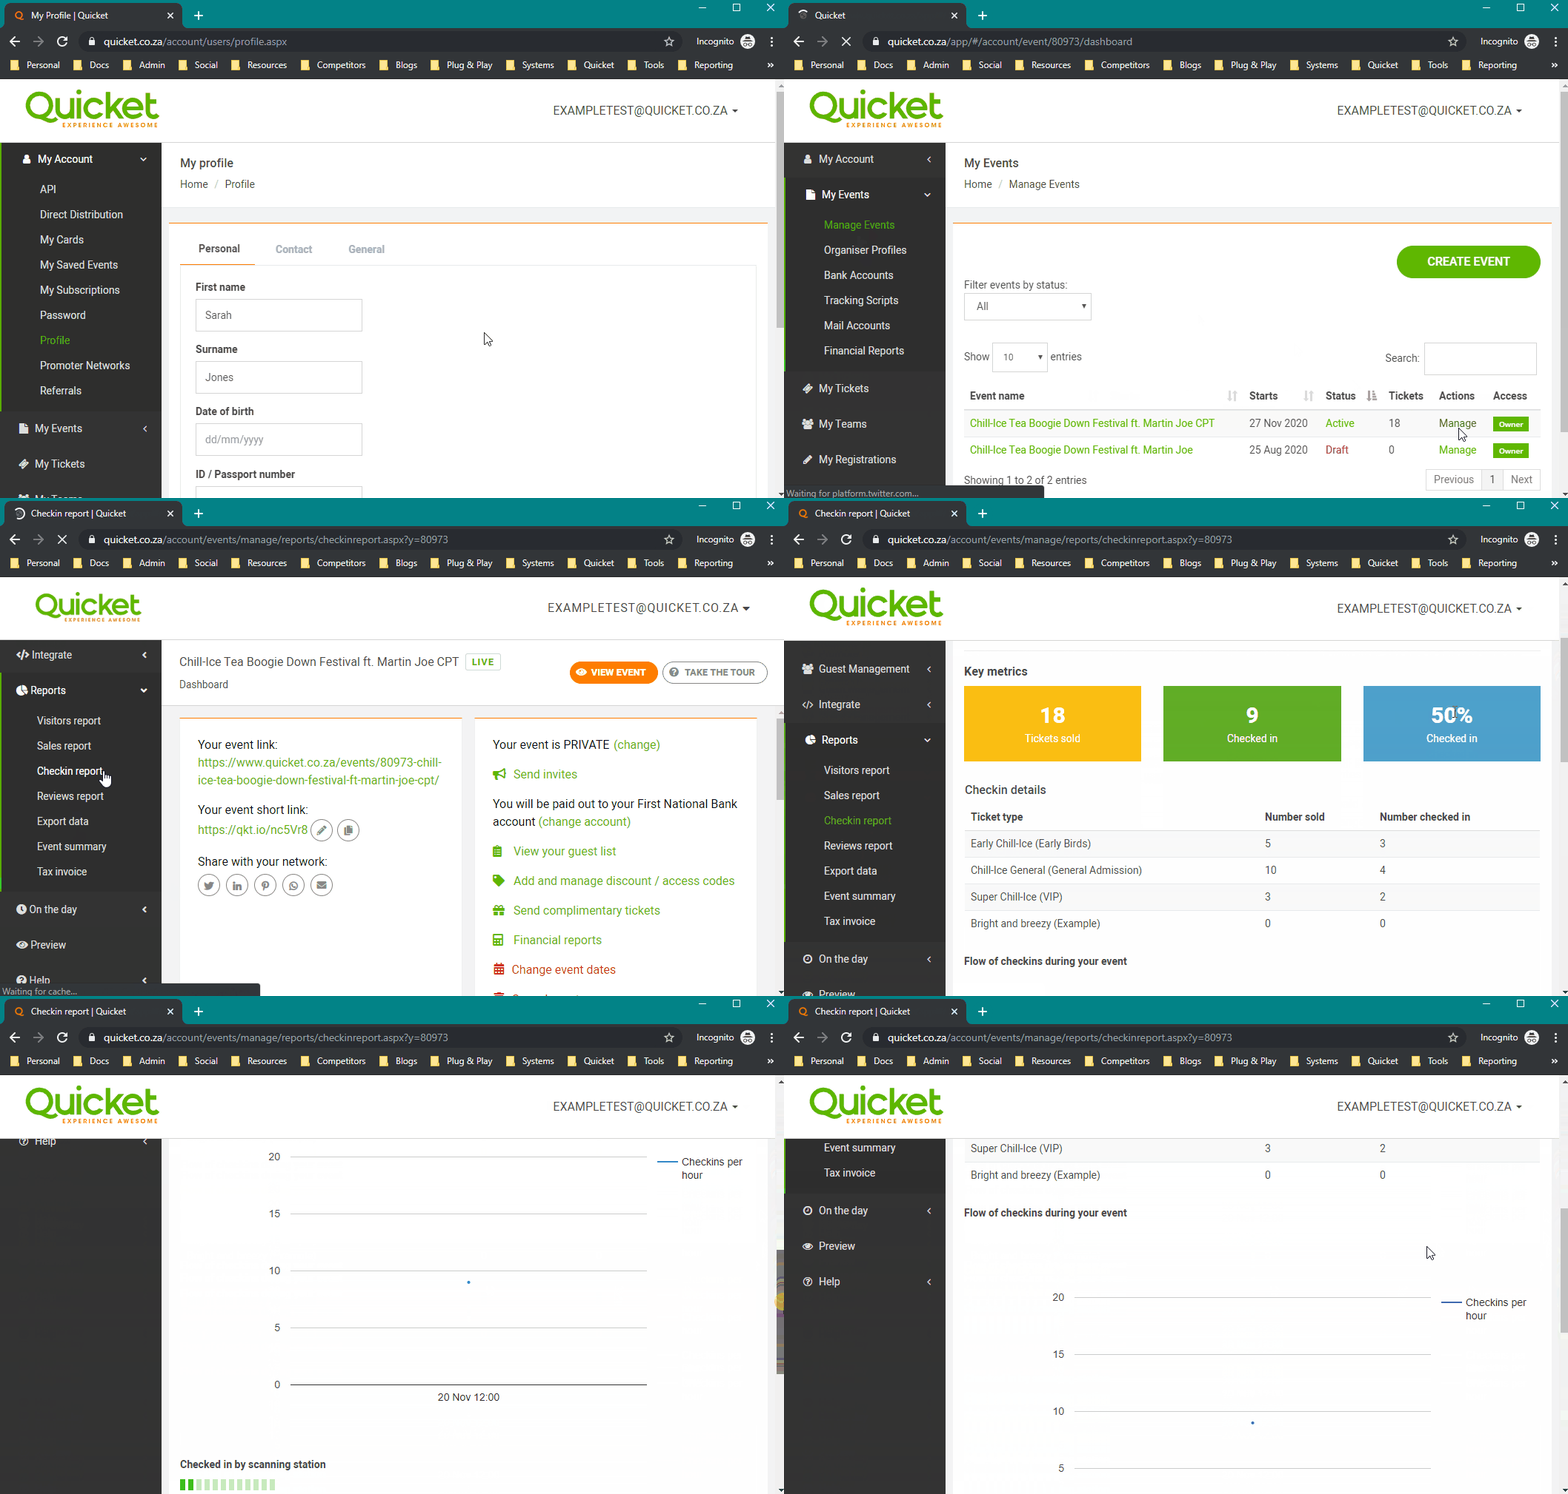
If you used a barcode scanner or the Quicket GO app - both of which electronically track people arriving at your event - you can see what times were the most popular for people to arrive.
If you had a lot of no-shows, think about whether the value you’re offering is high enough, or if your event was free, consider adding a price next time so that people are more committed. Click here for some advice on adding value to free events to reduce no-shows.
This overview on using your check in report will help you look at this data.
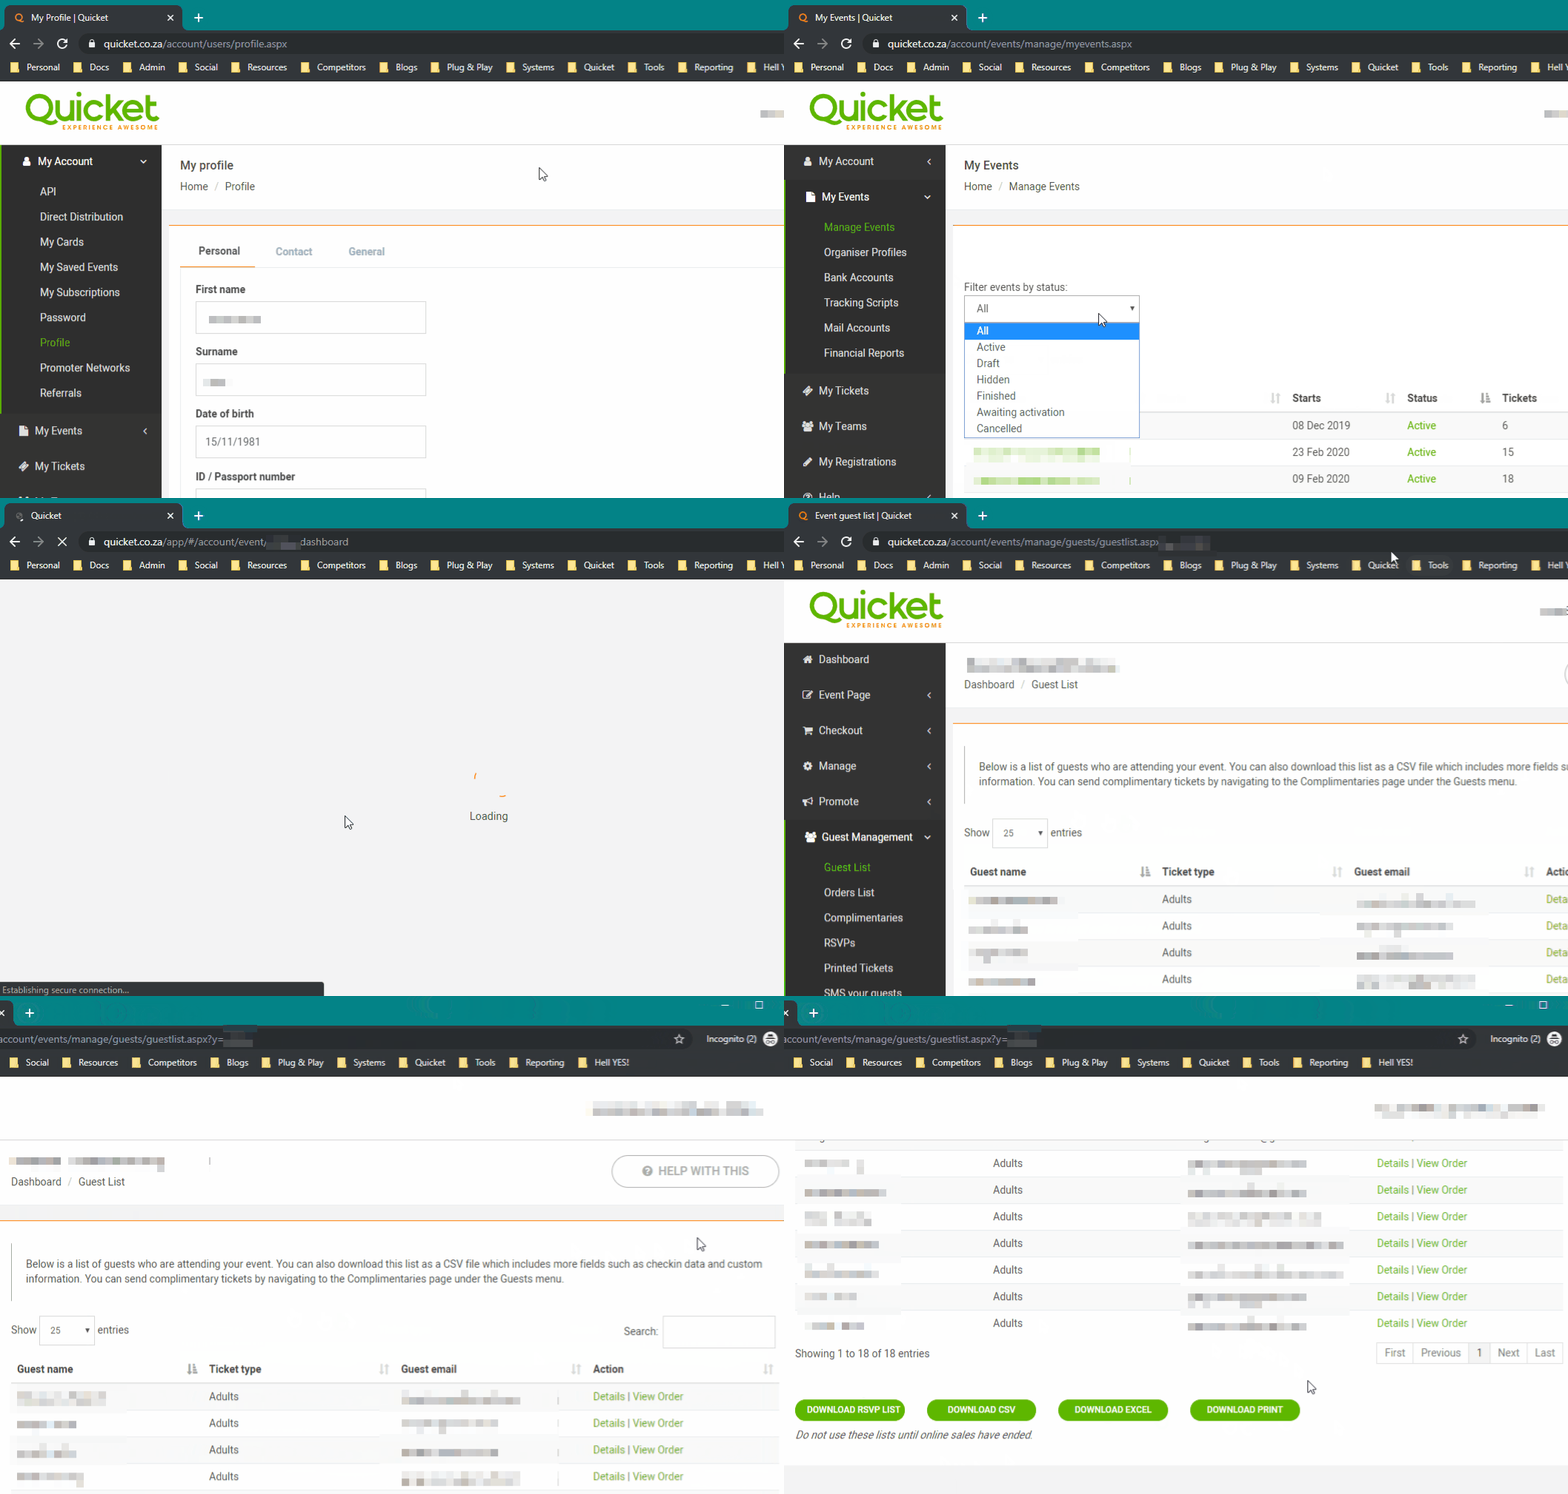
To check who’s attending your event, simply check your Quicket guest list.
3. What ticket type sold most and where are people buying?
Check whether people got their tickets online, at a vendor or at the door. Increase your marketing efforts where tickets sell most and consider changing things up where tickets aren’t selling well.
For your next event, you may need to consider increasing the quantity available of a certain ticket type for which there’s a clear high demand, or dropping one that there was little or no interest in.
To see this info on how well each ticket type sold, you can check your Sales report on your Quicket event. Click here for an overview on using your sales report.

4. When did people buy tickets? Was there a reason?
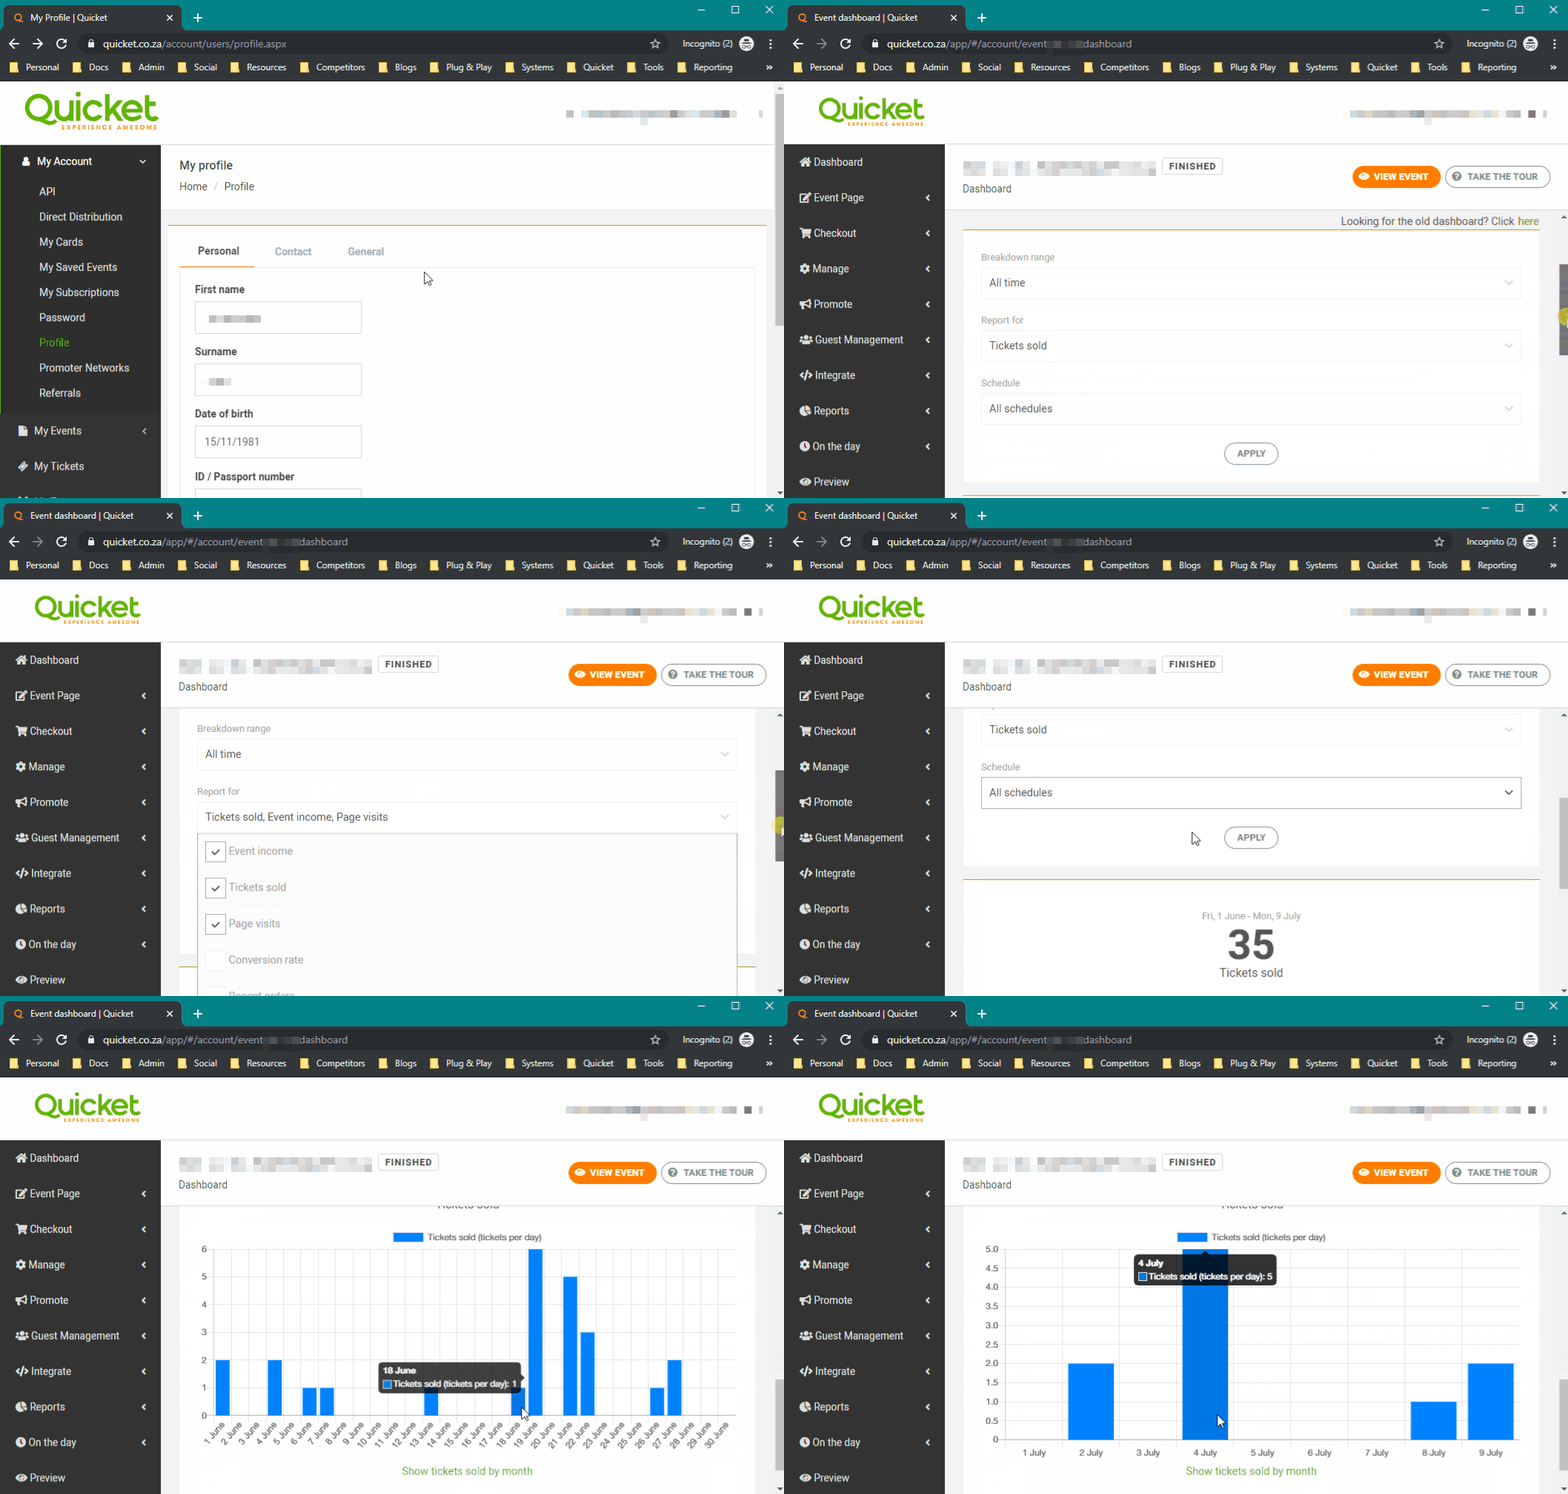
Checking the data on your Quicket event dashboard allows you to drill down into your ticket sales in detail.
For a specific date range or overall, you’re able to see how many tickets were sold, what your event income was, how many visits to your event page you had, what your conversion rate is, and any recent orders that were placed.
For any spikes in ticket sales - did you have a social post or ad going out that day? Was it pay day? Try see what impacted your sales so you can learn what works and what doesn’t.
Click here for more info on your dashboard and its reports.
Your event payout
Lesson 5: After your event - Section 5
Within 2-3 working days of your event ending, your payout from Quicket should be actioned.
If this time has passed and you haven’t received the payment, make sure you’ve added your bank details to your Quicket event. To see how to do this, click here to go back to that section from the second lesson of this course.
You also receive both an event summary and a tax invoice emailed to you when your event payout is actioned.
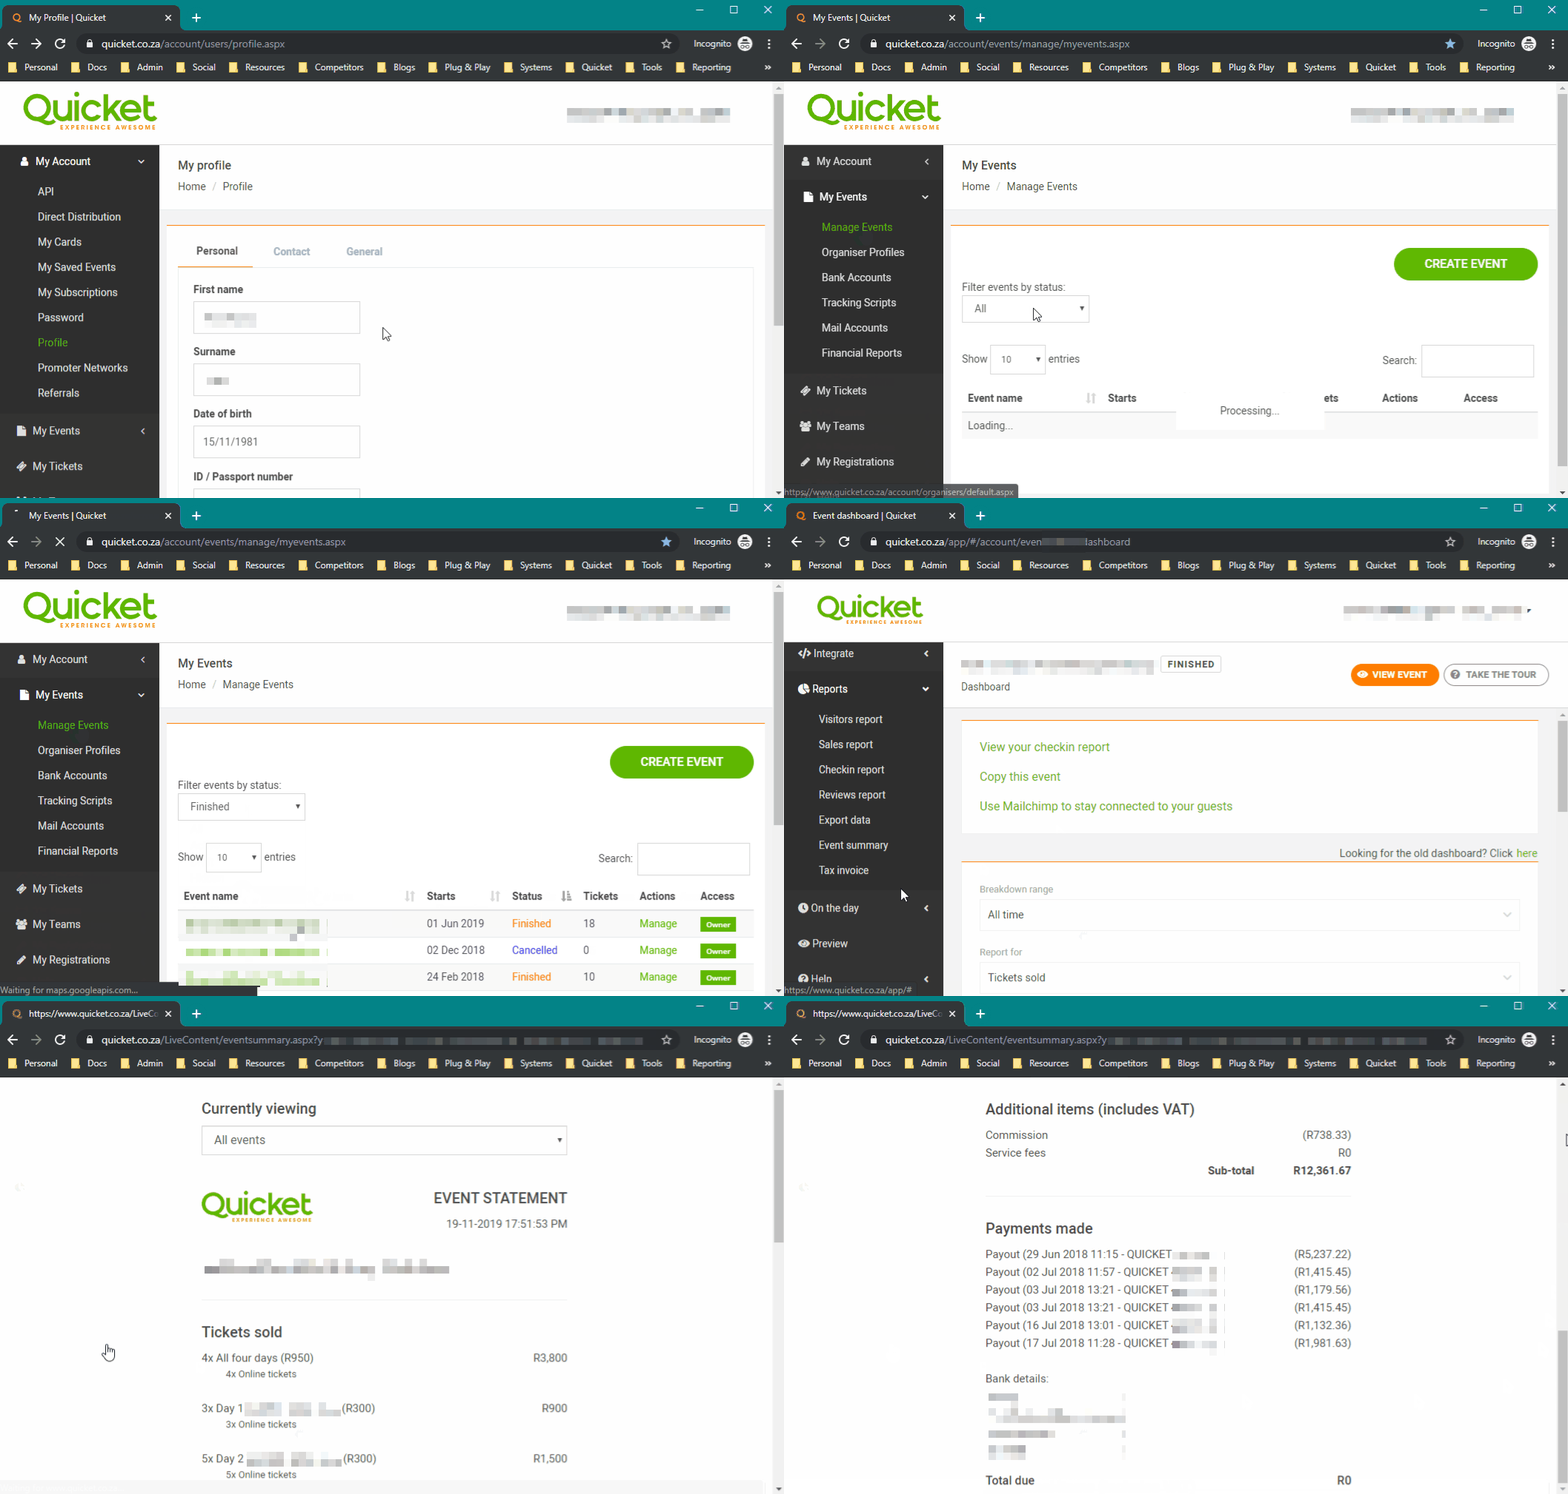
You can access both your event summary and your tax invoice from your event’s dashboard:
- Log into your Quicket account.
- Under ‘My Events’ in the menu, select ‘Manage Events’.
- If you have many events in your account, you can filter your events by status by clicking the dropdown 'Filter events by status' and selecting ‘Finished’.
- Select ‘Manage event’ next to the event you’re focusing on to access the event dashboard.
- From the menu, select ‘Reports’, then from the drop-down menu that appears, select ‘Event summary’ or ‘Tax invoice’.
Your event summary is a financial breakdown of your event, showing you your ticket sales, including how many of each ticket type was sold and the funds you turned from those tickets.
You'll also see any fees that were charged to you by Quicket. This will include commission and booking fees (if you chose to absorb the booking fees for your guests) as well any event extras you may have accumulated, such as equipment hire or printed tickets. If you need any more info on our fees, click here to go to our Event Academy courses page where you’ll find our ‘Event Starter Course’.
For more info on your event summary, click here.
Your tax invoice is for VAT purposes only and is not to be paid manually; Quicket will automatically deduct our commission and fees from your event payout. If you are collecting funds directly into your own merchant account, Quicket invoices you by email for fees at the end of your event.
For more info on adding claiming back VAT on your ticket sales and adding your VAT registration number to your tax invoice, click here.

All done!
Lesson 5: After your event - Section 6
That’s it for this course. We hope it’s helped you prepare for the most often-forgotten or left-until-too-late things that are likely to cause problems for you and your event.
Keen to check out our other courses? Click here.
Nina is the Marketing Manager for Quicket and is passionate about growing a community of event organisers into one that is empowered to create incredible experiences. An event organiser herself, she’s also worked across brand marketing, social media, and in the non-profit world. She’s a burner (AfrikaBurn) at heart, an avid baker, loves a good hug, and cooking dinner for friends over a glass of good wine.


