

This is lesson 4 in the ‘Essentials for your Quicket Event’ course.
Click here to go back to the previous lesson, click here to skip to the next lesson or click here to go to the start of the course.
Welcome to lesson 4 of our our ‘Essentials for your Quicket Event’ course. At the end of this 5-part course you’ll be sure that you haven’t missed a crucial step and aren’t caught with unexpected challenges on the day of or after your event.
This lesson covers:
The day of the event always has a mountain of things for you and your team to juggle and keep an eye on. In the frenzy of the day, you might be met with issues you didn’t expect, or might overlook something that will help you in the long run.
This lesson walks you through these so that instead of being caught off guard, you can plan for these and know what to do as part of your event production for the day.
Before you start scanning or selling tickets on the day
Lesson 4: On the day - Section 1
By the day of the event, you should make sure you have the following in place:
- Each of your scanning staff is equipped with a mobile device with the Quicket GO app ready and installed. To go back in this course and check how to do this, click here.
- Each person scanning has the correct access for scanning from individual Quicket accounts and that they know their login details. To go back in this course and check how to do this, click here.
- If you intend to sell tickets from the app, you need to have those ticket types set to “sell at the door” from your Quicket event dashboard. To go back to lesson one in this course and check how to do this, click here.
Then you’re good to go!
Tip: It’s advised to have separate devices dedicated to scanning and to ticket sales, so that your staff doesn’t need to delay the queue by switching between the two functions on the app.
How to switch to a different event
If you’re on the wrong event, and not the one you want to be scanning or selling tickets for, you can switch to the correct event easily.
It’s crucial to note that if you have been scanning or selling tickets already and then want to switch the event, take caution. If your device has not had a chance to connect to a network to sync the data, you’ll lose all your scanning and ticket sales data. So if you need to do this, be sure that your device is online.
To switch events on the app:
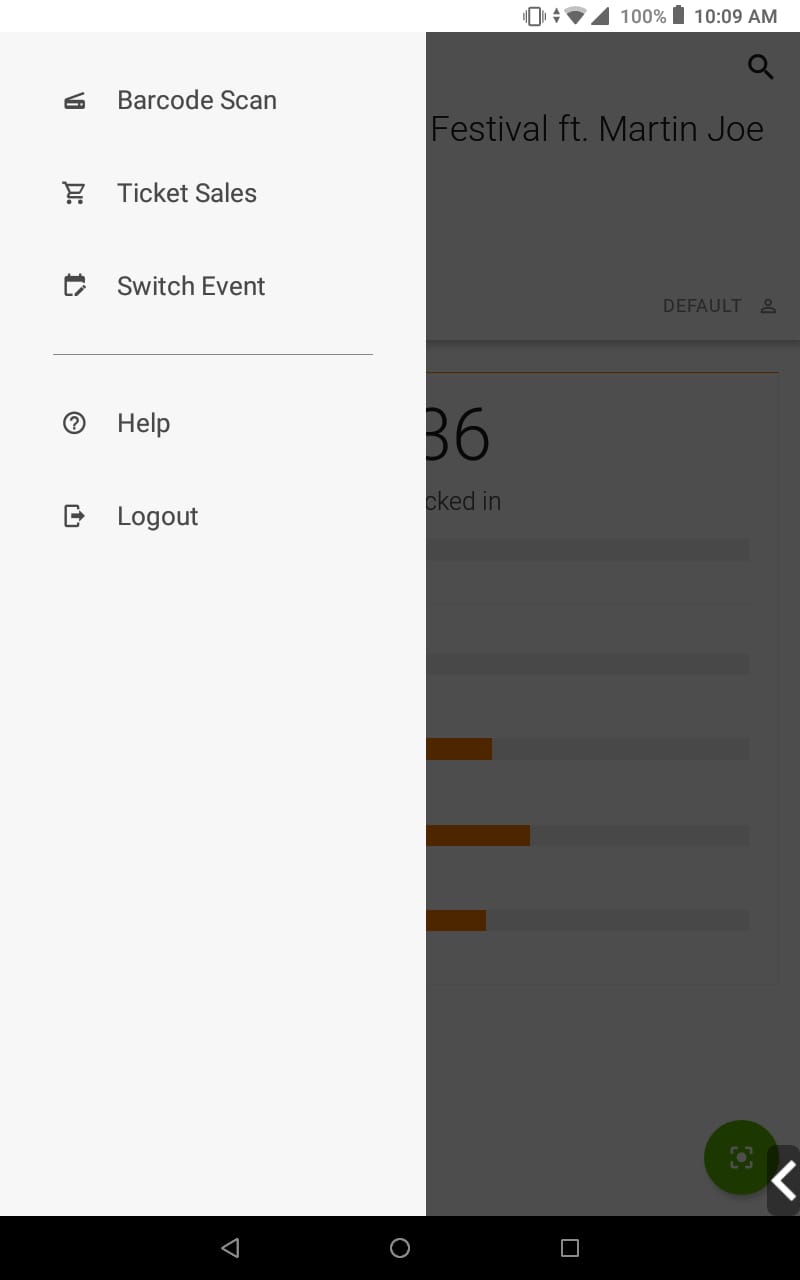
- Once logged in on the app, tap the hamburger menu icon in the top left corner.
- Select ‘Switch Event’ from the menu options.
- Confirm that you wish to go ahead by tapping ‘Yes’.
- Tap the event you would like to switch to.
How to switch between scanning tickets and selling tickets
- Once logged into the app, tap the hamburger menu icon in the top left corner.
- Select either ‘Scan Tickets’ or ‘Ticket Sales’ from the menu options. You’ll be taken to the relevant summary page and can then either scan or sell tickets. We’ll cover how to in the upcoming sections of this lesson.
Scanning tickets using the Quicket GO app
Lesson 4: On the day - Section 2
Here we’ll outline how to scan tickets, manually check guests in and out, use a traditional barcode scanner with the app, as well as troubleshoot any issues you may have.
Click below to jump to a specific section:
How to scan tickets:
- Open the Quicket GO app.
- Log in using the relevant login details that have scanning access.
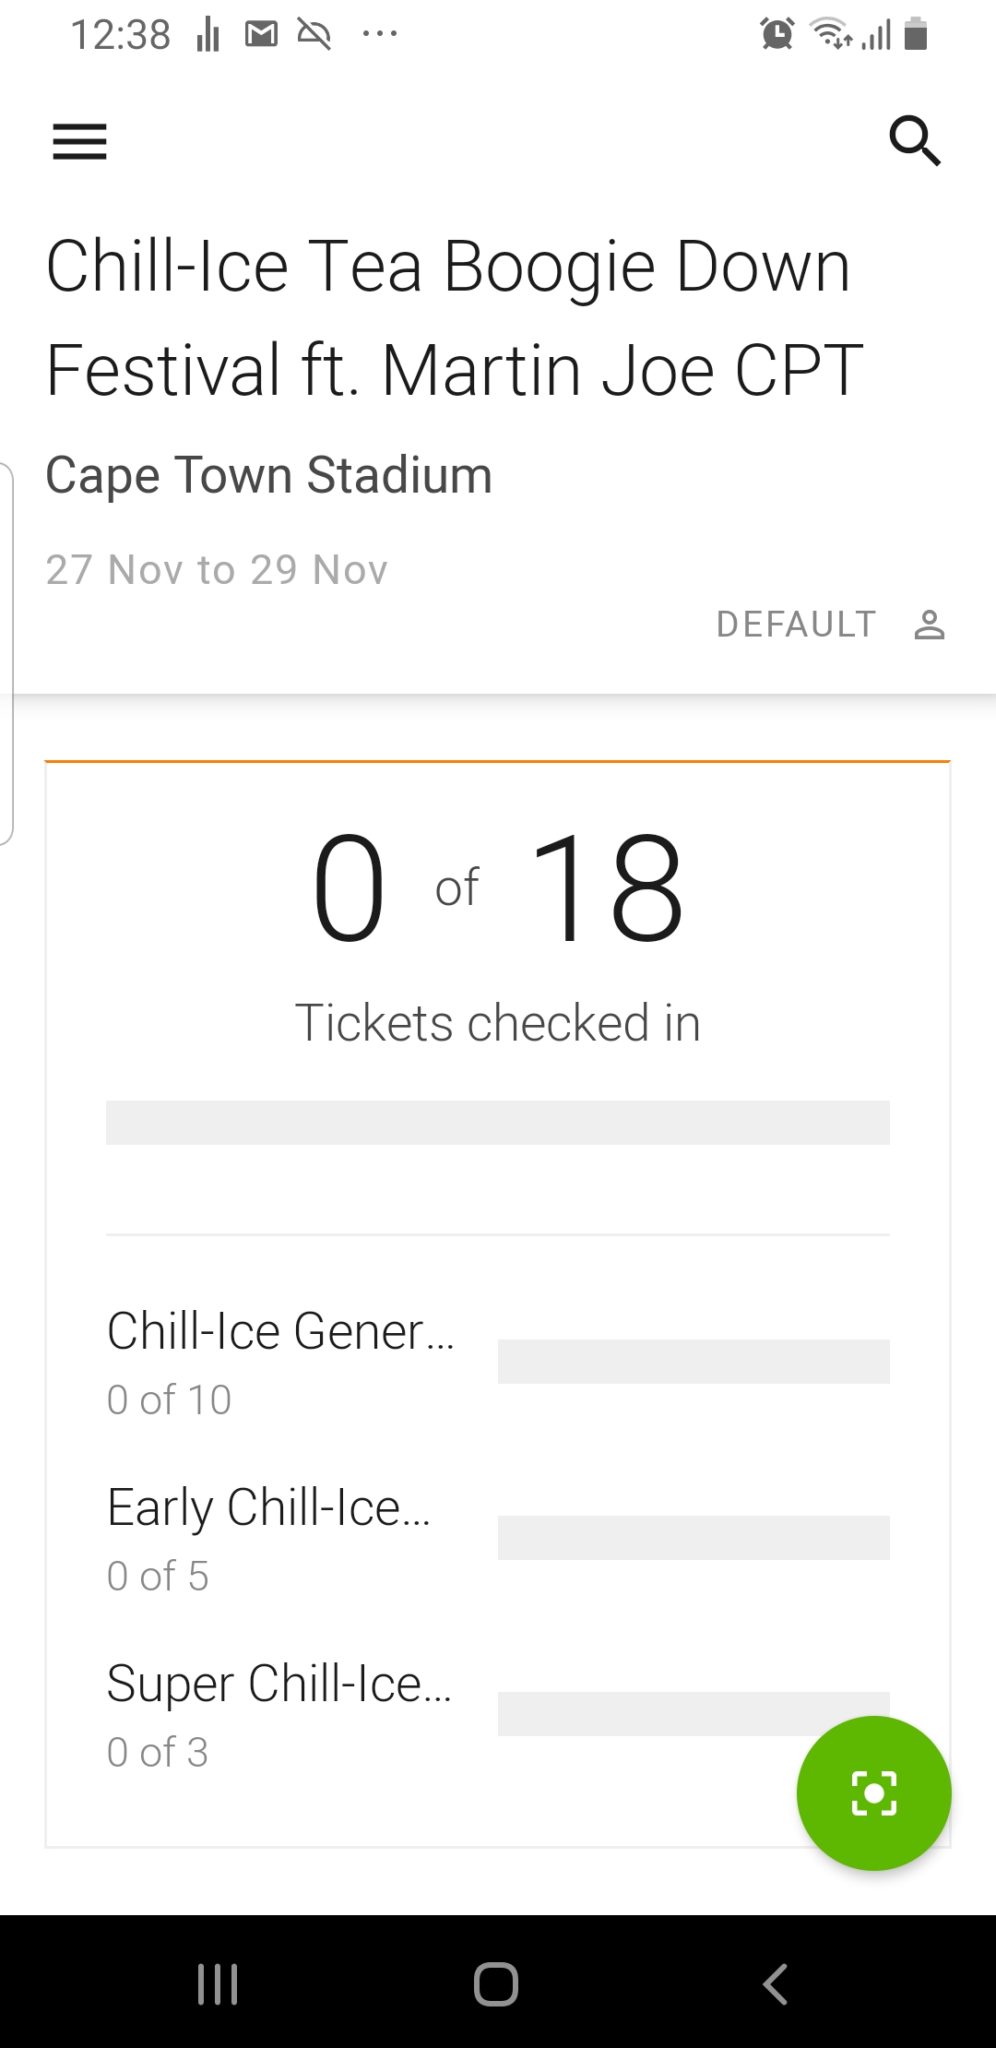
- Tap on the name of the event you’re scanning for. You’ll be taken to a scanning summary page showing you how many tickets of those that you sold have been checked in.
Ticket scanning pulls through live, so you’ll be able to see your check in stats here, as well as on your event dashboard in your Check in report.
Tip: On each device you’re logged into, you can create a username. Tap the person icon below the event date on this summary page, then type in your username and tap ‘Continue’. You can change this at any time, so if your devices switch hands, you can change the username. This will track the checkins per device and display on your check in report.
- To scan a ticket, tap the green scanning icon near the bottom of the screen.
- The first time you try scan on a device, you’ll be prompted to give the app permission to take pictures and record video. This is needed to scan tickets, so tap ‘Allow’.


- Hold the square that is shown over the QR code or barcode on the ticket to use the camera to scan it - there’s no need to tap anything, it will scan automatically. The ticket can be either on the guest’s phone, or printed.
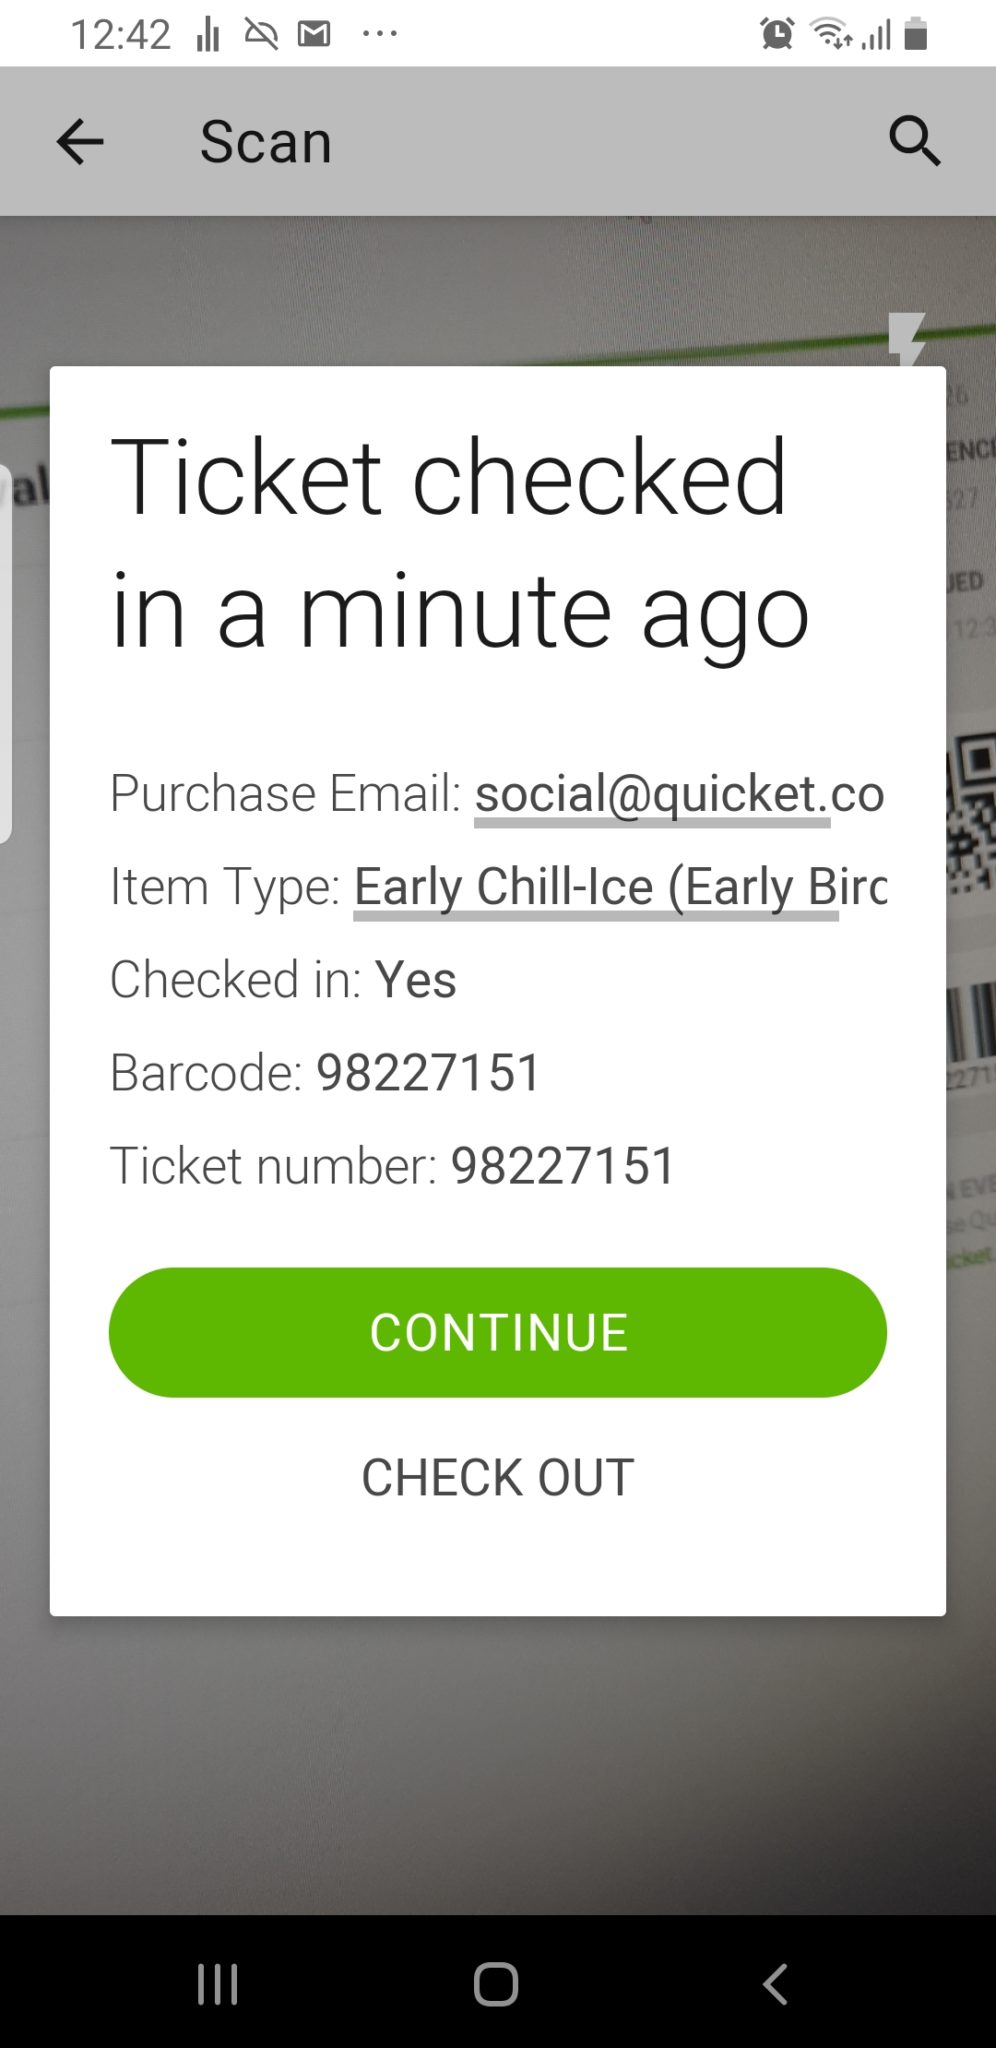
If the ticket is valid, you’ll be shown a success message. Tap either ‘Continue’ to carry on scanning, or ‘Check Out’ if you accidentally scanned the ticket in.


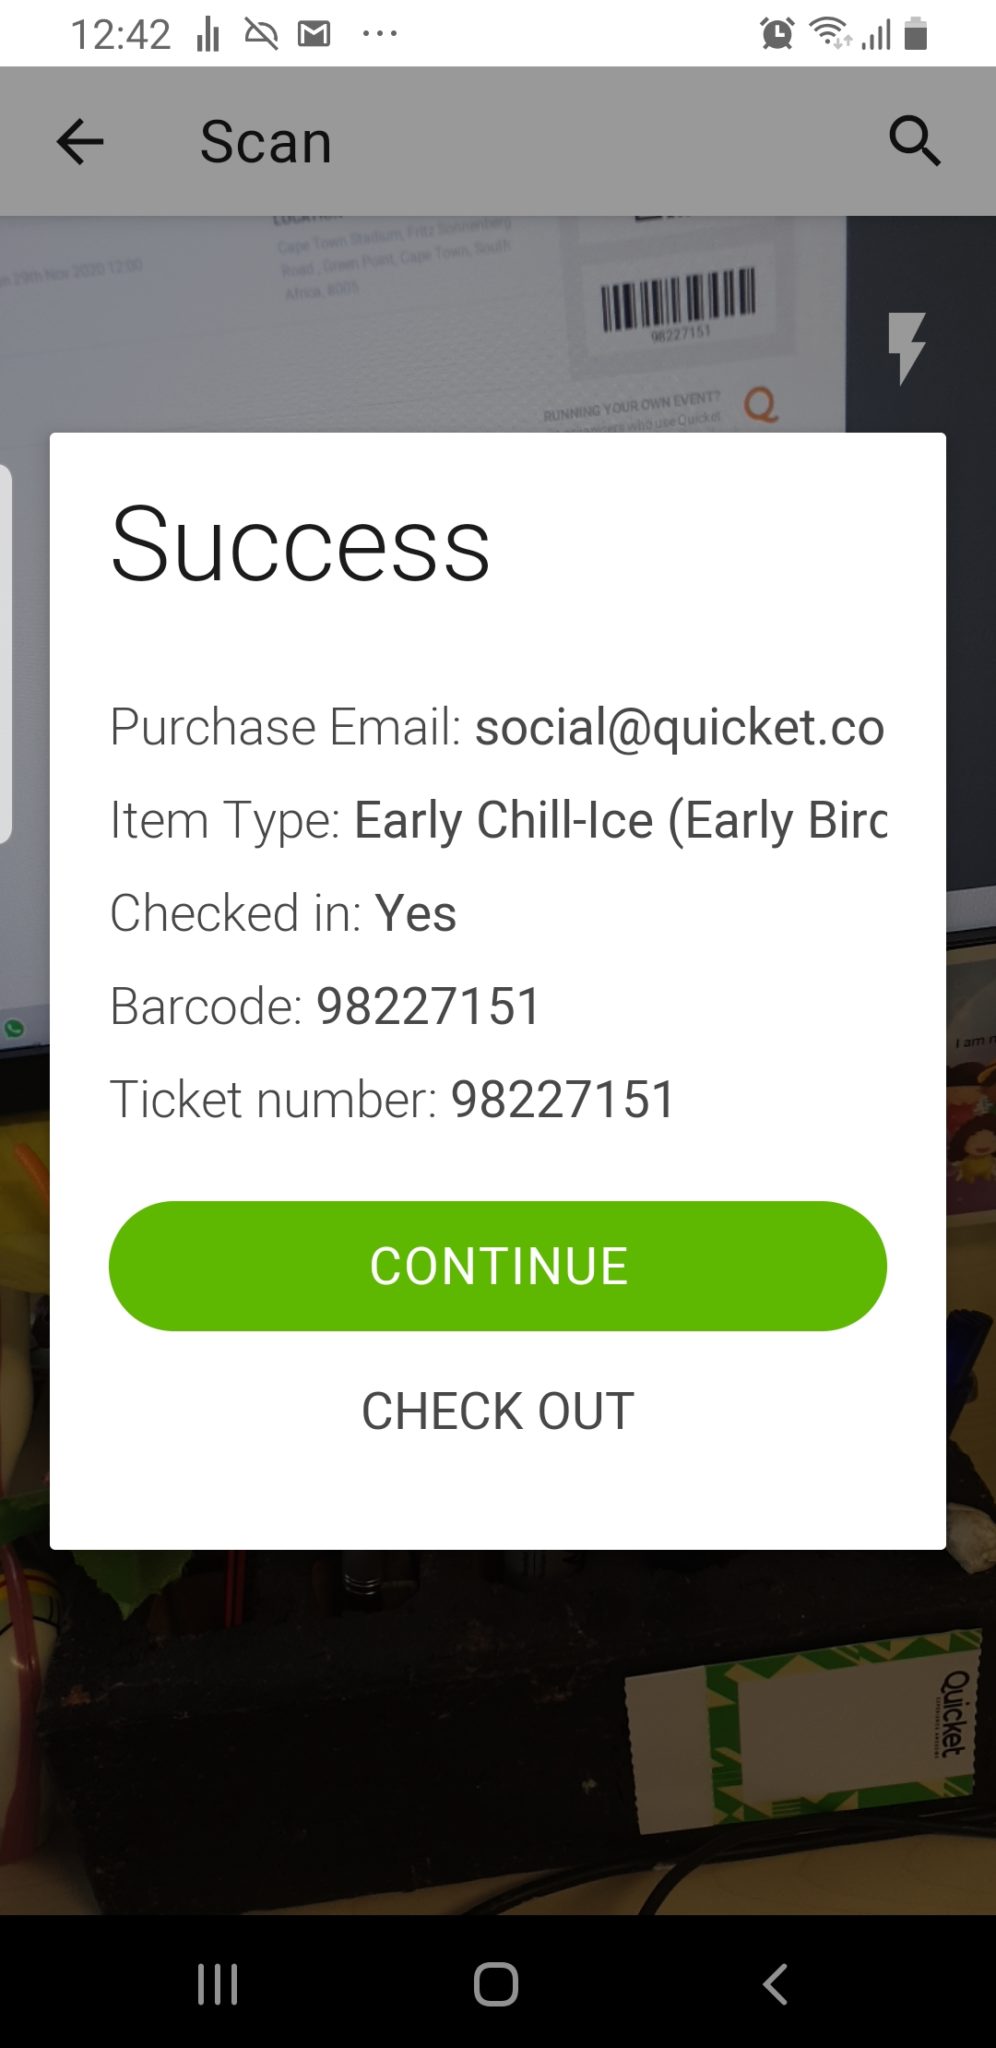
- If the ticket was already checked in, meaning either that you’re accidentally scanning the same ticket twice, or that someone has been given a duplicate ticket owned by somebody else, you’ll be shown an already-checked in message. Tap either ‘Continue’ to carry on scanning, or ‘Check Out’ if you accidentally scanned the ticket in.


Tip: If it’s too dark and you need more light, the app has a built in flash. On the scanning screen, simply tap the lightning bolt icon to turn on the flash. Tap it again to turn it off.
How to manually check guests in/out without a ticket
You can also manually check guests in or out. Note that at this stage, you can only use the email address that was used to book the tickets to do a manual search, so anything else, i.e. names or reference numbers will not work.
For example, this means that if ‘[email protected]’ was used to book the tickets, but filled in the details for ‘[email protected]’ and ‘[email protected]’, and Kozi and Sarah turn up without their tickets, they would need to provide Lebo’s email address to be checked-in manually.
To check guests in/out manually:
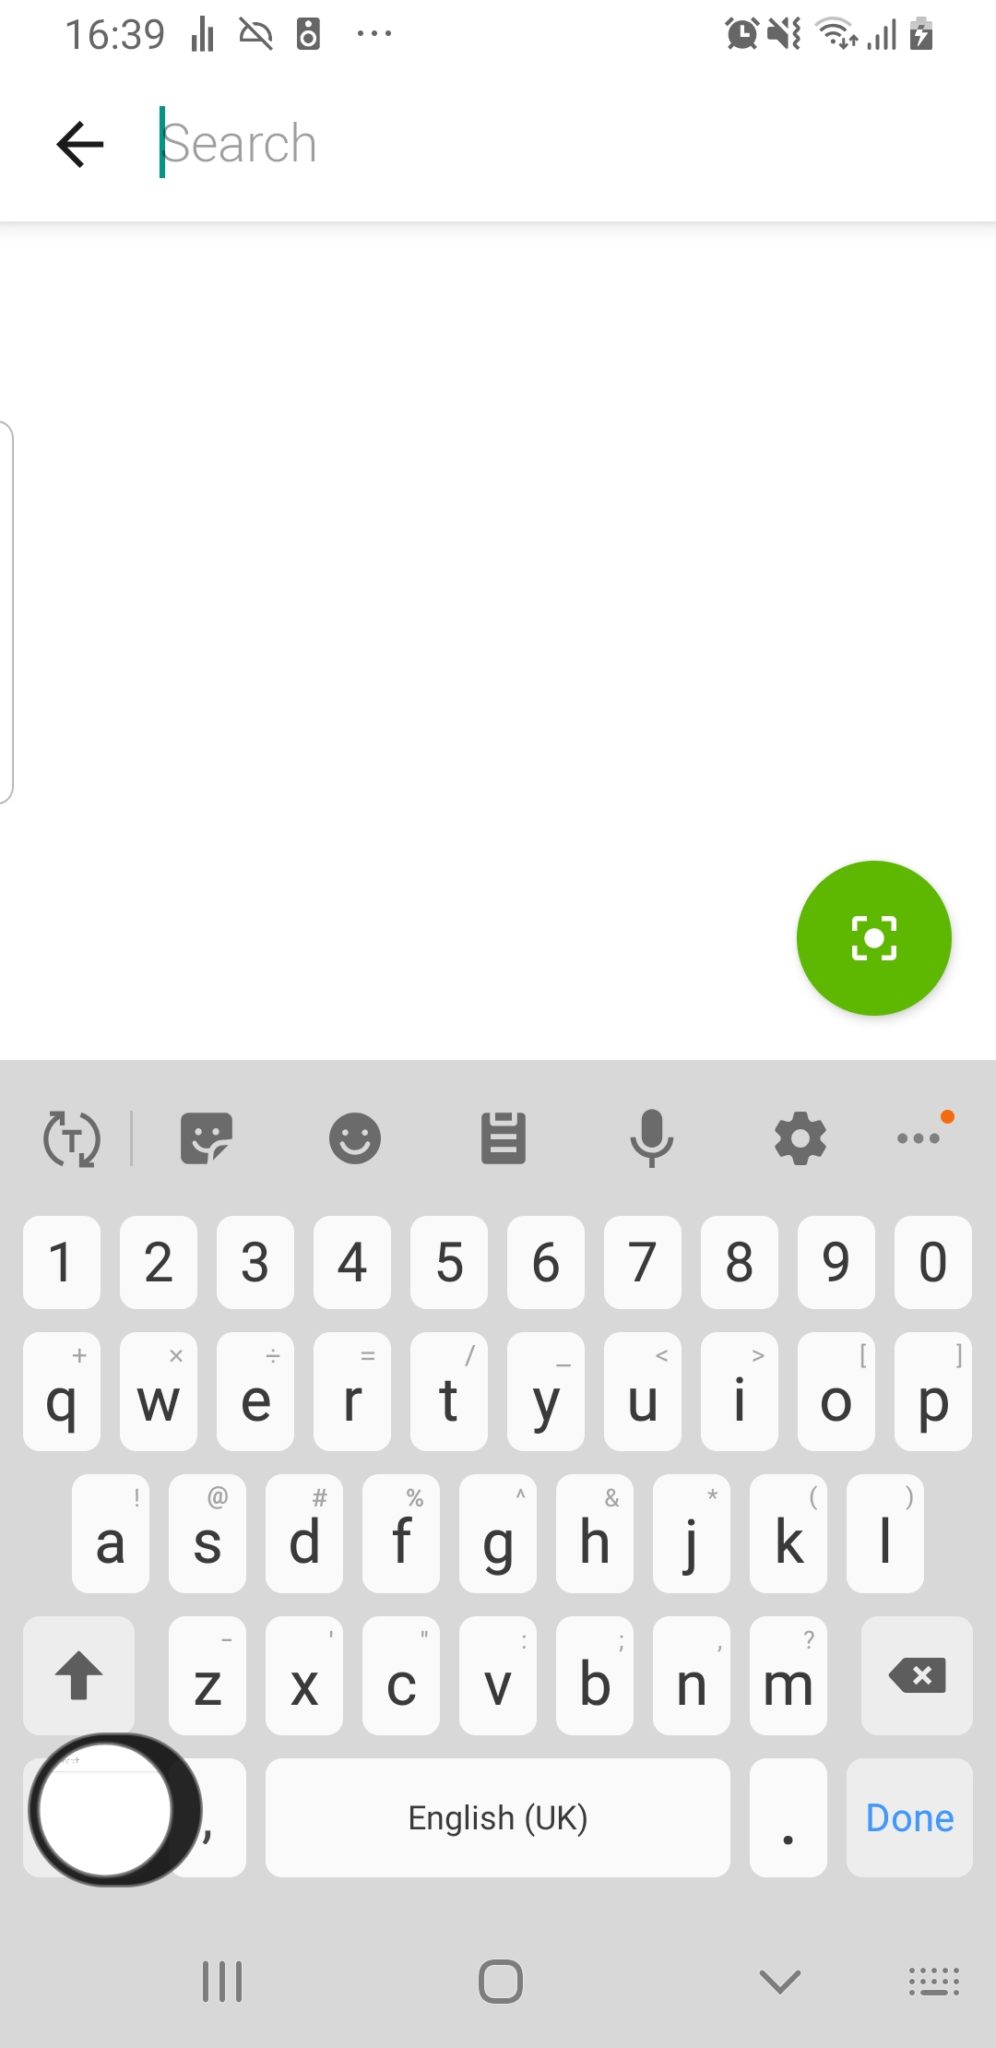
- First, tap the search icon from either your overview screen, or from the scanning screen.
- Start typing in the email address that was used to book the tickets.

- Next, from the search result of the ticket that you want to check in/out, slide it to the right to check that ticket in, or to the left to check that ticket out. Checked in tickets are indicated by a narrow green strip next to the search result.
To return to scanning using your device’s camera, tap the green scan icon at the bottom of the screen.


How to use a traditional barcode scanner with the Quicket Go app
For Android phones with a micro-USB port, you can rent barcode scanners from Quicket to plug into your phone’s charging port which will enable you to scan tickets that way.
To switch to using a barcode scanner, do the following:
- Once logged in on the app, tap the hamburger menu icon in the top left corner.
- Select ‘Barcode Scan’ from the menu options.
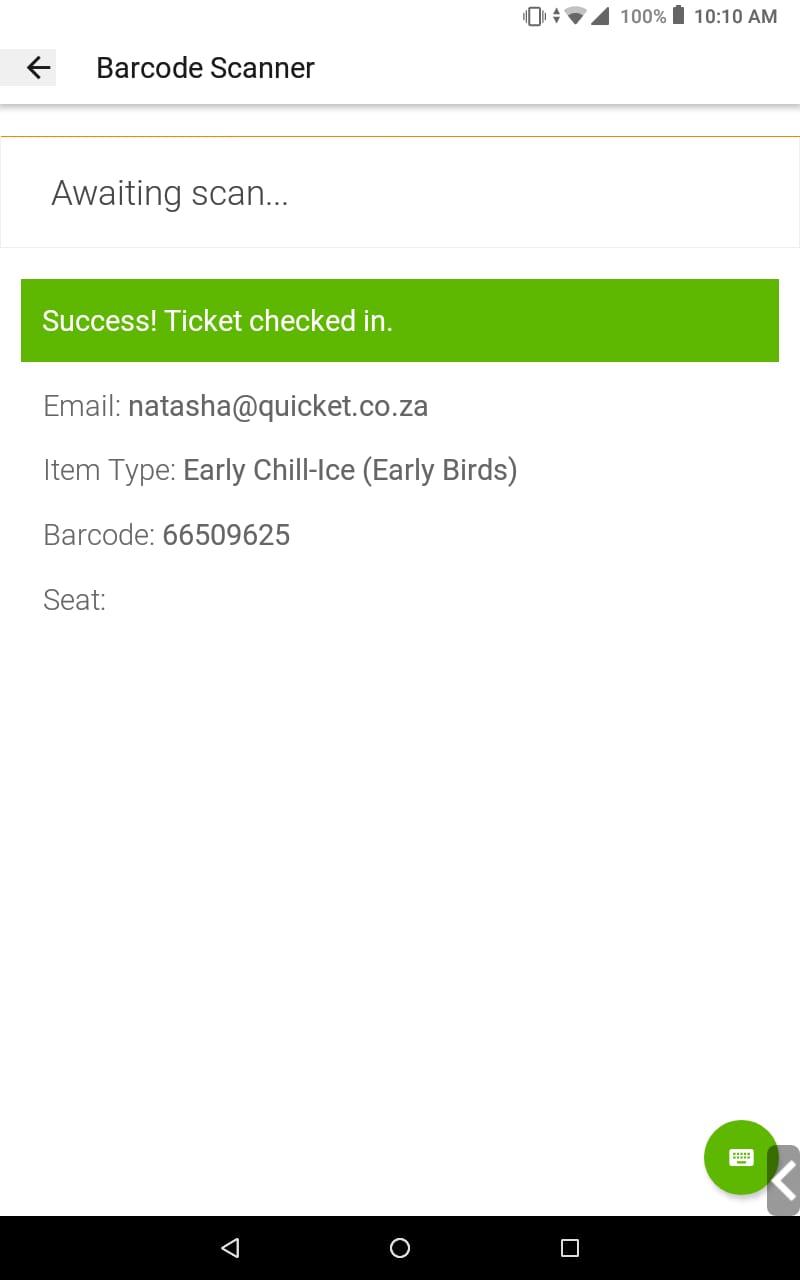
- The app will wait for you to plug in the scanner, and once connected, will track any check ins you do using it. It will show you the ‘Awaiting scan’ screen until you’ve done your first scan.
- If the ticket is valid, you’ll be shown a success message. You can simply continue scanning - there’s nothing to do on the screen after you’ve successfully scanned a valid ticket.
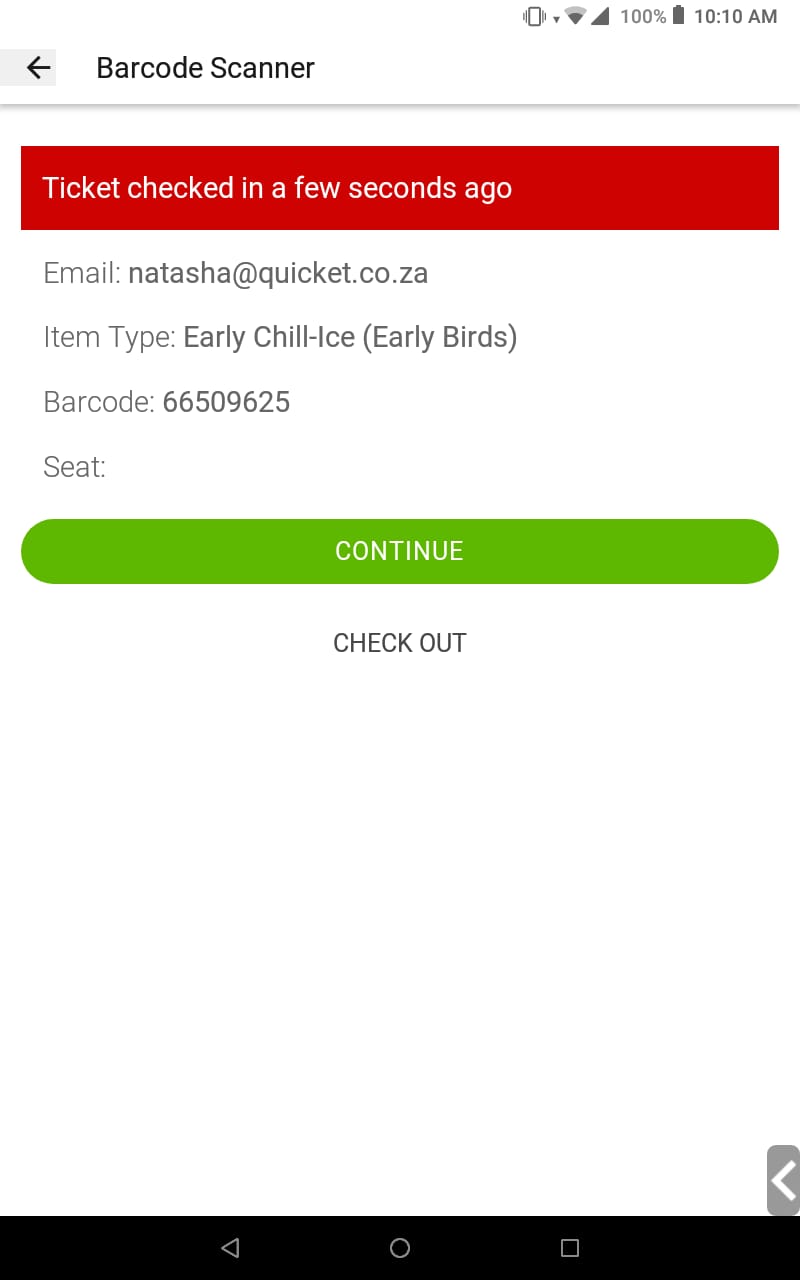
- If the ticket was already checked in, meaning either that you’re accidentally scanning the same ticket twice, or that someone has been given a duplicate ticket owned by somebody else, you’ll be shown an already-checked in message. To carry on scanning, you need to tap the ‘Continue’ button. You can also tap ‘Check Out’ if you accidentally scanned the ticket in.

You’re also able to manually check guests in/out from the barcode scanner view in the same way that you do from the camera scanning view, but take note: Android devices automatically read anything plugged in as a keyboard, so it will do so with the barcode scanner you are using. If you want to do a manual search for a ticket buyer, you will first need to unplug the barcode scanner, then tap the green keyboard icon to access the keyboard, and off you go! Click here to jump back to the previous section on using the manual search view which has some important things to take note of.
Troubleshooting with ticket scanning
Here are some issues that you might encounter, and what to do about them.
Problem: If you have a ticket buyer displaying a ticket on their phone, and your device with which you’re scanning the tickets doesn’t seem to be working...
✨ Solution:
Ensure that the brightness on the ticket buyer’s phone is turned up completely. This ensures that the barcode or QR code is clear enough for your scanning device to read.
Problem: If you have a ticket buyer displaying a ticket on paper, and your device with which you’re scanning the tickets doesn’t seem to be working...
✨ Solution:
Scanning doesn't work well in the dark, so ensure that you have enough lighting set up.
The Quicket GO app has a flash function that you can use to light up the ticket needing to be scanned. Simply turn it on (or off) from the top right corner of the scanning screen in the app.
Problem: The guest/s arriving does not have their ticket with them and cannot access it on their smartphone...
✨ Solution:
You can search for their tickets on the app using the email address that was used to book their ticket. Click here to jump back in this lesson for how to do this.
Selling tickets using the Quicket GO app
Lesson 4: On the day - Section 3
You’re able to sell tickets directly from the Quicket GO app using Snapscan, and you can log your cash and credit card sales directly as well!
Here we’ll outline how to sell tickets on the app, access your order history, switch to scanning, as well as troubleshoot any issues you may have.
Click below to jump to a specific section:
How to sell tickets
- Once logged in on the app, tap the hamburger menu icon in the top left corner.
- Select ‘Barcode Scan’ from the menu options.
- The app will wait for you to plug in the scanner, and once connected, will track any check ins you do using it. It will show you the ‘Awaiting scan’ screen until you’ve done your first scan.
- If the ticket is valid, you’ll be shown a success message. You can simply continue scanning - there’s nothing to do on the screen after you’ve successfully scanned a valid ticket.
- If the ticket was already checked in, meaning either that you’re accidentally scanning the same ticket twice, or that someone has been given a duplicate ticket owned by somebody else, you’ll be shown an already-checked in message. To carry on scanning, you need to tap the ‘Continue’ button. You can also tap ‘Check Out’ if you accidentally scanned the ticket in.
- Open the Quicket GO app.
- Log in using the relevant login details that have scanning access.
- Tap on the name of the event you’re scanning for. You’ll be taken to a scanning summary page showing you how many tickets of those that you sold have been checked in.
- Tap the hamburger menu icon in the top left corner.
- Select ‘Ticket Sales’ from the menu options to switch from scanning to ticket sales. You’ll be taken to a ticket sales summary page showing you how many tickets of those that you have available have been sold.
Ticket sales pull through live, so you’ll be able to see your ticket sales stats here, as well as on your event dashboard in your Sales report.
Tip: On each device you’re logged into, you can create a username. Tap the person icon below the event date on this summary page, then type in your username and tap ‘Continue’. You can change this at any time, so if your devices switch hands, you can change the username.
- To sell a ticket, tap the green shopping cart icon near the bottom of the screen. You’ll be taken to a screen where you can select the types and quantities of tickets you are selling.
An important note: only tickets that you have set to “sell at the door” from your Quicket dashboard will show here. These tickets must also not be hidden from your event page and the ticket sales start and end dates and times must include when you want to be selling tickets. For a refresher on how to do this, click here to go back to that section in lesson 2 of this course. - Tap the name/s of the relevant tickets and you’ll see the quantity increase with each tap.
To reset the quantity of a specific ticket type to zero, tap the number next to the ticket type name. - Tap the ‘Order’ button.
- Select the payment method: selecting ‘Snapscan’ will display a QR code for the ticket buyer to scan to make the transaction, and selecting ‘Cash’ or ‘Card’ will allow you to log those transactions.
- Tap the ‘Complete’ button. For cash and credit card sales, your staff will need to ensure that the correct amount was received, or that the car transaction was successful. For Snapscan sales, you can also tap ‘Manual complete’ if you don’t want to wait for the notification to come through on your side, but only do this if the guest’s phone shows the transaction is complete.
- Once the transaction is completed, you can request the guest’s email address and enter it in the email field. They’ll receive a receipt in their inbox - no need to print receipts on site!
- Tap the ‘Send’ button.
- Tap the ‘Done’ button to return to continue selling tickets.
How to access your ticket sales order history
- Once logged in on the app and on the ticket sales screen, tap the hamburger menu icon in the top left corner.
- Select ‘Order History’ from the menu options. If you have not made any sales on the app, you will be shown an error message, but once you’ve made your first sale you’ll be shown each sale made.
- Tap on an individual sale to access more functions. From this window you can:
- See more details about the transaction.
- Send or resend a receipt to the guest’s email address.
- Refund the guest by tapping the orange shopping cart icon.
Troubleshooting with selling tickets
Here are some issues that you might encounter, and what to do about them.
Problem: The guest/s arriving does not have their ticket with them and cannot access it on their smartphone...
✨ Solution:
You can search for their tickets on the app using the email address that was used to book their ticket. Click here to jump back in this lesson for how to do this.
Induce the FOMO
Lesson 4: On the day - Section 4
Your event day is the one chance you have to capture content that accurately reflects your event brand. It’s also a peak opportunity to connect with your audience from your live event.
This is both important for the perception of your brand, but also as a long term strategy.
You’ll be too focused on making sure your event happens to be able to focus on capturing and posting all this content, and you’ll inevitably miss a lot of those magic moments that would be perfect to share. As such, having a dedicated person to ensure a continuous social media presence at your event is key.
Put a plan together for them, and outline the types of things you want them to capture. Be specific to make sure they deliver what you need them to - even if it’s your friend rather than someone you’ve hired!
Consider content such as setup pics, things your guests can be excited for, and as the event progresses, highlights, photos, stories, and live videos of the day. Record and capture as much as you can!
Event day content is so impactful across the board. Here’s an overview of how you can use this content to connect with people in all stages of their awareness, interest and engagement with your event.
Those that didn’t make it
There will inevitably be people who were interested in your event that didn’t end up booking a ticket - whether that’s because they weren’t able to make it, simply chose not to attend, or a number of other reasons.
These people are likely to have clicked ‘Interested’ or even ‘Going’ on your Facebook event. Remember that this makes them a focused audience for you rather than a wide net one. Since they’ve already expressed some form of interest, you already have some of their attention, and attention is a hard thing to get from someone online.
Posting to your event on Facebook (and your pages on all your channels) on the day not only gets those who haven’t arrived at your event yet excited, but also communicates what your event is about in a very clear way to those who didn’t go. This in turn affects their perception of your event brand and makes them all the more likely to attend your next event - it gives them more reason to go next time! There’s nothing like a good case of FOMO to get interest building in your next event.
Those who attended
Similarly, these posts also connect your guests with your event brand - both during the event and after - so they have content to engage with, and to look back on and reminisce. People love being reminded of their awesome time and seeing and sharing photos of themselves with friends (this is pretty much the entire reason that social media exists).
All the photos you take that didn’t make it to your page and event walls as posts can and should be posted after the event, so make sure you actually get these shots!
People are very likely to tag themselves in these photos, which in turn is seen by their friends. If their friends didn’t attend and see their friends having fun, they’ll be all the more likely to attend your next event.
It also reminds them of the great time they had at your event and make them more likely to return again.
Those who don’t know about your event - yet
Content that shows people at an event having an awesome experience is one of the types of content that people love, especially on platforms such as Instagram. Capture and share these types of things on your pages to build up wonderful historical content for your event brand.
You can utilise stories with hashtags which are likely to expose your event brand to people who haven’t heard about it before. On Instagram, for example, many people follow hashtags and will see your stories if you use those hashtags in them, even if they don’t follow your actual page.
What about after your event?
Lesson 4: On the day - Section 5
It’s not over when your event ends. Our next lesson covers often-forgotten but crucial event follow up aspects you won’t want to forget.
In terms of event day though, that’s it for what you need to know or do! Of course there’s a lot more you’ll be focusing on during the day, but taking note of the points in this lesson will help you avoid being thrown any additional last-minute curveballs.
Ready for the next lesson of our Quicket Event Essentials Course? Click here.

Nina is the Marketing Manager for Quicket and is passionate about growing a community of event organisers into one that is empowered to create incredible experiences. An event organiser herself, she’s also worked across brand marketing, social media, and in the non-profit world. She’s a burner (AfrikaBurn) at heart, an avid baker, loves a good hug, and cooking dinner for friends over a glass of good wine.