This is lesson 3 in the ‘Essentials for your Quicket Event’ course.
Click here to go back to the previous lesson, click here to skip to the next lesson or click here to go to the start of the course.
Welcome to lesson 3 of our our ‘Essentials for your Quicket Event’ course. At the end of this 5-part course you’ll be sure that you haven’t missed a crucial step and aren’t caught with unexpected challenges on the day of or after your event.
This lesson covers:
No matter how well you plan, there are always unexpected hurdles to face in the lead up to your event. This lesson covers some of the main stress points for event organisers, and shows you how to resolve these should you encounter them.
When ticket sales stop (or you need them to)
Lesson 3: When the unexpected happens - Section 1
Have your ticket sales stopped when you have not intended them to? There are a few reasons why that may have happened. Or do you want to stop all ticket sales? This is quick and easy to do - we’ll show you how.
Select the option that applies to you:
My event page shows ‘Sold out’ next to my ticket typessales
This means what is says - your available tickets are sold out. Although this is usually a good thing, you might want to increase the number of tickets available.
Click here to jump to how to edit your tickets in order to change the quantity of tickets available.
My event page shows ‘Booked out’ next to my ticket types
This does not mean that your tickets are sold out - but they are close to it. What this means is that the last few available tickets are being held for people who are still in the process of purchasing their tickets.
If they do not purchase these tickets within their allocated time, they will be made available again. If all purchases are completed, ‘Booked out’ will change to ‘Sold out’ on your event page.
You might want to increase the number of tickets available. Click here to jump to how to edit your tickets in order to change the quantity of tickets available.
My event page shows ‘N/A’ next to my ticket types
This means that the end date and time of the date range of your ticket sales has been reached, and that ticket sales have stopped. Never fear! This is very easy to fix.
Click here to jump to how to edit your tickets in order to change the ticket sales start and end date and time.
I want to stop all ticket sales for my event
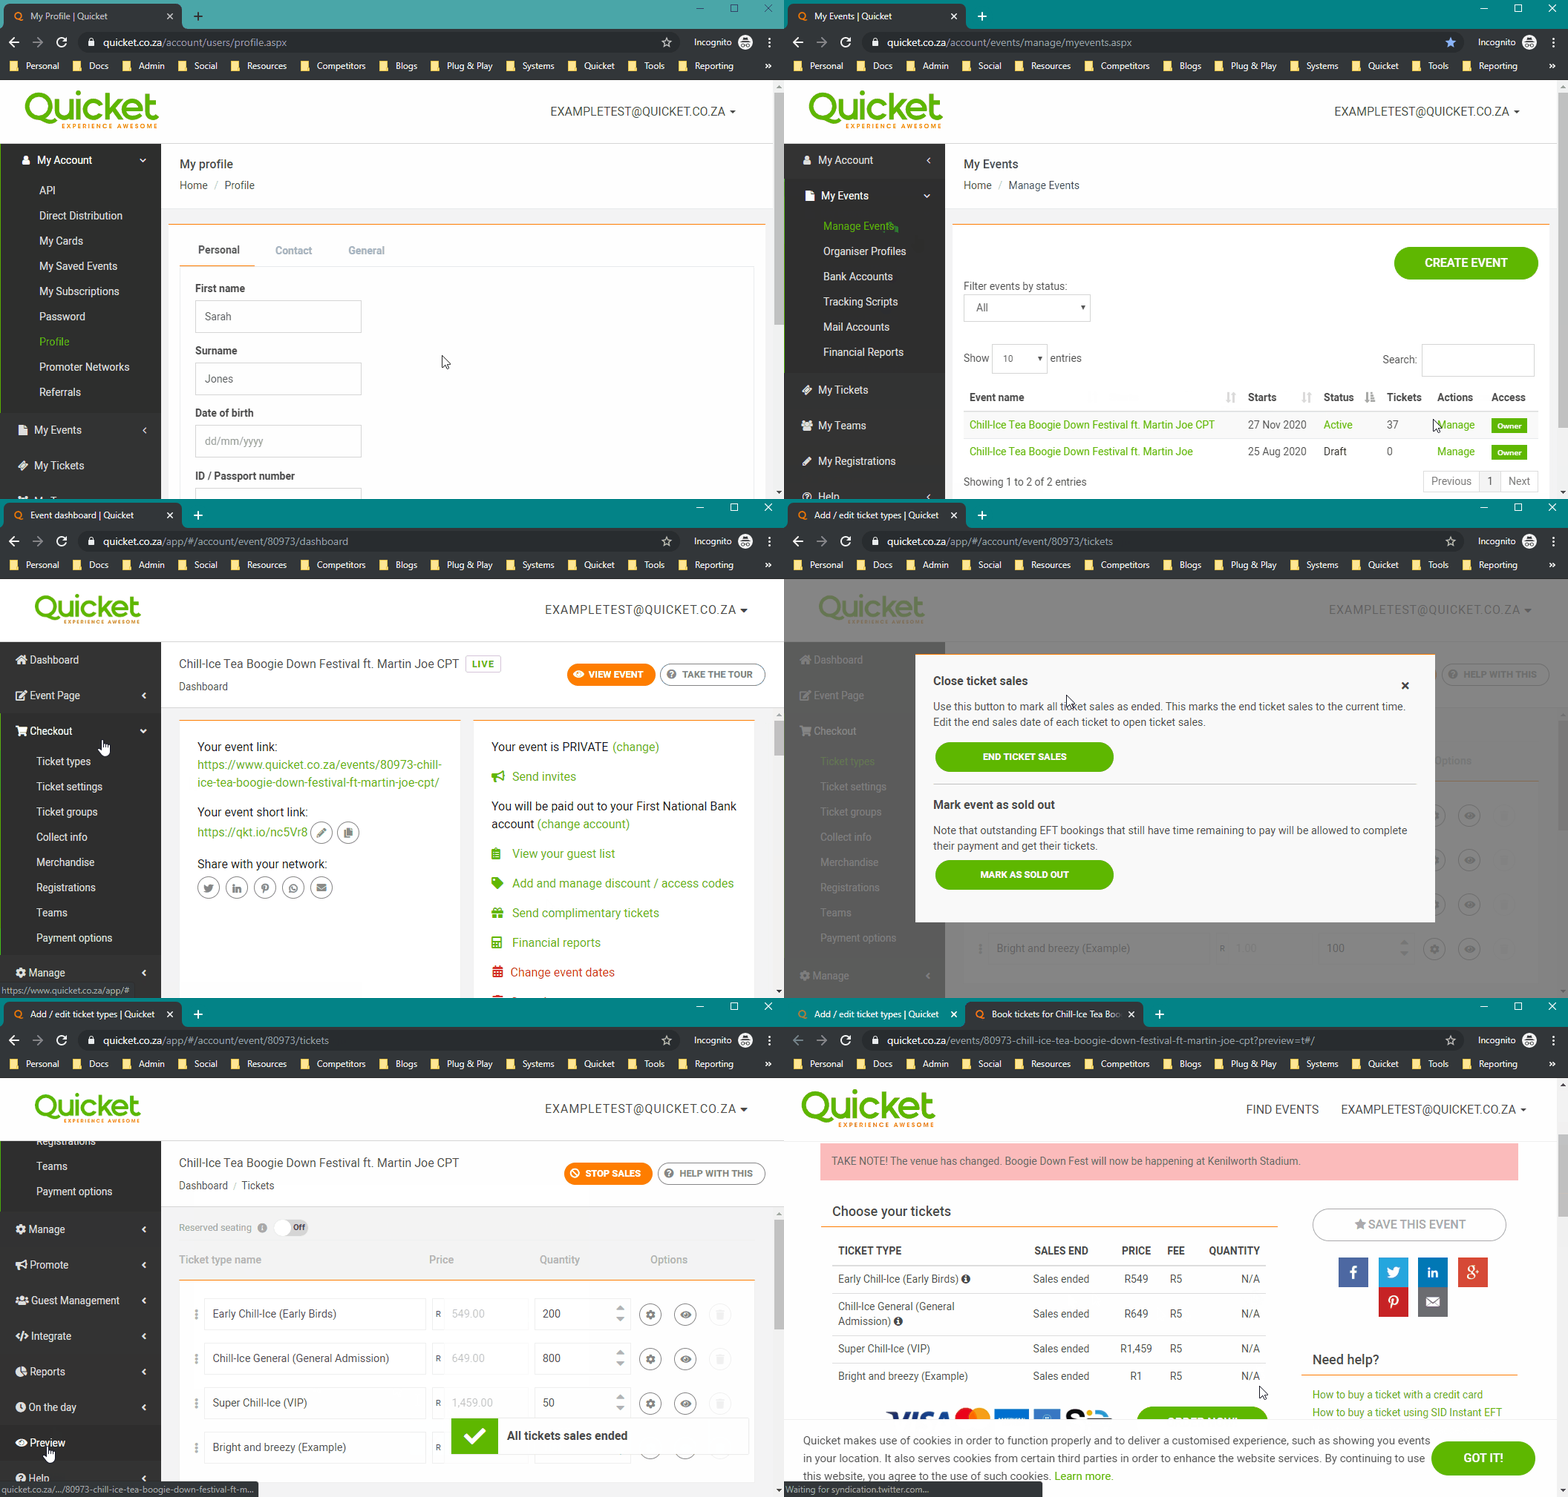
Perhaps you need to stop all your ticket sales immediately by pushing one big button. You can! Here’s how:
- Log into your Quicket account.
- Under ‘My Events’ in the menu, select ‘Manage Events’.
- Select ‘Manage event’ next to the event you’re focusing on to access the event dashboard.
- From the menu, select ‘Checkout’, then from the drop-down menu that appears, select ‘Ticket types’.
- Click the ‘Stop sales’ button.
- From the options given to you, you'll see the options to either ‘End Ticket Sales’ or ‘Mark as Sold Out’.
If you select ‘End Ticket Sales’, the end date and time for your ticket sales of all tickets will be set to the current date and time, and sales for all ticket types will stop. People that visit your event page will see 'N/A' under the quantity for each ticket type and will not be able to select any tickets to purchase.
-
If you selected this and want to open any of the ticket sales again, you will need to edit the end date and time of ticket sales for each ticket type that you want to open sales for again. Click here to jump to how to edit your tickets.

-
If you select ‘Mark as Sold Out’, the total event capacity will be set to zero, and sales for all ticket types will stop. People that visit your event page will see 'Sold out' under the quantity for each ticket type and will not be able to select any tickets to purchase.

-
If you selected this and want to open your ticket sales again, you will need to remove the ‘zero’ from the event capacity setting on this page. Click here to jump to how to edit your tickets.

Changes to your event details?
Lesson 3: When the unexpected happens - Section 2
Do you have a date change? Venue change? Need to update the lineup on your Quicket event page? Need to cancel? You can edit all your event information even once your event is live, right from your dashboard.
Click below to find out how to make changes to your event:
How to edit or change event details
If you want to change the date or time of your event, it’s important that you know that the following method is not the way to do so - unless you have not yet had any tickets booked.
There is, however, a proper way to change the dates of your event once a ticket has been issued that we’ll cover in the next section.
Using the following method, ticket buyers will not get a notification of changes. If you’re updating dates and times here, it’s best to only do so with this method if your ticket sales are not live yet or if you have not yet had any tickets issued.
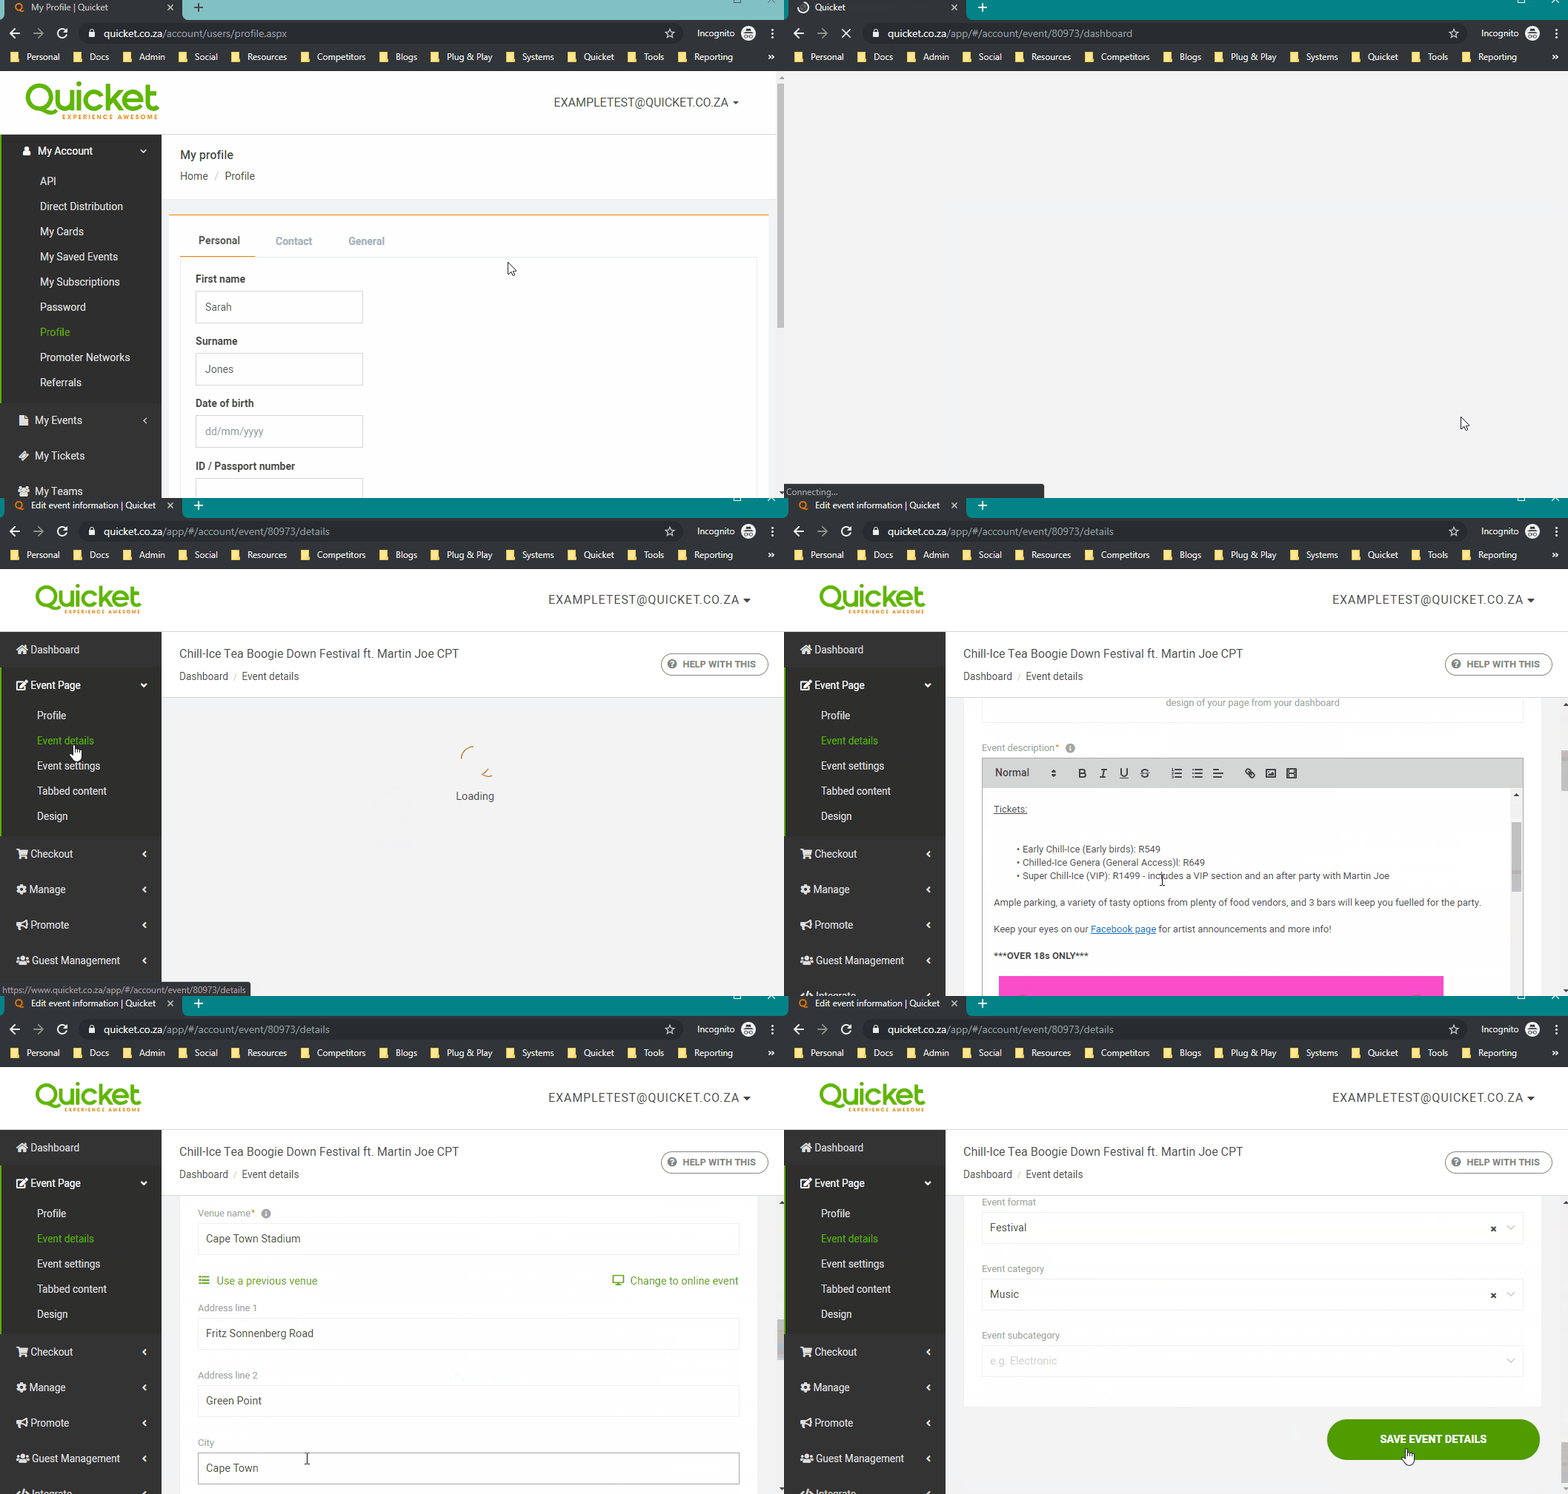
- Log into your Quicket account.
- Under ‘My Events’ in the menu, select ‘Manage Events’.
- Select ‘Manage event’ next to the event you’re focusing on to access the event dashboard.
- From the menu, select ‘Event Page’, then from the drop-down menu that appears, select ‘Event details’.
- Here you can update and edit all your event’s details: its name, profile image, description, date, venue, or whether it’s public or private.
- Click ‘Save event details’.
- If you made any changes to the date and time of your event, you’ll need to check that the start and end date and time of your ticket sales are correct.
Your tickets sales are initially set to start as your event is approved and goes live, and end as your event starts.
However, when you change the date or time of your event, the settings for your ticket sales start and end date and time do not update. Click here to jump to how to check and edit these.
For more info on each of these fields and how to put together a solid event page on Quicket, follow our Event Starter Course. This course also covers how to set up a seating plan.
If you need help to edit or set up a seating plan, click here to check out our Bonus lesson on seating plans and creating them, or click here for a knowledge base article on seating plans. Alternatively, we're more than happy to help! Get in touch with us either by emailing us at [email protected] or giving us a call on +27 21 424 9308.
How to change the dates or times of your event
Perhaps you had a venue change and the date or time of your event needs to change, or your event needs to be postponed for any number of reasons. If you’ve had one or more tickets booked, the below method is the correct way to change the date or time of your event.
Not only do your ticket buyers need to know about this date or time change, but some of your ticket buyers may not be able to make the new date or time and will need to be given the option to refund their tickets. This is something that Quicket handles automatically on your behalf when you use this method.
Before changing the dates of your event, you’ll need to understand how refunds work and what fees are charged to you.
By postponing your event, you agree to pay the refund fees for any refunds processed within 2 weeks of the date change as stipulated in our terms and conditions. Refund fees are 10% of the turnover of the ticket. You as the organiser are liable for these fees so that the ticket buyers who request a refund can receive a full refund for their tickets.
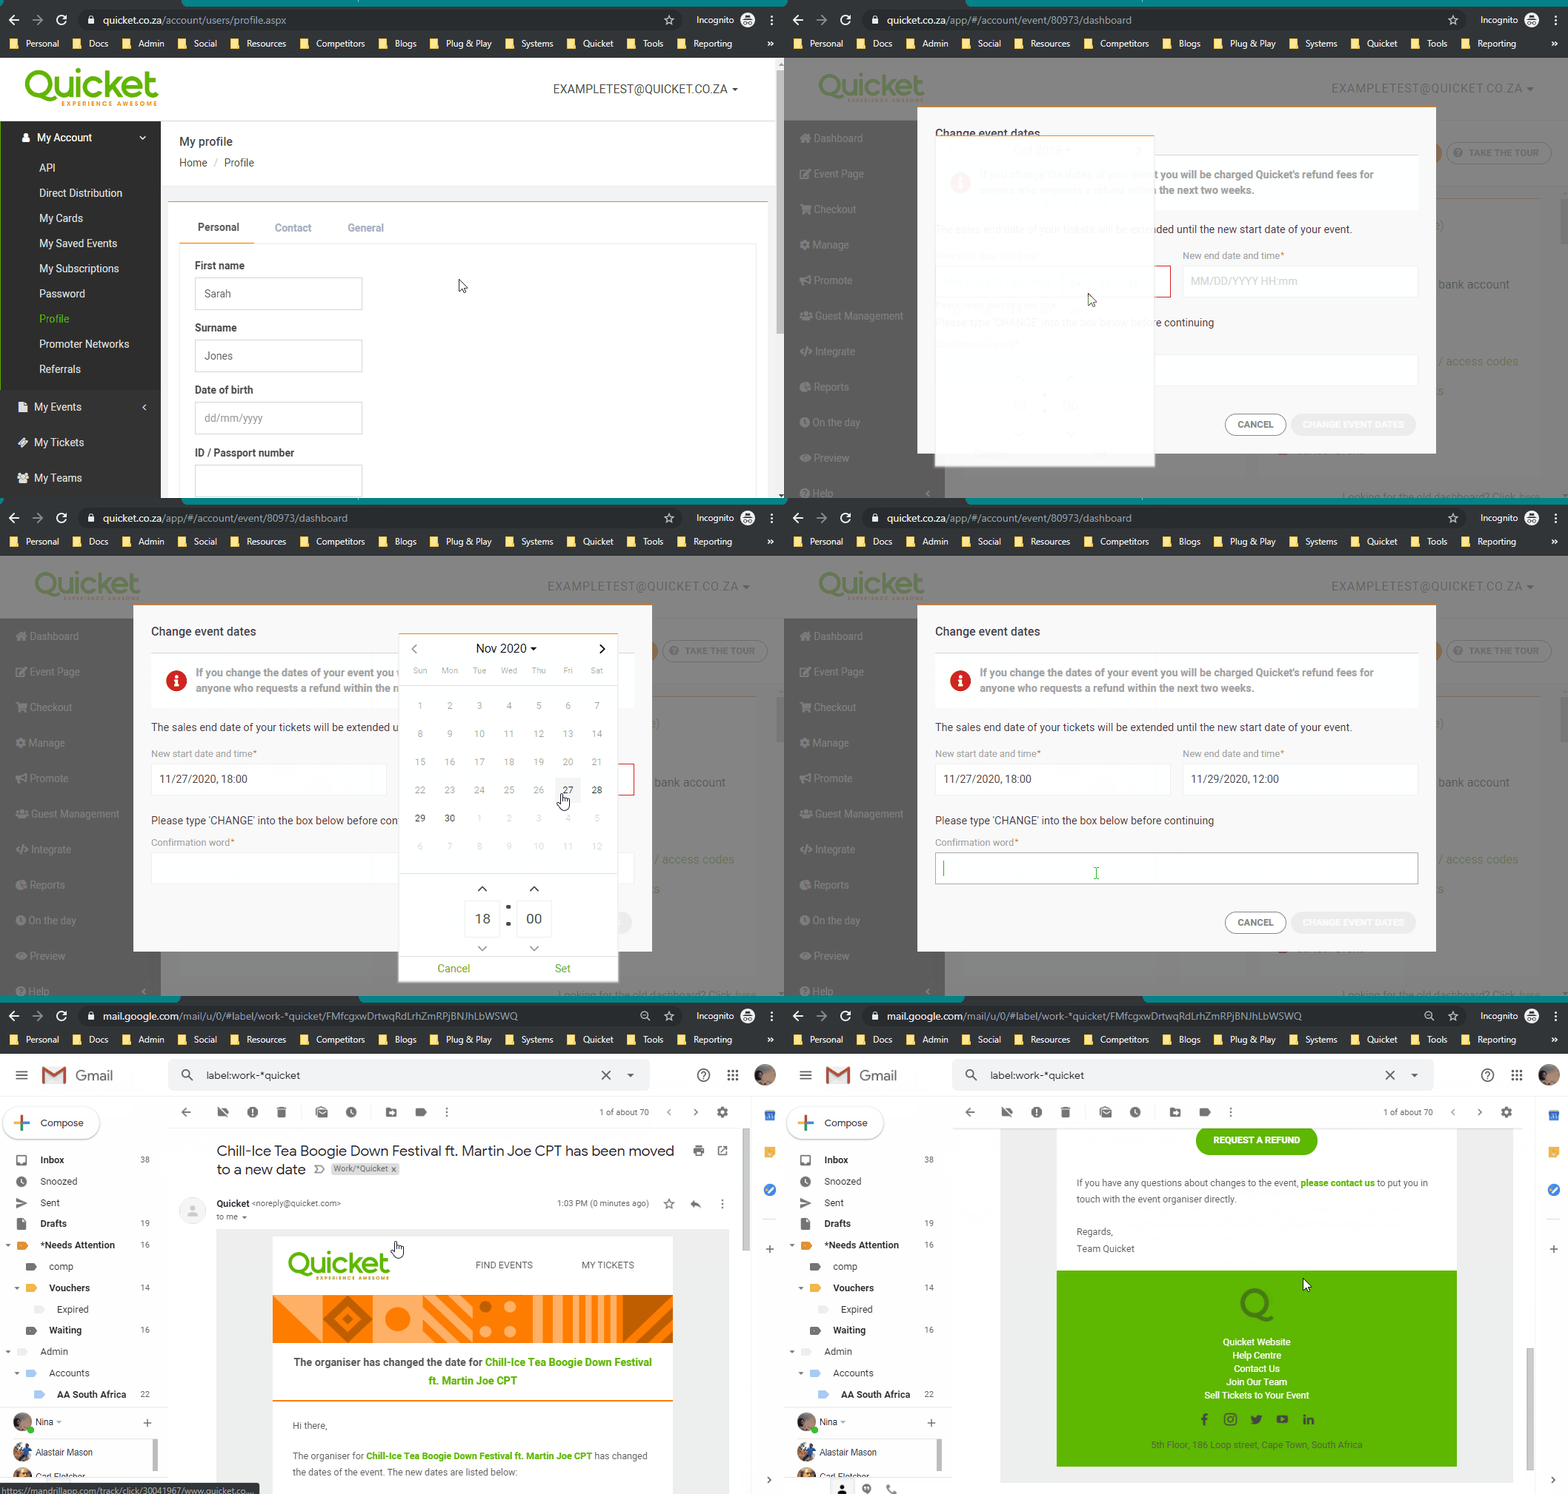
To postpone your event:
- Log into your Quicket account.
- Under ‘My Events’ in the menu, select ‘Manage Events’.
- Select ‘Manage event’ next to the event you’re focusing on to access the event dashboard. You’ll land on your event’s dashboard.
- From your dashboard, select ‘Change event dates.’
- Select your new dates from the fields available.
- Type the word ‘CHANGE’ into the text box then click ‘Change Dates’ to confirm the postponing of your event. Remember that by postponing you agree to pay the refund fees for any refunds processed within 2 weeks of changing the date.
Ticket buyers will receive an email letting them know about the date change. They will be given instructions on how to refund their tickets if they are unable to make the new date.
We then send you an invoice for the refund fees once all the refunds have been processed. - Now that you’ve changed the date and/or time of your event, you’ll need to check that the start and end date and time of your ticket sales are correct.
Your tickets sales are initially set to start as your event is approved and goes live, and end as your event starts.
However, when you change the date or time of your event, the settings for your ticket sales start and end date and time do not update. Click here to jump to how to check and edit these.
If you need a further reference, click here to check out our knowledge base article on ticket type settings.
How to edit or change event tickets (and check the start and end date and time for ticket sales)
You might need to add a new ticket type, change the price of a ticket, increase or decrease the quantity of tickets available, or hide a ticket type you no longer want showing. Or, you might need to check that the start and end date and time for your ticket sales is set correctly after changing your event’s date or time.
Here’s how to access these settings:
- Log into your Quicket account.
- Under ‘My Events’ in the menu, select ‘Manage Events’.
- Select ‘Manage event’ next to the event you’re focusing on to access the event dashboard.
- From the menu, select ‘Checkout’, then from the drop-down menu that appears, select ‘Ticket types’.
- Here you can update and edit all the details for your event’s tickets: their names, prices, quantities available, whether they’re visible or hidden, your event capacity, and refunds and ticket booking fee settings.
You can also access more settings for each of your tickets by clicking the gear icon, which will expand additional options for you: start and end date and time for sales, a ticket description, minimum and maximum number each person can book, when that ticket is valid for (useful for multi-day events), etc.
If you’re checking the start and end date and time of your ticket sales, click the gear icon next to each ticket type then select the correct dates and times. Click the gear icon again to collapse the additional settings. - Click ‘Save event tickets’ when you’re done.

For more info on each of these fields and how to put together a solid event page on Quicket, follow our Event Starter Course.
If you need a further reference, click here to check out our knowledge base article on cancelling or postponing your event.
How to cancel your event
Sometimes things don’t go to plan and you might need to cancel your event. If you have paid tickets, your guests will need to be refunded for their purchases, but this is something that Quicket handles automatically on your behalf.
Before cancelling your event, you’ll need to understand how refunds work and what fees are charged to you.
By cancelling your event, you agree to pay the refund fees as stipulated in our terms and conditions. Refund fees are 10% of the total ticket turnover for your event. You as the organiser are liable for these fees so that the ticket buyers can receive a full refund for their tickets.
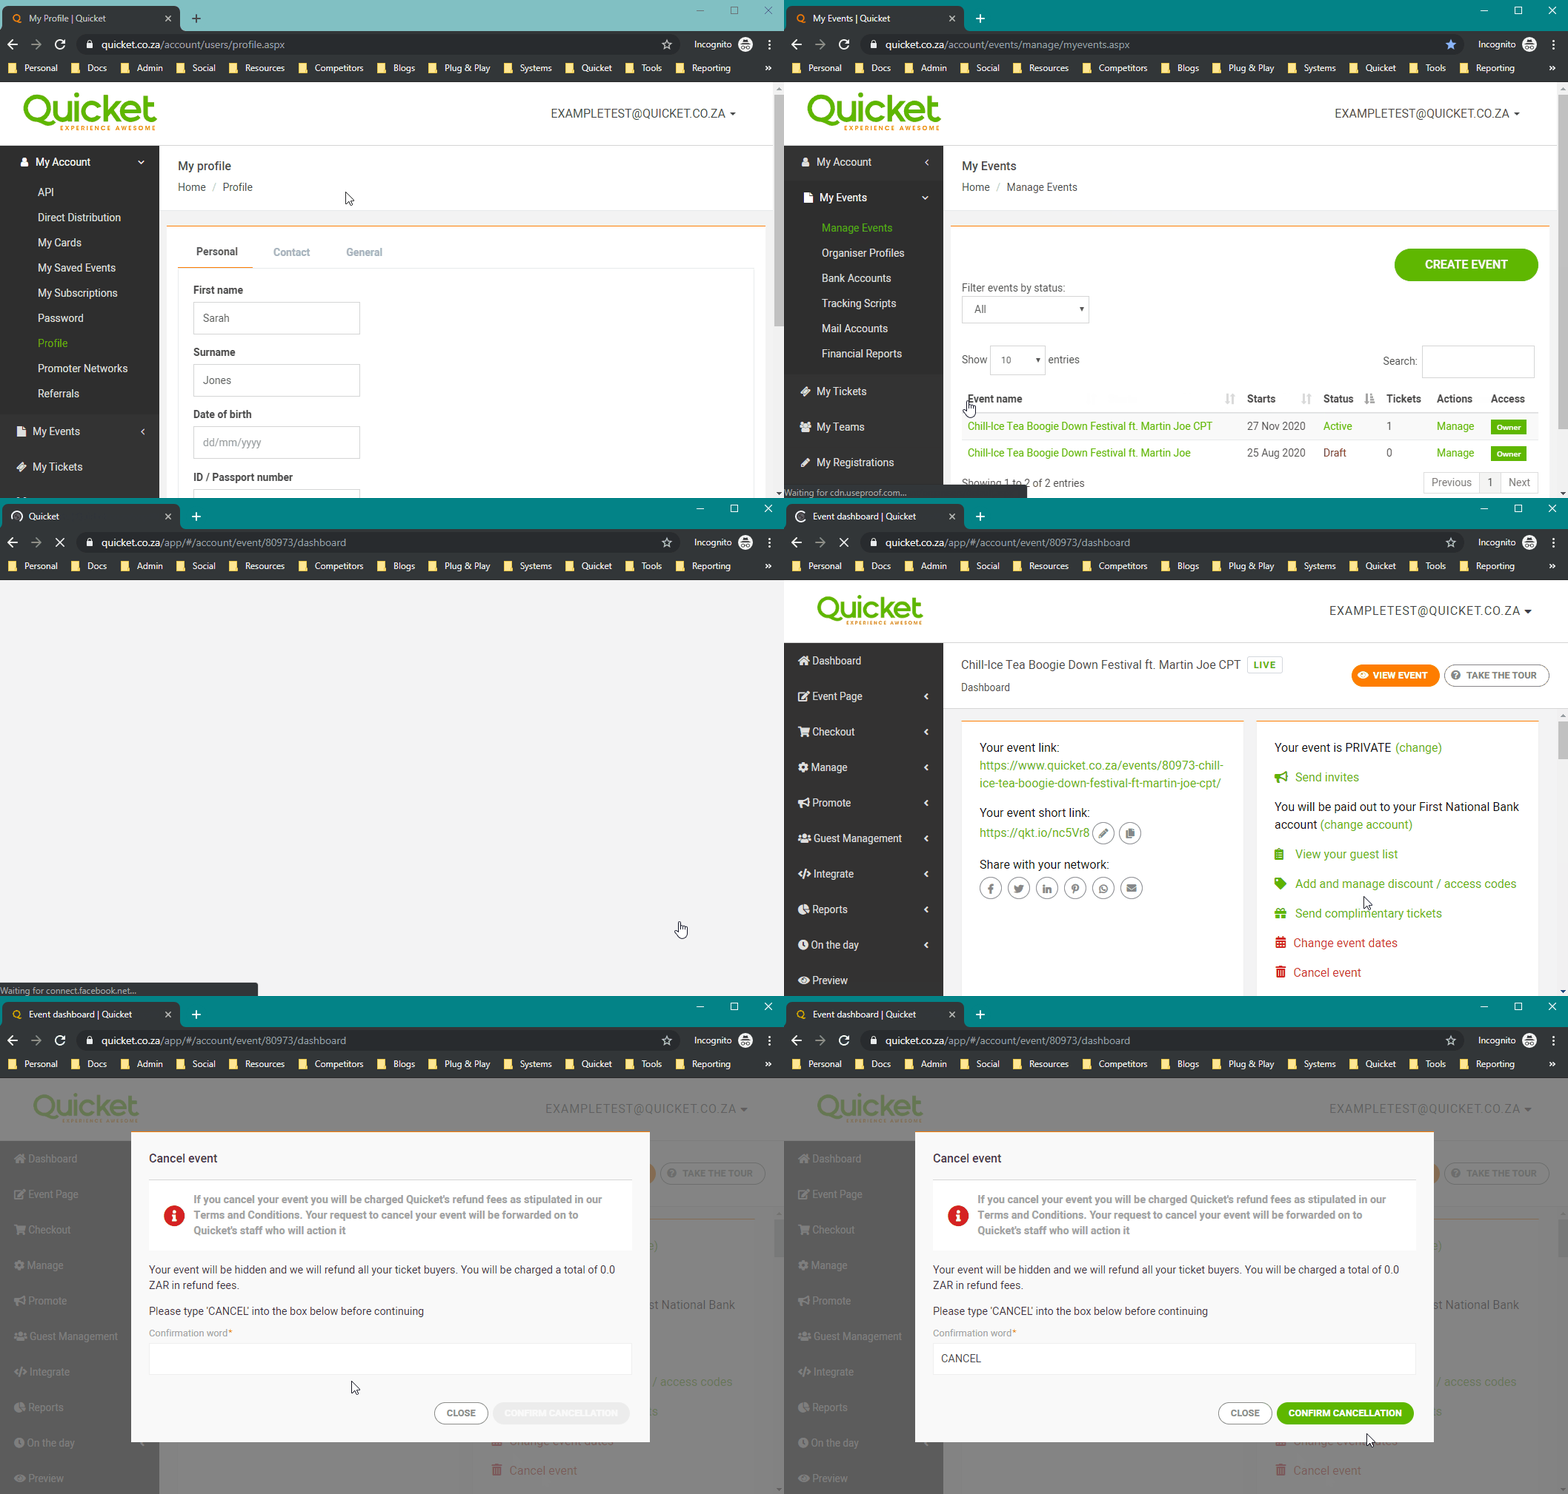
To cancel your event:
- Log into your Quicket account.
- Under ‘My Events’ in the menu, select ‘Manage Events’.
- Select ‘Manage event’ next to the event you’re focusing on to access the event dashboard. You’ll land on your event’s dashboard.
- From your dashboard, select ‘Cancel event.’
- Type the word ‘CANCEL’ into the text box then click ‘Cancel Event’ to confirm the cancellation. Remember that by cancelling you agree to pay the refund fees.
Your event will now no longer be visible on the Quicket website, and ticket buyers will receive an email letting them know about the cancellation.
Those who purchased their tickets by card will be refunded automatically. However, those who paid for their tickets by EFT, Instant EFT or SnapScan will be sent instructions on how to action their refunds from their Quicket accounts.
We then send you an invoice for the refund fees once all the refunds have been processed.
If you need a further reference, click here to check out our knowledge base article on cancelling or postponing your event.
Always tell the people
Lesson 3: When the unexpected happens - Section 3
If there are any major changes to your event (for example time, date, location, a cancelled speaker or artist, etc.) make sure you communicate this everywhere: not only on social posts, but also send an email and reminders if needed, etc.
Check our course on ‘Marketing your Quicket Event' for details of how to easily stay in touch with your guests.
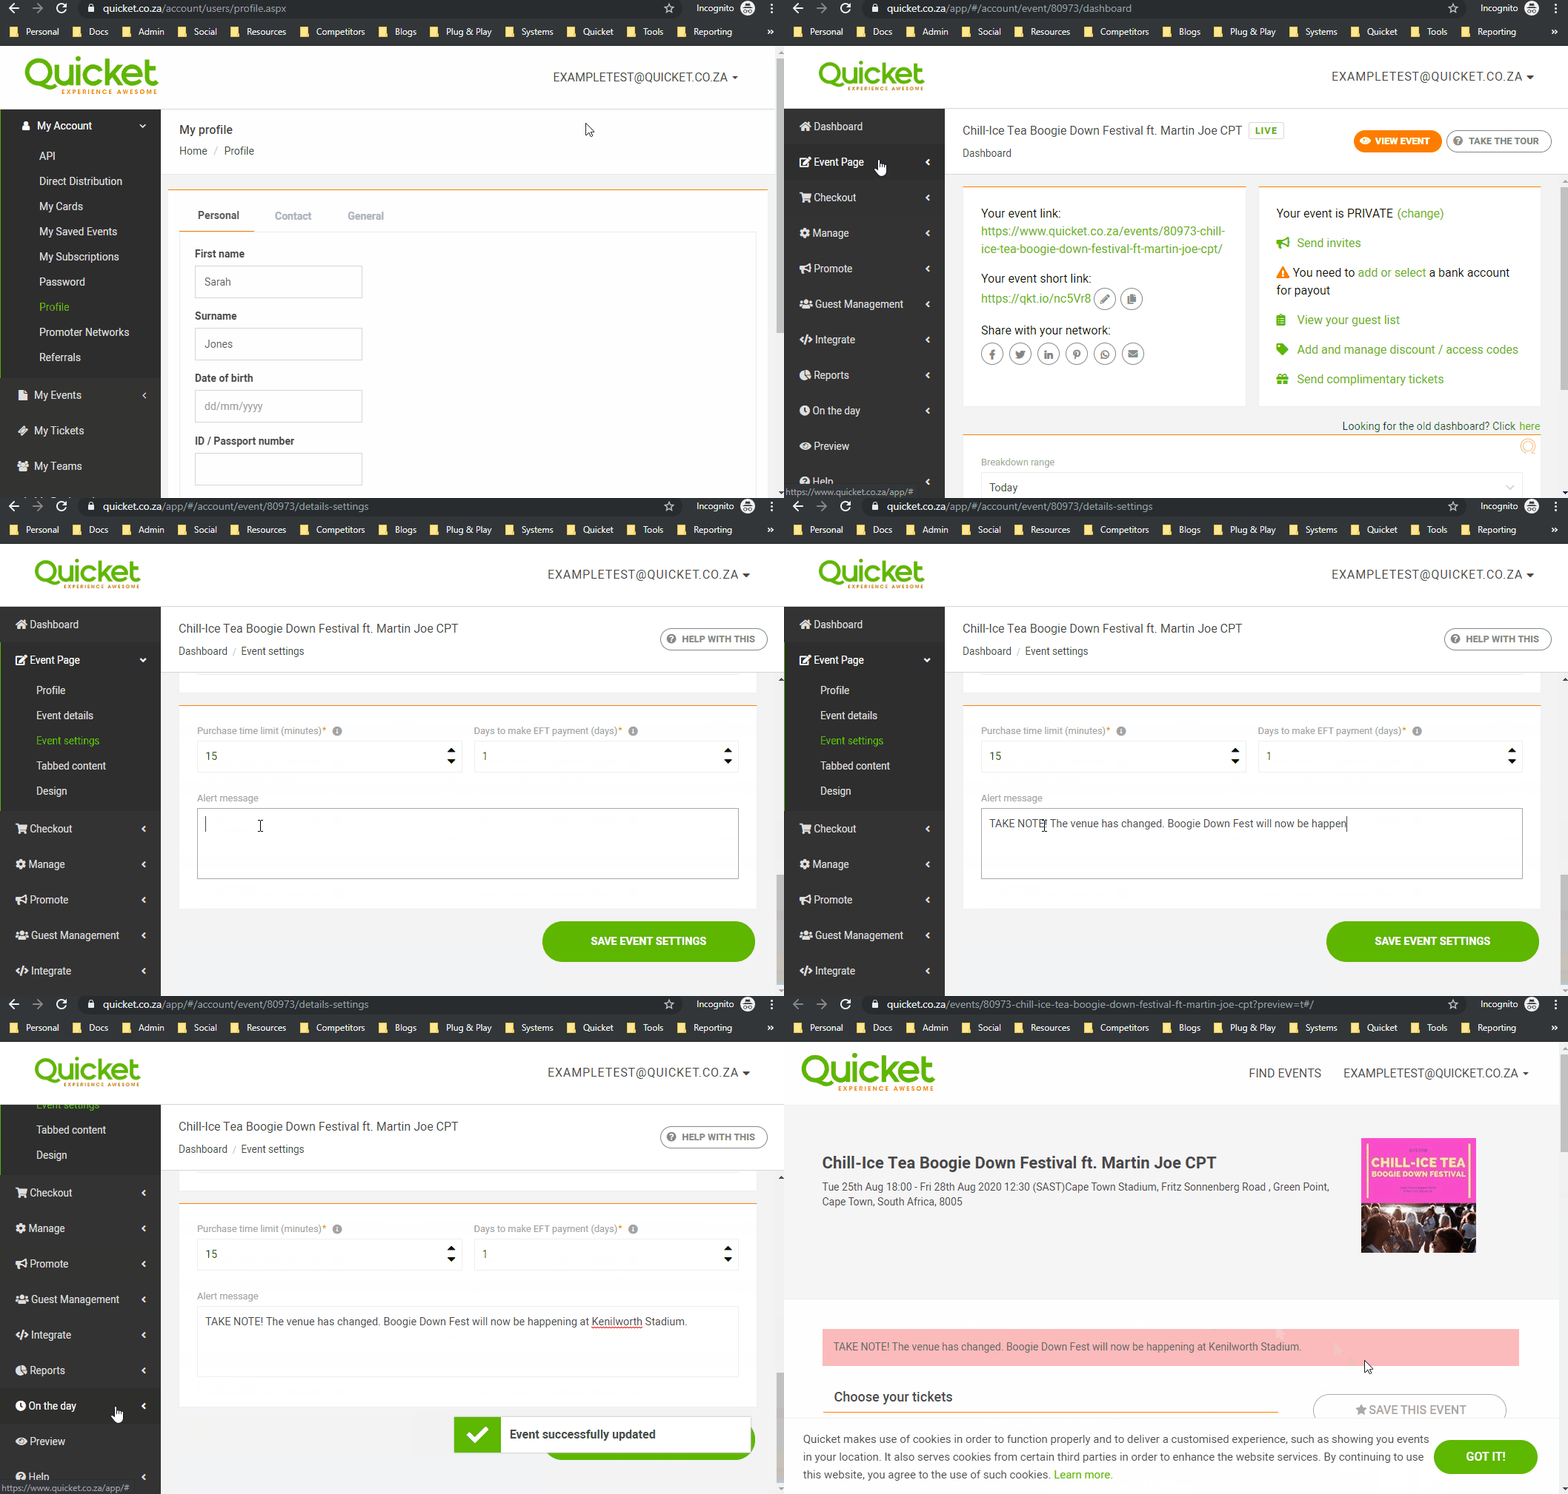
For very important notes, you can use Quicket’s alert message feature in addition to contacting your guests. This will display a custom alert message on your event page above the ticket sales section shown before a person has selected their tickets. To set one, simply do the following:
- Log into your Quicket account.
- Under ‘My Events’ in the menu, select ‘Manage Events’.
- Select ‘Manage event’ next to the event you’re focusing on to access the event dashboard.
- From the menu, select ‘Event Page’, then from the drop-down menu that appears, select ‘Event settings’.
- Scroll down and add your message in the ‘Alert message’ field.
- Click ‘Save event settings’
Ready for event day?
Lesson 3: When the unexpected happens - Section 4
That should cover the most frequent unexpected changes and how to manage these, ensuring that your guests are informed and well looked-after! Next, we cover those things that need to happen on event day that are often thought of too late.
Ready for the next lesson of our Quicket Event Essentials Course? Click here.
Nina is the Marketing Manager for Quicket and is passionate about growing a community of event organisers into one that is empowered to create incredible experiences. An event organiser herself, she’s also worked across brand marketing, social media, and in the non-profit world. She’s a burner (AfrikaBurn) at heart, an avid baker, loves a good hug, and cooking dinner for friends over a glass of good wine.


