

This is lesson 3 in the Quicket event setup starter course.
Click here to go back to the previous lesson, click here to skip to the next lesson or click here to go to the start of the course.
Welcome to lesson 3 of our event starter course. At the end of this 4-part course your event on Quicket will be in draft mode, where you’ll be able to edit and optimise it further.
This lesson covers:
This lesson covers step 2 of event creation on Quicket, where you’ll add all the details of your event.
Before we start, a reminder that you can still edit everything covered in this lesson later and use this course as a reference as you flesh out your event on Quicket.
You should be on ‘Step 2. Event details’ where we left off in the previous lesson. (If you’ve lost this screen, simply click here - which should take you to the step you left off. If you’ve logged out, you’ll need to log in again.)
What’s in a name? Crafting an event name that works
Lesson 3: Adding all your event details to better sell tickets - Section 1
First off, you need to give your event a name. A good name can attract interest and get people excited about your event. A bad name, may do the opposite.
Here are some guidelines to make sure that your event name is effective in marketing your event and making it memorable.
- Keep it snappy and interesting. Your event name needs to be relevant and honest.
- A snappy name shouldn’t be vague, though. With thousands of events that happen in a month, “Workshop” is not a sufficient name to make your event easy to find for your potential ticket buyers. If you want something simple and straightforward, rather call it something like “2-day Paella-Making Workshop.”
- Although you should be descriptive in your event name, don't try to put all the details about your event in the title - that's what your event description is for. Instead of calling your event “3-day Chill-Ice Tea Boogie Down Festival ft Martin Joe! More artists to be announced, regret no kids”, you can slim down the title while still including a sponsor and a headliner, e.g. “Chill-Ice Tea Boogie Down Festival ft. Martin Joe”.
- That said, make sure you include important identifying information. For example, if you’re running the same event in two different cities, it’s a good idea to include that in the name on the respective event page, e.g. Chill-Ice Tea Boogie Down Festival ft. Martin Joe CPT.
- You’ll also want your event name to be memorable, and not confused with other events. Do some research on the same type of events to make sure yours isn’t too similar. You wouldn’t want to send your ticket buyers to your competitors' events.

Add your event name in the text box beneath ‘Event name’ (pictured above) then continue to the next section of this lesson.
A picture is worth a thousand words: your event profile picture
Lesson 3: Adding all your event details to better sell tickets - Section 2
In this step of event creation, you have the option to upload a square image for your event.
It is optional, so after this lesson in the course, you can complete your event creation without uploading anything here, but we highly recommend you refer back to this section and add the image later on if you don’t have one ready yet. The imagery of your event is a crucial aspect.
There are a couple of differently-sized images you’ll need for different purposes in setting up your event and marketing it effectively - for example, the banner image that displays at the top of your event page. In this lesson we’re just going to touch on the square profile picture. The rest we’ll cover separately.
Tip: If you want to go ahead and have your designer create all the images you need so long, click here to take a look at our image cheat sheet which has a breakdown of all the formats and sizes needed to put together ship-tight imagery for your event.
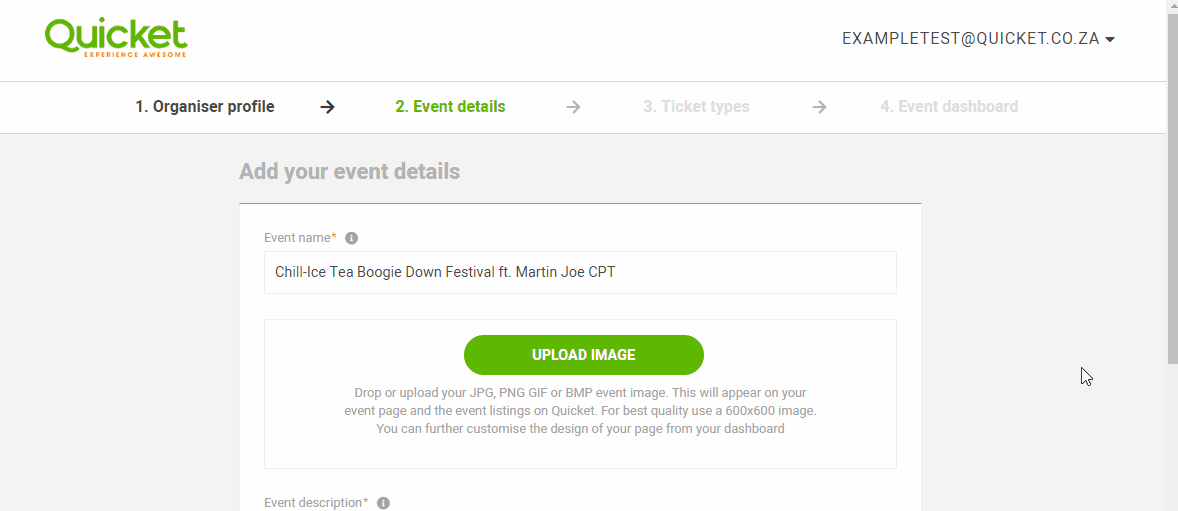
To add your square profile image to your event during event creation, simply click the ‘Upload Image’ button (pictured above) and select the image from your desktop. But before you do, take note of the following important notes regarding the design of your event images.
Consistency is key.
It’s important that your event posters and images are consistent - whether they’re the images on your Quicket event page, your Facebook posts and Facebook event, or your printed posters. You want to make sure that it all looks like it’s part of the same event and that your event is easily recognisable.
A matter of design.
It should also capture the essence of your event. If you have the budget, it’s worth it to set aside some money for a proper designer to really capture the essence of your event - humans are incredibly visual creatures. And very importantly, if you're not a designer, do not attempt to design something yourself - this often comes off looking less professional and can be jarring to the eye.
If you want to sidestep the cost and would like to try design something yourself, then rather use free software like Canva that will guide you with templatised content that has a trendy look and feel.
Size does matter.
IMAGE SPECS
The square image you need for your event’s profile picture needs to be a of specific dimensions and specifications to ensure it looks good, as well as doesn't slow the page loading time down for your potential ticket buyers.
We’ve broken the specs down per required image for you in our Image Specification Cheat Sheet. Click here to check what the dimensions for this image (and images such as your banner image) need to be. If you’re working with a designer, as we recommend, you don’t necessarily need to understand pixels, but do pass on the required specs linked to above to your designer.
That said, nothing wrong with learning something new. If you’re not familiar with what these terms are and want to learn, we’ve got you covered. Click here to break off to our bonus lesson which covers everything to do with image sizing - pixels, DPI and KB.
Context is half the work.
Make sure your various images are relevant for where they will be displayed. So where does this square image display?
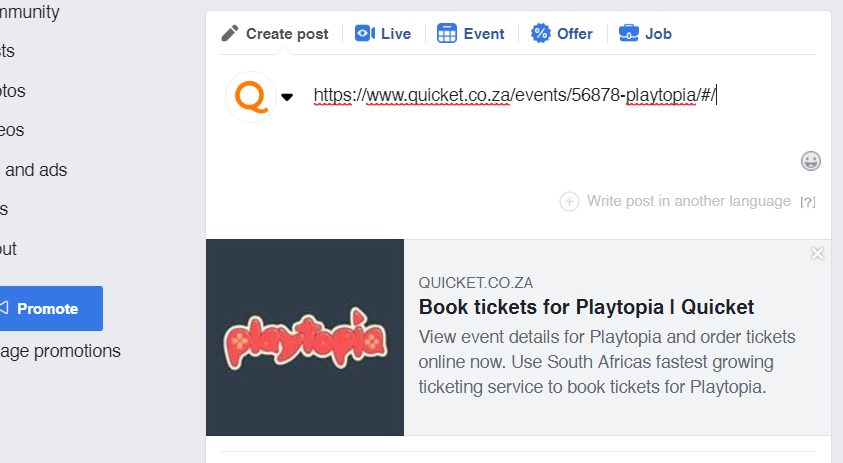
This is an incredibly important image as it displays anywhere that the URL for your ticket sales page includes a preview image. An example? Here's one where the ticket link from an event page on Quicket was posted to Facebook. Having a relevant image to your event here makes a big impact in conveying professionalism to your audience as well as closely aligning itself with your event branding to create an instant association with followers.
This image is also displayed in the event listings on the Quicket website as in the next example (if the event is made public).

Here's our handy summary for ensuring your event has kickass images:

After adding your image (or if you leave it for now and plan to add it later), continue below to the next section of this lesson for information on writing an effective description for your event.
A description that sells: writing the perfect event description
Lesson 3: Adding all your event details to better sell tickets - Section 3
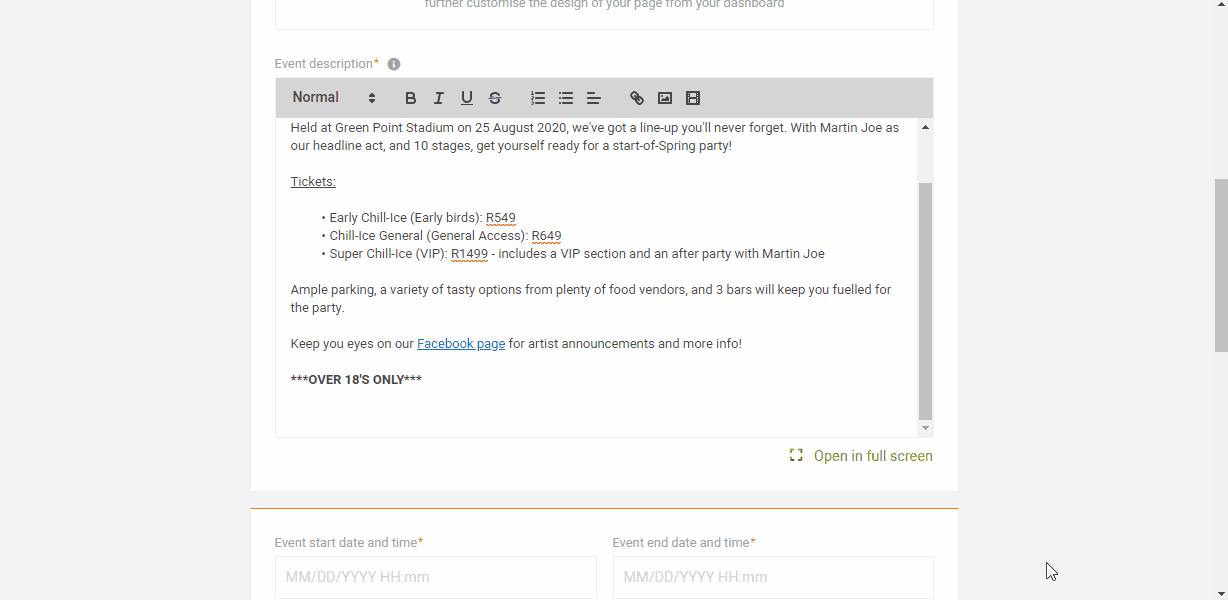
Next is to fill in your event description in the box pictured below. Before you do - read on to make sure your description actually encourages potential ticket buyers to book. Remember you can edit everything later so if you don’t have the information yet, no worries! Just add in some placeholder information - but make sure you update it before you go live.

Minimise questions.
You should never overwhelm your ticket buyers with too much info in your event description, but leaving them in the dark is worse.
Often the first questions that people ask are: when is it, where is it, how much does it cost, and what do I get for the cost? Keep this in mind as you write out your event description.
Here are some pointers to make sure people actually read your event description, rather than contact us to ask basic questions. At Quicket we handle all your ticket buyer support queries for you so you can focus on making your event happen. However, if we can’t find the information on your event page itself, we’ll have to get in touch with you - and we’d like to avoid adding ourselves to the long list of people contacting you about the event already, as well as delaying a response to your potential ticket buyers.
- First, make the benefit of attending the event clear. This first part of your event description is what will hook a person in to find out more, so sell it to them. You might know the event will be awesome but your ticket buyers won’t unless you convince them.
- Next, go over what’s covered and included in the ticket price. If there are different types of tickets, lay out what they include and how they differ.
- Lastly, cover general info such as whether food and drinks will be on sale, if it’s a child-friendly event, what the entertainment will be, whether parking is available, etc.
Formatting is fundamental.
It’s also recommended that if you copy your description text from somewhere else, such as your event listing on Facebook, that you first strip the formatting.
To do this, simply copy your event description then paste it in a plain text editor such as Notepad, copy it again from Notepad, then paste it into your Quicket event description. This may seem redundant, but it will ensure that the description on your event page matches the look and feel of the Quicket website. If you don't do this and rather copy then paste directly from another website, your description could look unclear or out of place, which can be off putting to ticket buyers.
Tip: Keep clear of text editors such as Microsoft Word or Google Docs to strip text of formatting - without pasting as plain text, these retain the inherent text formatting.
Alternatively, you could copy your event description, then right click in the Event Description box and select ‘Paste as plain text’ to automatically strip the formatting at the same time as pasting it.
Once you’ve gathered all the information you want in your event description, try to organise it in an easy-to-read way: use shorter sentences, format headings to larger font sizes, bold important bits, use a legible size font for older audiences, bullet point information where you can, and make use of paragraphs.
Keep it easy.
You can even add images and videos to your description, but if you feel you're getting to a point where the description is becoming too long, you should consider using tabbed content to organise it. We'll cover tabbed content in a future course when your event is in draft mode, so feel free to keep your description as-is for now.
Check it twice.
Lastly, get someone to check your spelling and grammar. Not only does this add to your event’s professionalism and trustworthiness, but some people simply won't tolerate common errors, so there’s no need to aggravate them.
After adding your event description, continue to the next section of this lesson to learn about setting dates and times for your events - whether it’s a once-off event or whether they repeat on a scheduled timeline.
Dates, times and schedules
Lesson 3: Adding all your event details to better sell tickets - Section 4
This next section will help you set the dates and times of your event - whether your event is a one-day or multi-day once-off event, or a series of the same or similar events that repeat or run on multiple different days (e.g. a dinner club you host on the last Friday of every month).
Click on the option that applies to you:
Setting your event’s date and time.
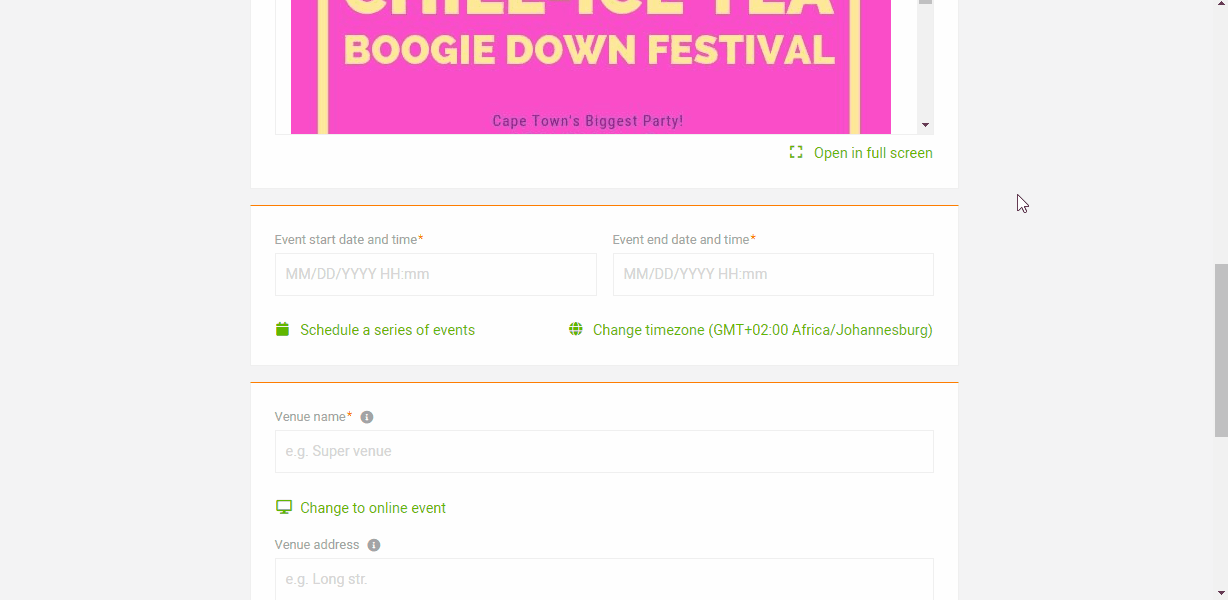
To do this, simply click the box beneath ‘Event start date and time’ as pictured below, and use the arrows to navigate to the correct date and time for the start of your event then click ‘Set’.
Repeat the above for the end date of your event by clicking beneath ‘Event end date and time’.

If you clicked on this accidentally or realise you’re needing to run an event with multiple different dates, or one that repeats daily weekly or monthly, simply click ‘Cancel’ and continue to the next section of this lesson to learn about scheduling a series of events.
Setting a series of dates and times for your events.
If you have a series of events, you can simply create a schedule for the event series instead of creating a separate event page for each date.
Before we start, it’s important to take note of the following:
-
Multiple payments for multiple dates in a series of events.
If you’re creating a series of recurring events, you’ll receive a payment for each event in the series. E.g., if you have a series of three events over the course of three weeks, you will receive one payout for each individual event within 3 working days of each event ending.
-
Some settings can’t be changed.
There are some settings that will need to be the same for each event in your series of events, and can’t be different for different dates: the ticket types that you create will apply to each event in the series. Your event capacity will also stay the same across the series.
You will, however, be able to filter your event data to each day in the series, or take a collective look at it.
-
Ticket buyers book for one date at a time.
It’s also important to note that ticket buyers will select the date of the event before selecting which ticket types they'd like to order. This means that if ticket buyers want to purchase tickets for multiple dates, they will need to go through multiple transactions, one for each date they are attending.
Let’s set those dates and times.
To do this, simply click the ‘Schedule a series of events’ link at the bottom left of the ‘Event start date and time’ block (pictured above). The options available will change to allow you to add multiple dates (pictured below).
Tip: To go back to scheduling an event with a single start date and time and a single end date and time, just click the ‘Schedule a single event’ link at the bottom left of the ‘Event start date and time’ block.

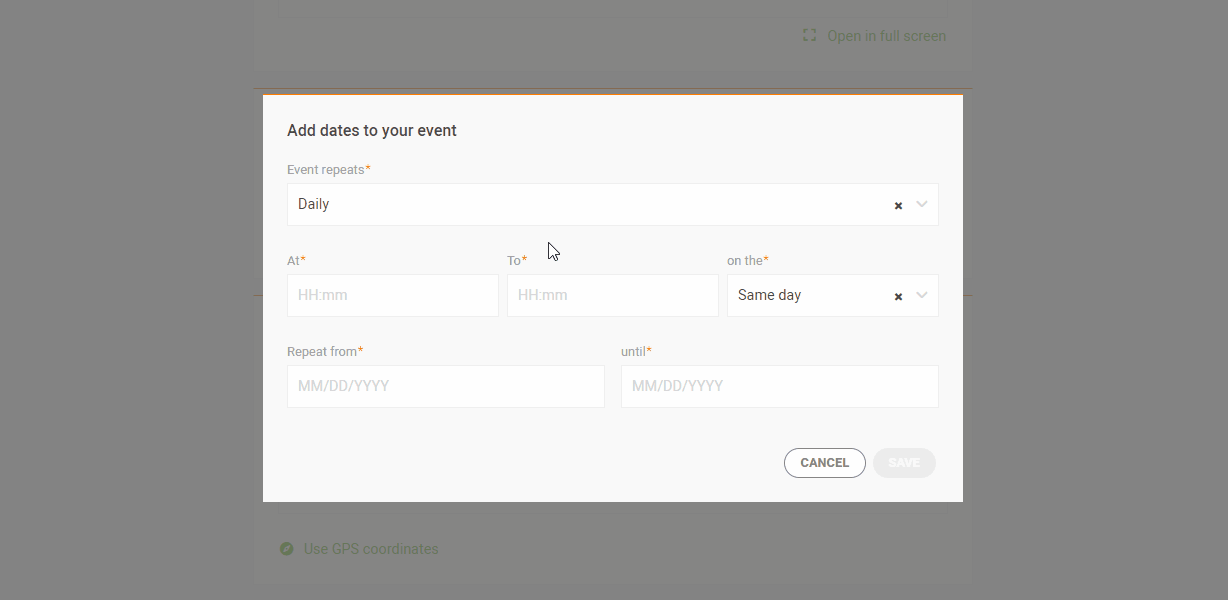
From these new options, click the ‘Add Dates’ button. A modal (pictured below) will appear.
In this modal you will set the dates that your event repeats, as well as set the times for them.
- ‘Daily’: Click this option if your event happens every single day within a specified date range. E.g. Your event will take place every single day between the dates 1 May 2020 to 15 May 2020.
- ‘Weekly’: Click this option and then from the additional option that appears, choose which day of the week your event repeats. E.g. Your event will repeat weekly on Thursdays from 1 May 2020 until 31 August 2020.
- ‘Monthly’: Click this option and then from the additional options that appear, either set which date of the month your event repeats, or day of the week in that month your event repeats. Toggle between these options by clicking ‘Select by day of week’ (e.g. Your event will repeat monthly on the third Friday of each month 1 May 2020 until 28 April 2021) or to go back, click ‘Select by day of month’ (e.g. Your event will repeat monthly on the 25th day of each month 1 May 2020 until 28 April 2021).
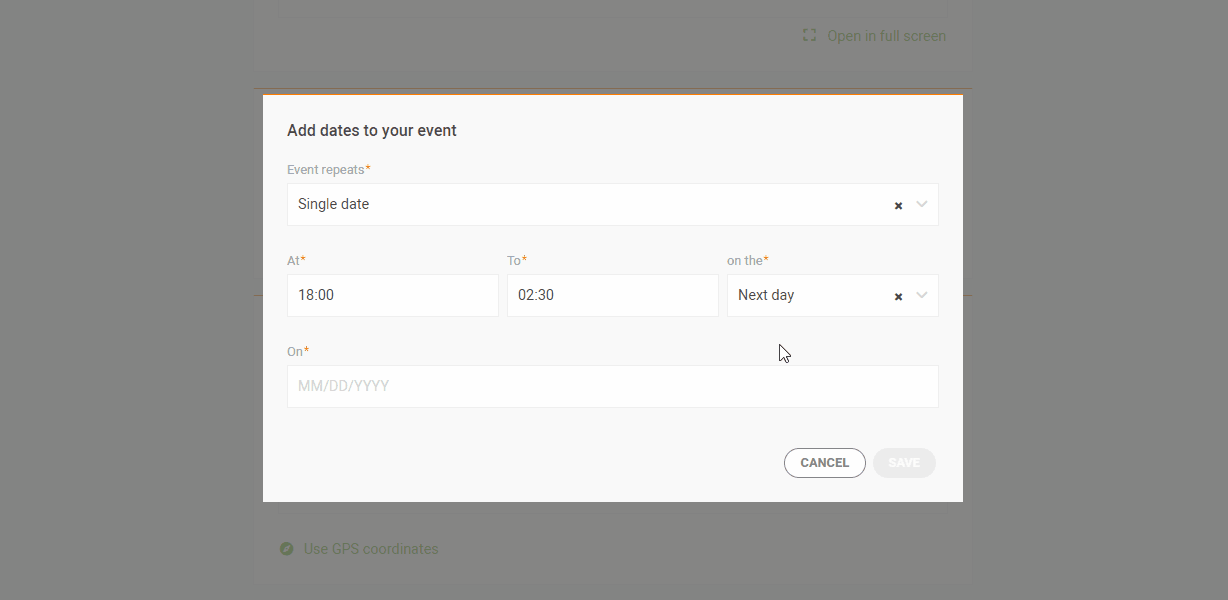
- ‘Single date’: Click this option if your event runs on multiple dates that are not consistent in their repetitions. This option will allow you to add each of these dates individually. Add a date then complete the rest of the steps below for the time settings for that date. Do this for each date in the series. E.g. Your event will repeat on 25 June 2020, 12 July 2020, 17 July 2020 and 19 July 2020.
Next, click ‘At’ to choose the start time and ‘To’ to choose the end time. Then, click ‘On the’ to set which day from the start of your event your end time needs to fall on. E.g. You would select ‘Same day’ for an event that runs from 6pm until 11pm on each day of the event, because the 11pm end time is on the same day as the start time. However, you would select ‘Next day’ for an event that runs from 6pm until 2am on each day of the event, because the 2am end time is on the next day from the start time.
For this example, we've selected the ‘Daily’ option.
If you selected ‘Single date’, skip the next step.
Finally, if you selected ‘Daily’, ‘Weekly’ or ‘Monthly’, click ‘Repeat from’ and ‘Repeat to’ to choose your date range that you want your event repetitions to run within.

Add more dates for events that don't repeat consistently.
To do this, click simply repeat the above steps by clicking ‘Add date’ after adding your first date, and setting the time and date for your additional dates.
Tip: Adding your dates in no particular order? Quicket will automatically slot your ‘outlier’ dates in chronological order.
Further edits and settings.
Once you’ve added and saved your event dates, there are a few more things you can do. To the right of the date ranges you’ve added, you’ll see a few icons.
Location, location, location: Making it easy for guests to find you
Lesson 3: Adding all your event details to better sell tickets - Section 5
Next is the venue of your event.
Give it a name (or not).
Under venue name, type in your venue (pictured below). This should not be the full address of the venue, just the name. Make absolutely sure you’ve got the name of your venue 100% correct - Google it to check if you’re not sure, or maybe in any case to make sure you have it spelled right, and have all the parts of the official name included.

If you’ve added a venue before, you can also click on ‘Use a previous venue’ (pictured below). Click in the box beneath ‘Select venue’ and all your previous venues you created will appear as options. Select the one you want and click ‘Save’. This means that you only ever need to create each venue you use once, and for future events you can just select it again.
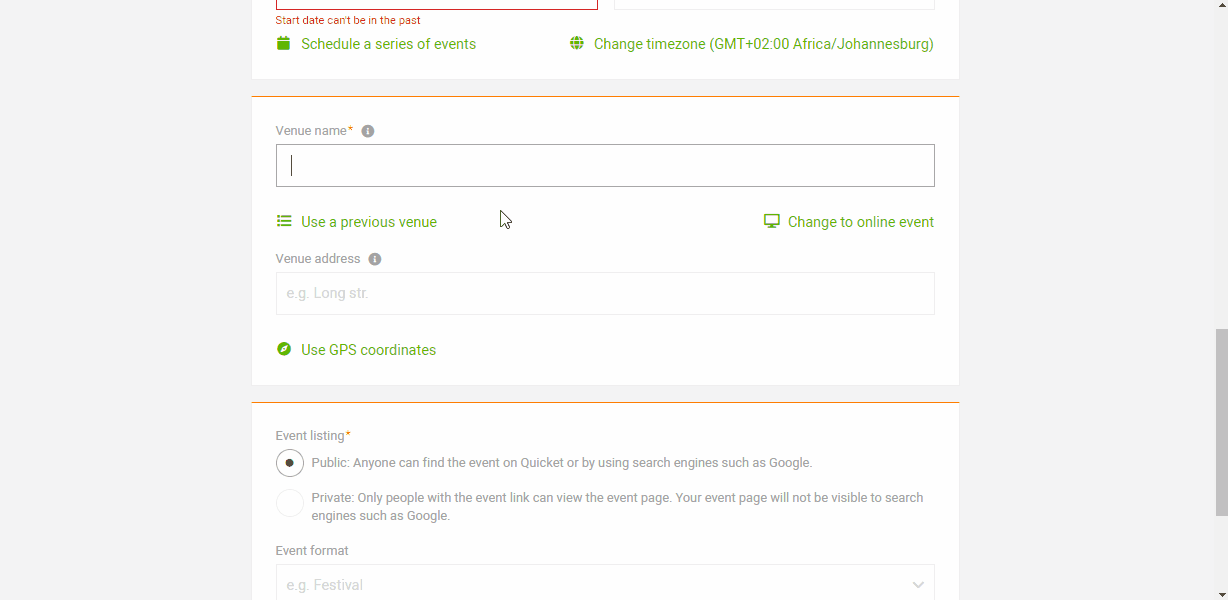
If your event doesn’t have a physical location, for example if it’s an online fundraiser, workshop or webinar, click ‘Change to online event’ which will remove the venue section from your event (pictured below). If you clicked on this and want to go back to setting a venue, click ‘Change to physical venue’.

Where to find it.
Next you need to add in the address of your venue. This is technically an optional field, but we highly recommend using it as it will improve the experience of your ticket buyers, knowing where the event is and how to get to it. You can either use address search or GPS coordinates.
Click on the option that applies to you:
I have my venue’s physical address.
To use the Venue Address field search, just start typing the address into the box and you’ll see the autocomplete options from the drop down. Keep typing the address (or copy and paste it from Google) until you see the correct option for your event, and select it (pictured below).
Once you select the address you’ll see it spit the address out into the different address, city, country and postal code lines and shows the location on a map. Here you can make any changes if needed, but note that this will delink the map.
Below the map, you can mark whether you want the map to show on your event page or not. (We recommend that you do - context is helpful for your ticket buyers!)

If you prefer using GPS coordinates, continue to the next section for more information.
And if you want to start from scratch with adding the address? Simply click ‘Clear this venue’.

I have my venue’s GPS coordinates.
To switch to GPS coordinates instead of typing an address, click ‘Use GPS coordinates’ and you’ll see the venue field change accordingly (pictured below).
Add the latitude and longitude in the respective fields, then click ‘Get Location’. You’ll see it spit the address out into the different address, city, country and postal code lines and show the location on a map. Here you can make any changes if needed, but note that this will delink the map.
Below the map, you can mark whether you want the map to show on your event page or not. (We recommend that you do - context is helpful for your ticket buyers!)

If you prefer using address search, switch back to it by clicking ‘Use address search’ then click here for more information on using addresses.
And if you want to start from scratch with adding the address? Simply click ‘Clear this venue’.
Final settings: Your event’s searchability
Lesson 3: Adding all your event details to better sell tickets - Section 6
The last few settings are easy peasy and involve who will see your event, the type of event it is and the categories it falls under.
Public or private.
Select the option that applies to your event to set whether your event on Quicket is public or private.
A public event will be visible to anyone who looks for it on the Quicket website or on a search engine such as Google. This works well for events that you want to market to the general public, and where you don’t mind who the attendees are.
A private event however, will only be visible to people you have sent the direct event page link to. If someone goes to the Quicket homepage and searches for your event or searched for it on a search engine such as Google, they won’t find it. The direct link to your page is what gives them access to it, so you could for example create a private event on Facebook and use your event page link, and only people you invite to that event will have access to it. This works well for events for closed communities, or where the event has a specific guest list.
Format, category and subcategory.
Selecting these are optional but recommended - especially if your event is public, as it increases visibility for your event in the case that a customer is using the category to filter results on the Quicket website.
Select the event format first - this is simply the type of event you’re hosting.
Next, select the category that best fits your event. Once you’ve selected a category, you’ll see that subcategory options appear. If you feel the top-level category is not specific enough to your event, you can specify further by selecting a relevant subcategory for your event.

What’s next?
Lesson 3: Adding all your event details to better sell tickets - Section 7
Once you’ve filled in the details for your event, click the ‘Continue to Create Tickets’ button and carry on to the next lesson for Step 3 of event creation. If the button is not clickable, it means all the required information has not been completed.
Want to finish up later? Just be sure to click the 'Continue to Create Tickets' button first. This saves your progress so far so that when you come back later, you don't need to fill in Step 2 of Event Creation again.
To check that you've covered everything, here's a quick list of info you need to fill in to continue (once again - remember that you can edit everything here later!) Click the links below to go back in this lesson and check the information in those sections.
The rest of this starter course will walk you through the event creation, giving you more information about the crucial parts that you need to be aware of. We will also highlight all of the options available to you during this initial setup and help make sure your event setup is perfect for selling tickets smoothly.
Ready for the next lesson of our Quicket Event Starter Course? Click here.

Nina is the Marketing Manager for Quicket and is passionate about growing a community of event organisers into one that is empowered to create incredible experiences. An event organiser herself, she’s also worked across brand marketing, social media, and in the non-profit world. She’s a burner (AfrikaBurn) at heart, an avid baker, loves a good hug, and cooking dinner for friends over a glass of good wine.