This is lesson 2 in the Quicket event setup starter course.
Click here to go back to the first lesson or click here to skip to the next lesson.
Welcome to lesson 2 of our event starter course. At the end of this 4-part course your event on Quicket will be in draft mode, where you’ll be able to edit and optimise it further.
This lesson covers:
Ready? Here’s how to register your account and set up your Organiser Profile.
Register an account on Quicket
Lesson 2: Registering your Quicket account, setting up your Organiser Profile - Section 1
I already have an account on Quicket that I’d like to use.
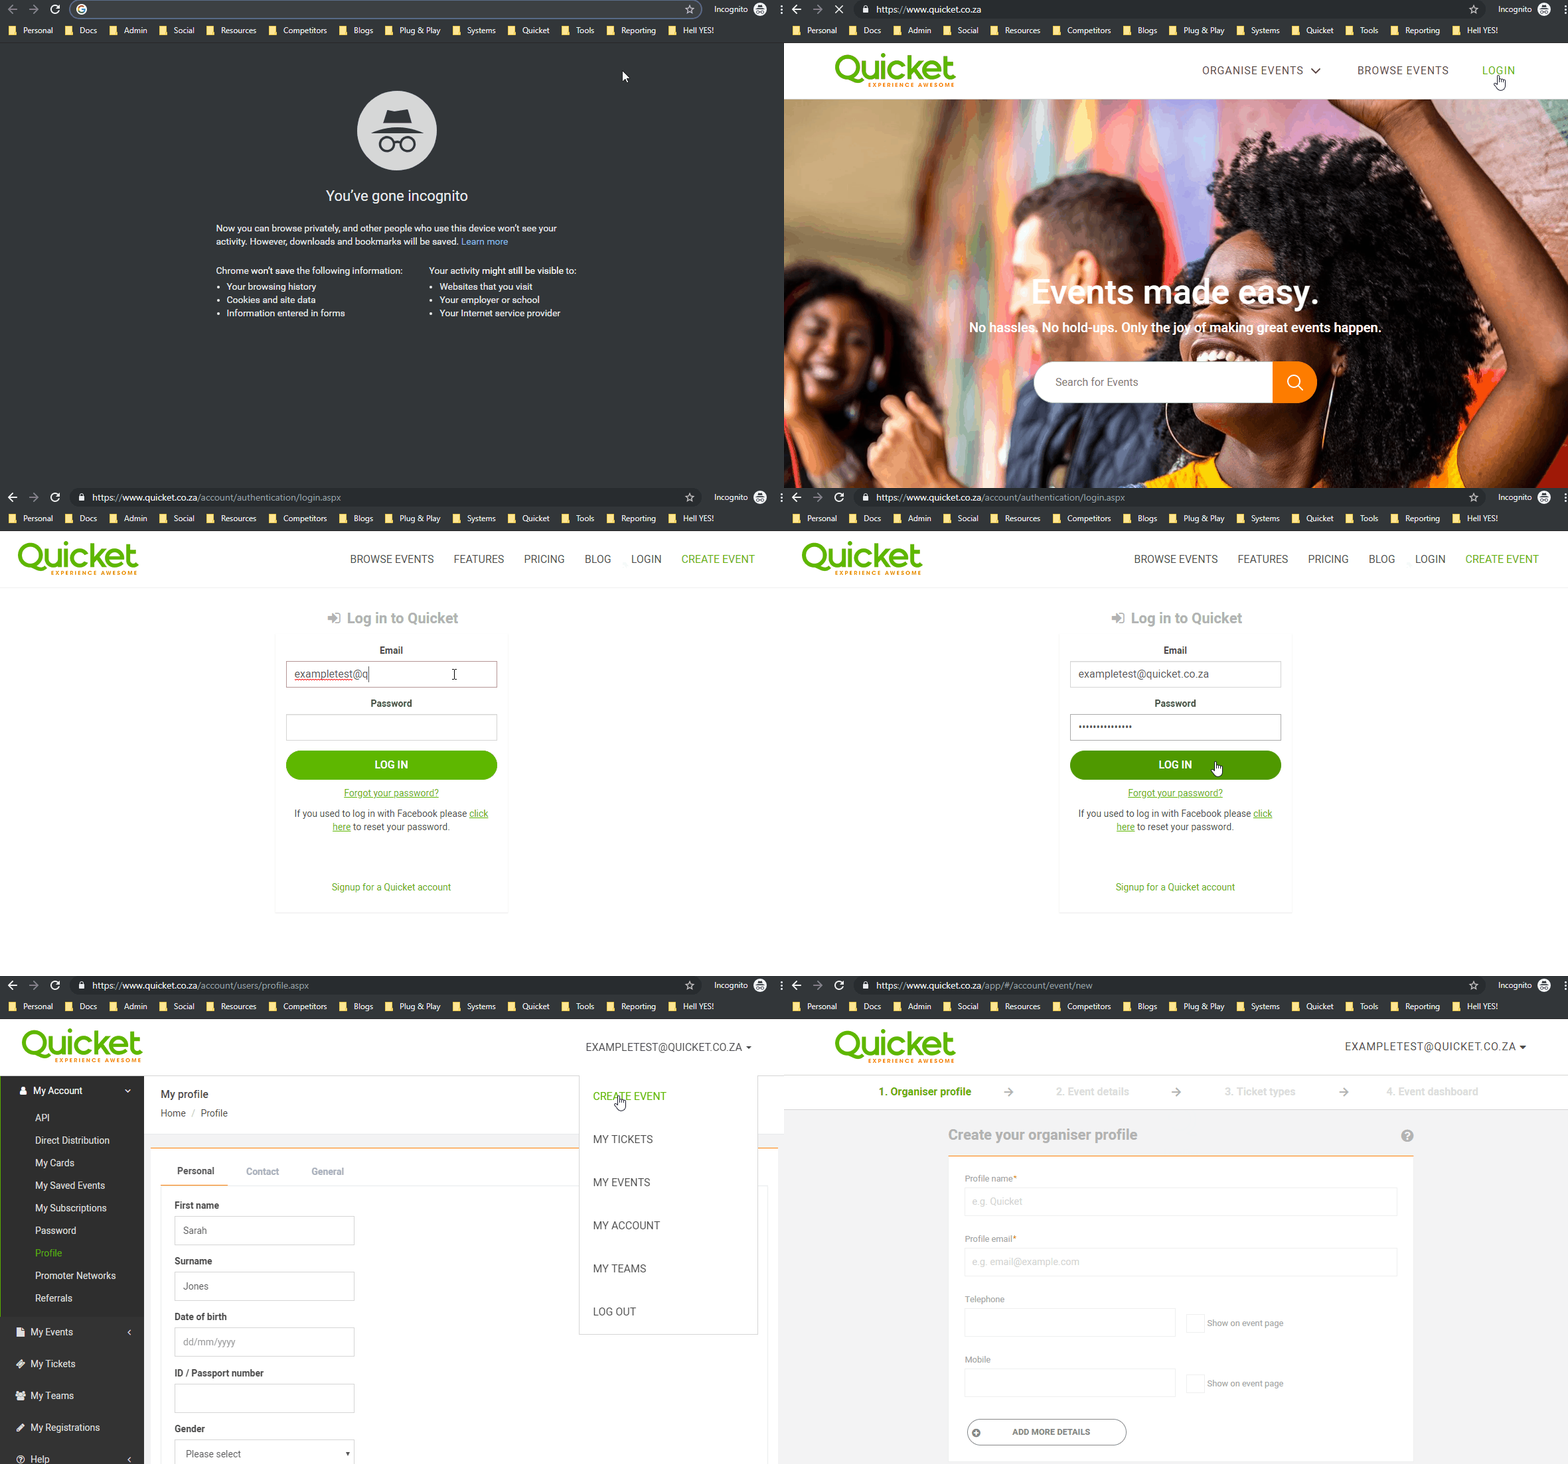
Great! Simply log in here before continuing with this section. Alternatively, you can also log in from the homepage as follows:
- Go to www.quicket.co.za.
- Click on ‘Login’ in the top right corner.
- Enter your email address and password and click ‘Log In’.
- Before you carry on with this lesson, once you’re logged in, you’ll need to click on your email address in the top right corner of the screen, then click on ‘Create Event’.

If you’ve forgotten your password, simply click the ‘Forgot your password?’ link below the Log In button or click here and follow the instructions.
I need to register an account on Quicket.
Whether you’ve never used Quicket before, or if you want to create a different Quicket account (for example for a different brand that you manage), you’ll first need to register an account before continuing. You’ll only need to provide your email address and set your password.
To register an account, click here, enter your details, and click ‘Register’. Alternatively, you can also register from the homepage:
- Go to www.quicket.co.za.
- Click on ‘Login’ in the top right corner.
- Scroll down and click on the ‘Signup for a Quicket account’ link below the password reset options.
- Enter your email address and set your password.
- Before you carry on with this lesson, once you’re logged in, you’ll need to click on your email address in the top right corner of the screen, then click on ‘Create Event’.
- Finally, you’ll need to provide some basic contact details in case we need to contact you about your event: first name, surname, and a phone number. These details will not be shown publicly.

Once you’re logged in, continue to the next step.
Your Organiser Profile (Event Creation Step 1)
Lesson 2: Registering your Quicket account, setting up your Organiser Profile - Section 2
Once you have logged in/registered your Quicket account, you'll be taken to the first step of the Event Creation Process. It starts with a short intro - go through it to get an idea of the steps we’ll go into detail on for the rest of this course, or click ‘Skip intro’ if you’re familiar with it.

Step 1 of event creation requires that you either select an existing Organiser Profile, or create a new one. An Organiser Profile is a very powerful tool in terms of organising your events and carrying your event brand.
What’s an Organiser Profile? Why is it important?
An Organiser Profile is essentially a ‘container’ for all your events on Quicket. Any Organiser Profile you create can be used to group your events together into a single page. For example, let’s say that you run a monthly wine event. Your Organiser Profile will show all of your current events for that wine event brand that tickets are on sale for, those you’ve run in the past, as well as important contact information to get in touch with you.
It also makes it clear to your potential ticket buyers who’s running the event that they’re interested in.
You can have multiple Organiser Profiles, which means that if you run events for different brands, these events can be neatly organised according to their brand - and you can still access them all from your Quicket account. For example; if you also do a quarterly art workshop that’s completely unrelated to your wine event, these events can also be filed in their own Organiser Profile.
Even better, in addition to the contact details, you can upload a profile or banner image and edit the appearance of this page to align with the brand of your event.
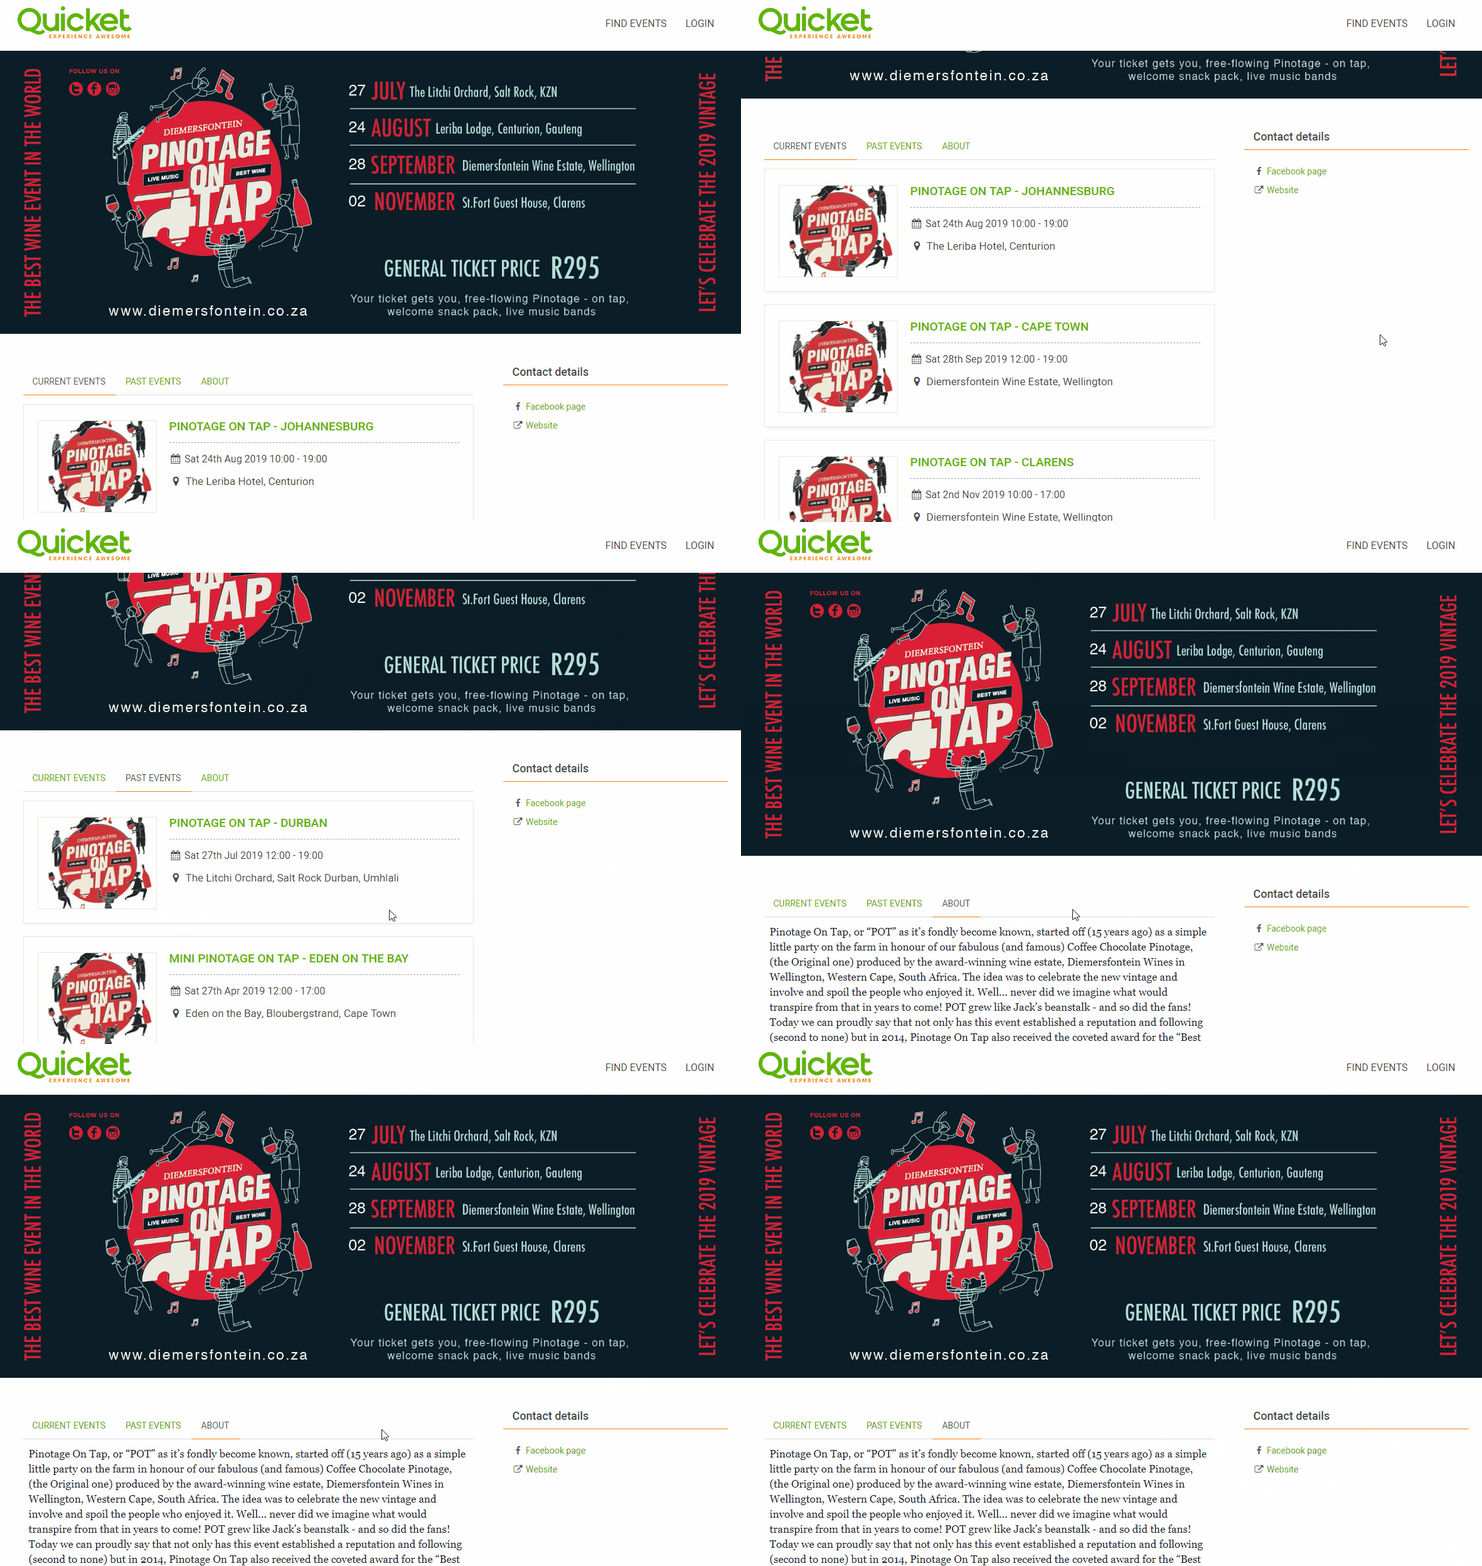
Here's an example of an Organiser Profile on Quicket:

How do I set up an Organiser Profile correctly?
You should be on the ‘1. Organiser profile’ screen that we left you on above. (If you’ve lost this screen, simply click here - you’ll need to log in again if you’ve logged out.)
Click on the option that applies to you:
Creating a new Organiser Profile.
If you’re wanting to create a new Organiser Profile for a brand you haven’t run an event for on Quicket yet, click the ‘+ Or Create a New Profile’ button.

This will give you several fields for the profile (more info on these next) that you can complete with your event brand information.
Your Organiser Profile.
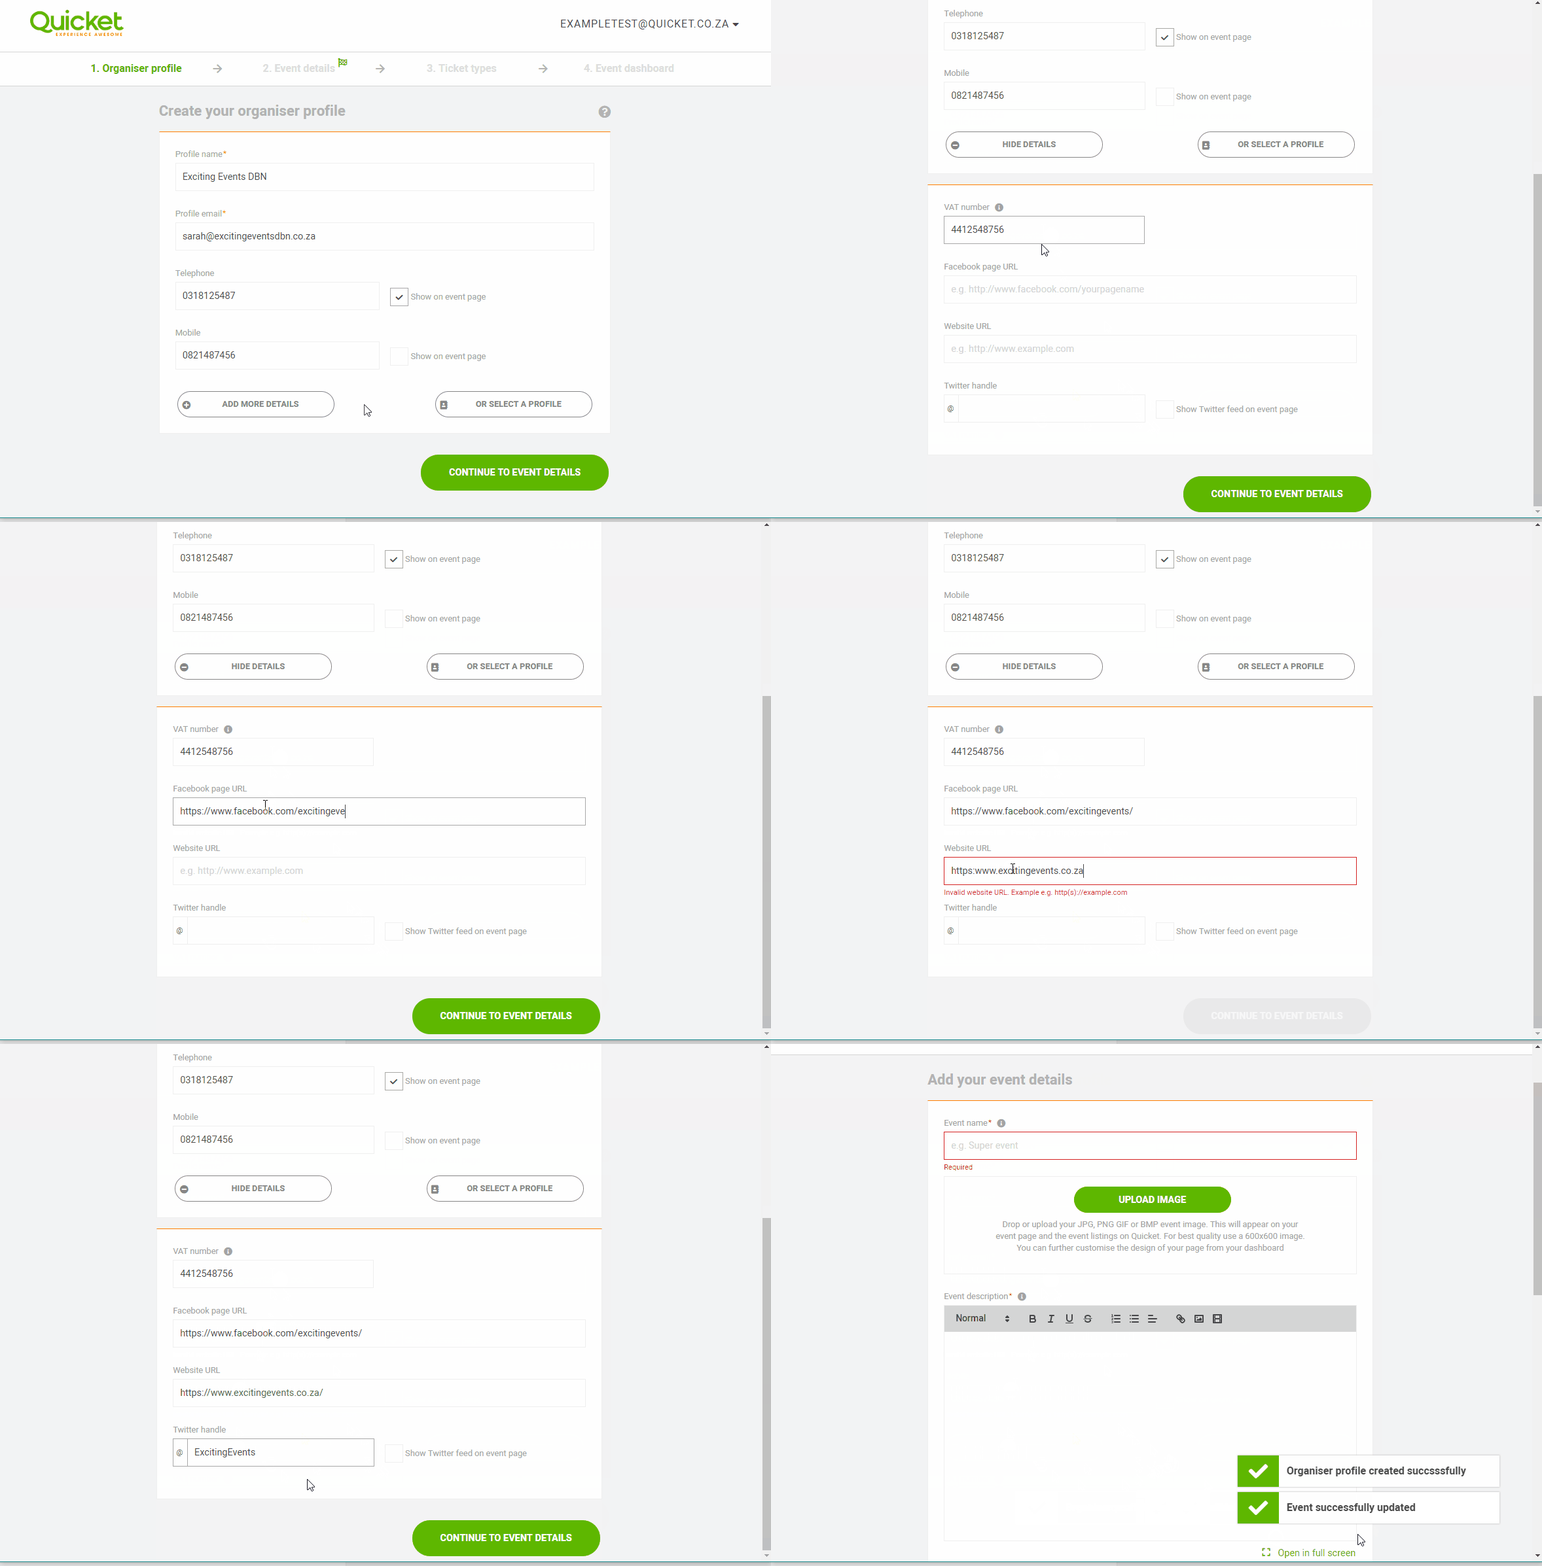
You’ll need to create an Organiser Profile if this is your first time creating an event on Quicket, or if you want to create one for a brand of events that you've not run on Quicket before.
- The name of your profile can be a brand, organisation, or if needed an individual’s name, although as far as possible we recommend not using your own name and rather opting for a brand or organisation name.
- Your email address is only used by us to contact you about your event and will not be accessible on the event page.
- It’s also beneficial to include your phone number(s) so our internal team can get hold of you. You can also choose whether you would like this information displayed on your events page or not.

You’ll also see a ‘+ Add More Details’ button. Click this button and you’ll see that it expands to offer you a few more fields. These fields are optional, but the more information you fill in the better. It’s incredibly beneficial to your brand to not only be easy to contact, but for your potential ticket buyers to be able to look you up on your website or your social media channels.
-
The website and Facebook URLs/links and the Twitter handle that you place here will be displayed on the ticket sales page for any event that you list on Quicket page which is linked to this Organiser Profile.
Take note: Make sure you’re adding in the correct information here! We’ve seen it before where someone might think they know their page’s URL/link or handle, and type it in. To be sure, rather go to those channels, and copy the URL/link or handle, and paste it into the form for your Organiser Profile. - Here you can also fill in your VAT number (which is needed if you want to claim VAT back on your ticket sales)
Important: If you're not VAT registered, just leave this field blank!
Tip: If you don’t have any website, Facebook page or Twitter page to link here, we recommend you set one up! You can do so later, and first complete this course, then come back to add it to your Organiser Profile. Not only does it add to the professionalism of your event, but it will provide you with channels through which to build an audience who will be interested in your event. You can then spread the word about your event to these channels to generate interest. There are tons of tutorials online that can guide you in setting these up.

When you create future events on Quicket for an Organiser Profile that already exists, you will not need to repeat these steps. Read the next section called ‘Using an Existing Organiser Profile’ below to see how to use an existing one.
Using an existing Organiser Profile.
If you've used Quicket to sell tickets before, you'll already have an Organiser Profile. Simply click the dropdown field below ‘Organiser profile’, and the select the profile you want to use for this event. When you create future events on Quicket for an Organiser Profile that already exists, you’ll do the same.

If you’d like to check or edit the details of this existing profile, click the ‘+ Show Profile Details’ button. Remember that updating your organiser profile updates it across all events linked to it. This will expand the profile detail options and you can edit or enter your event brand information. For more information on the importance of each of these, click here to read the breakdown in the previous section.
Alternatively if you’re creating an event for a brand that you haven’t run an event for on Quicket before, click here to follow the steps in the previous ‘Creating a new Organiser Profile’ section.
What’s next?
Lesson 2: Registering your Quicket account, setting up your Organiser Profile - Section 3
Once you’ve filled in the details for your new Organiser Profile, or selected your existing one, click the ‘Continue to Event Details’ button and carry on to the next lesson for Step 2 of event creation. If the button is not clickable, it means you didn’t fill out required information or didn’t select a profile. Click here to go back and check you’ve covered everything.
Want to finish up later? Just be sure to click the 'Continue to Event Details' button first. This saves your progress so that when you come back later, you don't need to fill in Step 1 of Event Creation again.
The rest of this starter course will walk you through event creation, giving you more information about the crucial parts that you need to be aware of. We will also highlight all of the options available to you during this initial setup and help make sure your event setup is perfect for selling tickets smoothly.
Ready for the next lesson of our Quicket Event Starter Course? Click here.
Nina is the Marketing Manager for Quicket and is passionate about growing a community of event organisers into one that is empowered to create incredible experiences. An event organiser herself, she’s also worked across brand marketing, social media, and in the non-profit world. She’s a burner (AfrikaBurn) at heart, an avid baker, loves a good hug, and cooking dinner for friends over a glass of good wine.


