This is lesson 7 in the ‘Marketing your Quicket Event’ course.
Click here to go back to the previous lesson, click here to skip to the next lesson or click here to go to the start of the course.
Welcome to lesson 7 of our ‘Marketing your Quicket event’ course. At the end of this 10-part course you’ll have all the tools you need to market your event effectively, ensuring you have as many ticket sales as possible.
This lesson covers:
After the last lesson, your Mailchimp account is all set up, you have an audience with all the contacts you have so far sorted into groups according to their events. and your Mailchimp is connected to your past, current and future Quicket events.
This lesson will walk you through prepping your mailers that you’d like to send to these people using Mailchimp.
Tip: If you’re already running email campaigns through Mailchimp, that’s great! The rest of this lesson has information that is just as relevant to you, so we’d still recommend working through it.
Before starting this lesson, a reminder to keep the rules for email marketing from lesson 5 front of mind when preparing your campaign material, building and scheduling them. If you want a refresher, click here to check them out.
Plan your content schedule
Lesson 7: Planning and Creating Email Campaigns - Section 1
Much like with social media, having a clear plan mapped out before you start creating your marketing material will save you time, and ensure you have continuous engagement with your audience in the lead up to your event without overwhelming them.
You can plan this any way you prefer, but using a spreadsheet for this works well. You can use the same template from lesson 4 and edit it to include emails - that way, all your content planning is in one place. Click here to access the Google Sheets version of the template, then click ‘File’ and ‘Make a copy…’ to save a copy to your drive, or click here to download the Excel version.
Start by mapping out the content you plan to send all the way up until after your event and plan out each part of your mailers - the topic, subject line, preview text, image, body and call to action. Also plan when to send them - the date and the time, so that when you schedule these you don’t have to figure this out under pressure. We’ll go into detail about all of these later in this lesson.
What and when to email
Lesson 7: Planning and Creating Email Campaigns - Section 2
How to approach scheduling your mailers
Remember that email is a different beast to social media. You should not be sending nearly as many emails as you do social media posts. People are overwhelmed by email on a daily basis, so you need to send enough that they notice you, but not too much that they start ignoring you. If you send mails too infrequently, you’re basically starting from scratch with gaining someone’s attention each time.
Just like with social media, how often you send mailers will entirely depend on your audience. The best way to figure out what works best for you and your specific audience is to test.
There are three golden rules of testing
- Only change one thing at a time: if you change more than one thing - how will you know which change resulted in a certain outcome?
- When you make a change, give it enough time to see how that change affects things before you decide whether it works or not.
- Document your changes and results. If you’re recording the results somewhere, you’ll soon get mixed up with what you changed when and why, and what actually worked well.
In assessing your results, also keep external factors in mind. There are many things that may influence someone’s behaviour, e.g. pay day, how many other emails they have in their inbox competing against yours for their attention, etc.
How often and when to send your mailers
The focus on sending mailers on certain days at certain times is based on people’s attention (i.e. when they are more likely to open your email rather than delete or ignore it) and competition (i.e. when more emails are being sent where yours is more likely to not be noticed amongst the volume).
If you have no idea where to begin, refer to our summary below, or check out this practical guide to give you a starting point which you can use to test and see what works best for your audience specifically.
If you want more info, check out these comprehensive guides from CoSchedule which will give you lots of info to help in making your decisions:
Here’s our summary:
Best days, times and frequency for mailers
- Days: Up until recently, the consensus on the best days to send has been Tuesday, Wednesday or Thursday. Recently, Sunday is coming up as a good day to send as well. Check out the guides above for more info.
- Frequency: No more than three times a week. Recommended schedules are once a week, once every two weeks, or 2-3 times a month. Once a month could also work, but this may not be as effective and might be too spread out. Check out the guides above for more info.
- Times: 10am has often shown to be the best time, but good results also come from 8pm, 2pm and 6am. Remember that the times apply to the time zone that the majority of your audience uses. Check out the guides above for more info.
What to email your audience about
Split your content plan into two: those who have bought tickets to your event, and those who have not. The messaging aimed at these two groups will be different.
You’re able to segment out people who have booked tickets to a specific event easily with the linking of your Mailchimp audience groups to your Quicket events that we did in the previous lesson.
For your broader audience excluding those people who have bought tickets already, your main aim is to advertise your event, to drive excitement about it, and to get people to book tickets. Keep that in mind as you plan and create your content.
Here are some ideas for emails you may want to consider planning.
Content ideas for your broader audience
- A good four to six weeks before the event, an initial email telling people about the event.
- Lineup announcements and other very exciting announcements about the event.
- Competitions or specials on tickets - in theory you could send this to both groups.
- Just before the event, a summary of all the good things the event has to offer - this is aimed at the people that book tickets last minute.
For people who have bought tickets already, your main aim is to keep them excited and engaged about your event, for them to tell others about it, and to communicate essential information to them.
Here are some ideas for emails you may want to consider planning.
Content ideas for your guests
- A few weeks before the event, a summary of the event details, and a few exciting things about the event. This reminds them about the event, and is likely to encourage them to get their friends to book tickets as well.
- If any big important changes happen, for example venue, date or time changes, definitely send this out via email as an official update.
- Competitions or specials on tickets - in theory you could send this to both groups, but the idea here is to get this group to let encourage their friends to book tickets to join them at the event.
- After your event, send an email thanking them for participating. Here you can also let them know about upcoming events, and ask them for their feedback.
Tip: After your event ends, Quicket automatically sends the people who booked tickets an email asking them to review the event. You can access this info by heading to your event Dashboard, clicking on ‘Reports’ from the menu, then selecting ‘Reviews Report’
If you find yourself sending out an email to both groups, keep in mind that you’re speaking to a mixed audience, so make sure that what you’re saying to them is relevant and appropriate for both of them.
Remember the difference between promotional and transactional mailers. With Quicket as your ticketing provider, you don’t need to worry about any transactional mailers relating to your ticket buyers booking their tickets - we’ve got these waxed and your ticket buyers will be updated on their journey with us at all necessary points. The mails you’ll send out are likely to be promotional mailers.
And remember your aim with your mails is to build a healthy relationship with potential ticket buyers and keep connected with existing ones.
The composition of a mailer
Lesson 7: Planning and Creating Email Campaigns - Section 3
A mailer is made up of different parts, and paying attention to each of these individually and how your mailer comes together as a whole is key in building effective mailers - where the content looks attractive, is engaging, and results in the desired outcome of the email you’re sending.
Tip: If you’ve sent mailers to your audience through Mailchimp or similar previously, be sure to check your campaign reports before you start putting fresh mailers together. Learn from your past campaigns and identify ways in which you can make changes to improve your deliverability, open and click through rates. We’ll delve into these later on.
Here’s an overview of what you need to know about each part of a mailer. Click on any of the following links to jump to the info for a specific part of a mailer to make sure you get it right.
Applicable to all parts of a mailer
Spam filters work on a certain list of words that is constantly updated to catch mails from spammers. As such, you need to steer clear of using certain words that will negate all the hard work you’re doing.
There are many resources online that have collated these words, but here’s a recent one which covers 455 of them.
Throughout your mailer - whether you’re working on the subject line, alt text of an image, or the body text of the mailer itself - you’ll have a higher delivery rate if you avoid these words, i.e. more people that you’re emailing will receive your email in their inbox.
Subject line
This is often seen as the most important part of your mailer, as it’s the first thing the recipient will see. Together with the sender name and preview text, it’s primarily responsible for whether someone decides to open your mailer or not.
There’s tons of advice available online (like this HubSpot guide) about writing catchy subject lines, and many different strategies you can use, based on the aim of your email.
Some characteristics of great subject lines are:
- Short and sweet: Longer subject lines get cut off - especially on mobile where most people open their mails. Fifty characters is a good limit to stick to, and use concise language that’s easy to scan. If you can’t keep it short, put the words that matter most in the beginning.
- Urgency: i.e. that ‘Act now!’ feeling, but worded more creatively and not necessarily using those specific words (remember those spam words!). Urgent-sounding subject lines should be used sparingly to ensure their efficacy.
- Curiosity: Although conveying the benefit of opening the email works, sometimes maintaining an air of mystery where the recipient needs to open the email to get more information is very effective. This works for a storytelling approach as well, if you’re sure not to make false promises. Make sure this is not too obscure and relevant to your event to avoid being seen as spam, though.
- Offers: These very clearly state the benefit of opening an email - discounts, special offers, free stuff included in the subject line are very effective. Just be sure to watch those spam words. And don’t make false promises!
- Personlisation: Send different mailers to different groups of people based on what you know about them, or use merge tags on Mailchimp to personalise your mailers even further, making people feel special.
- Relevance and timing: Including current trending topics or headlines in your subject lines is helpful. Relevance also applies to the relevance to your event and brand. Keep it in line!
- Stand out: Using a compelling question, or a good, quirky pun, or specific numbers instead of a vague statement will help in making your email stand out from the crowd.
Emojis are great too especially when cleverly used, i.e. in the place of where a word would be - just don’t overdo them, and check that your chosen emoji will display on all devices instead of just showing the following where the emoji would be: ▢. This list shows you how each emoji will display on different devices. Use ‘Ctrl’ + ‘F’ on your keyboard to type in keywords and search emojis you may be needing. - Punctuation & formatting: Never use all caps, multiple exclamation marks, a question mark and exclamation mark together. You’re bound to land up in spam land.
Sender name
A familiar sender name and email address is very powerful. We set this up with you in Mailchimp in previous lessons of this course.
Never use ‘No Reply’ and ‘[email protected]’ or similar as your from name and email address - people won’t add your address to their address book, and it will look like a robot is emailing them.
Similarly, using your own personal email address such as ‘[email protected]’ looks unprofessional and won’t build any confidence in your event as a product with your potential ticket buyers.
The best results come from individual names and email addresses of people at a company, such as Sarah Wattle and ‘[email protected]’ - even if your email is technically coming from your event brand as a whole. It communicates that you’re making room for a conversation. If you have a website, you have the ability to have an address such as this - chat to your web developer for help. If you don’t have a website, focus on that first before you delve into the land of email marketing!
Preview text
The preview text will appear next to or beneath the subject, and is important because it gives recipients further insight into the content of your mail. Great news is that you can (and should) personalise this!
If you don’t put a well thought-out preview text snippet together, the email will default to the contents of the mail which often looks messy in an inbox. Not specifying preview text is a wasted opportunity to connect with your audience.
Image
Effective mailers have an eye-catching and engaging mailer header image. These images have some specs that work well across the board, considering that your mails will be received in all manner of places - different email clients and devices. You also need to ensure that the important information you want seen is not too low on your header image.
IMAGE SPECS
Click here to see the dimensions for this in our Image Specification Cheat Sheet. If you’re working with a designer, as we recommend, you don’t necessarily need to understand these required specs, but do pass them on to your designer.
Also check that.your email content is not too long as it will be snipped in the email client, and the recipient will need to click out from their mail client to view the full email. With every click that you make someone do, more people will end up not performing the task you originally intended.
In terms of format, JPEG would work best as the file sizes are smaller and will load faster. PNG is okay if needed, but larger file sizes will reduce your delivery rate and might take too long to load when your mails are opened.
What about alt text? You’ll see a field to add alt text for each of your images in your emails. Using alt text will improve the deliverability of your mailers. Alt text is text that lives “behind” an image and is used for a number of different reasons, but in each case its purpose is to convey what the image would have conveyed if the image is not accessible:
- A person’s internet connectivity might be spotty
- Some people may have their mail set to not show images
- Other people are visually impaired and use screen readers which will pick up the alt text and read this to them
Body
This is made up of whatever you would like it to include, but most commonly, consists of text and a button linking to where you want your recipients to click through to.
Open your mail with a friendly or quirky greeting. Use merge tags to personalise the name of the person you’re emailing.
Keep the bulk of your body content short and to the point - long-form emails are hardly read. Also keep legibility in mind: it’s commonly recommended to stay within a range of 45-75 characters per line, and to use shorter paragraphs. Remember to steer clear from using different types and colours of fonts - not only is this less jarring to the eye, but will help you avoid being labelled as spam as well.
It’s very important that as long as your ticket sales are open, every single email you send should include the link to book tickets. Since most people do not read emails thoroughly, it’s even better if you include this link more than once in the mailer: somewhere in the text at the start of your mailer, in a button fairly soon after, as well as at the end of the body of your mailer.
A note about links in emails: never, ever, ever use a shortened link here. Spam filters will instantly see your mailers as spam since a lot of spammers use link shorteners to hide the web address of where clicking on a link will take a person. This applies to any link you place in any mailer - anywhere - ever.
Sign your mail off at the end of the body of content.
Footer
At the bottom of your mailers body of content, Mailchimp will automatically add a footer which contains an unsubscribe link, the info you added about where the person signed up for the mails, and your company address that you added which is needed from a legal perspective. It’s best to just leave this footer as is as it covers you legally.
That said, you can also add in your own brand-focused footer which will display above the Mailchimp one. This can include things such as your logo, links to your website, where to book tickets, etc.
Creating a template for your mailers
Lesson 7: Planning and Creating Email Campaigns - Section 4
Right, so you’ve planned out your content, and are ready to build your first mailer. But to make sure your mailers all have a consistent look and feel, we’re first going to create a template. It’s best to make sure that your emails have a baseline look that’s the same and easily recognisable.
You can build a template (or a few variations of one for different uses) and instead of creating the layout, fonts, colours, and other look and feel aspects of your mailers from scratch each time, you can just select a template and add in the content needed.
Mailchimp will give you a number of pre-designed layouts or themes to start with, or you have the option to custom-code your template entirely - very handy if you work with a designer or a developer, or have existing mailer code that you would like to start with.
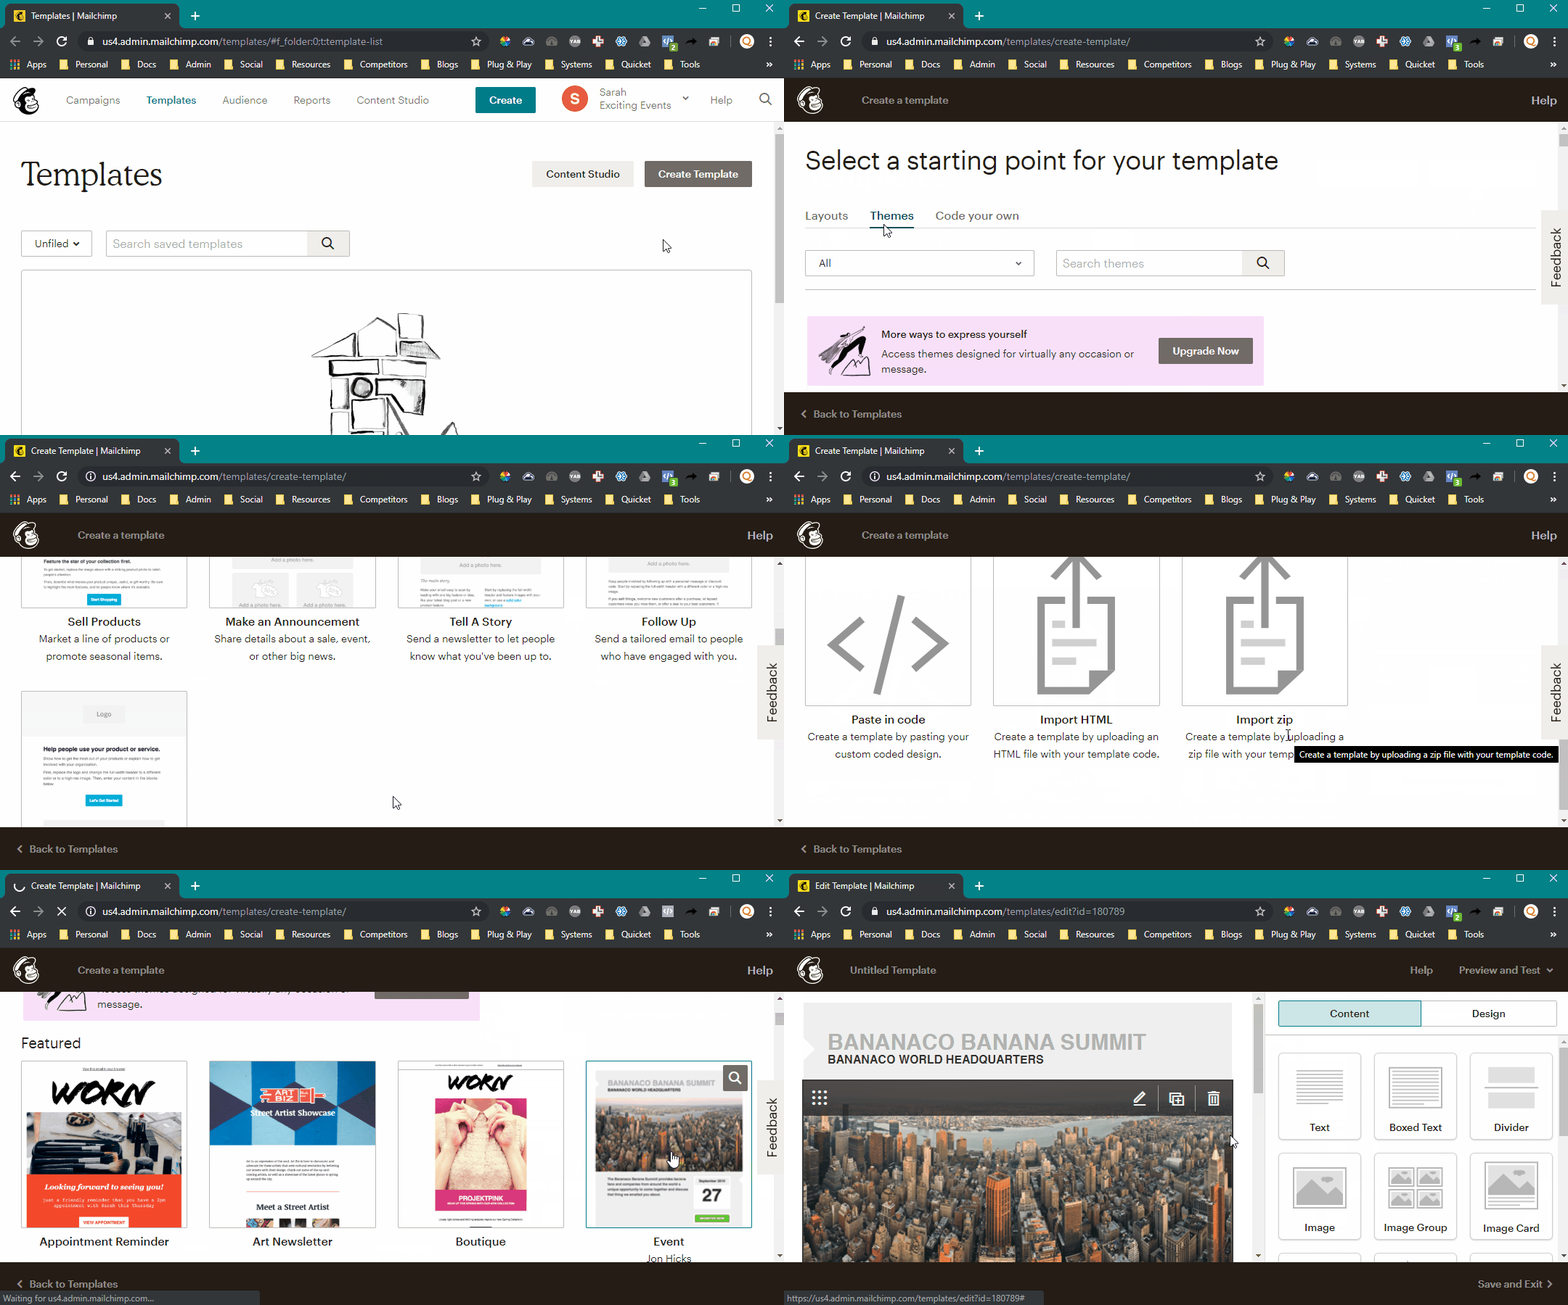
Creating a template
- In Mailchimp select ‘Templates’ from the menu bar.
- Select the ‘Create Template’ button.
- Select either ‘Layouts’, ‘Themes’ or ‘Code your own’. For this example, we’ll use a premade theme.
- Select a theme (or layout) that you like the look of as a start. Note that the free version of Mailchimp will only allow you to use certain themes, and for others you’ll need to upgrade to the paid plan. You can still customise everything from a theme so simply select that one that’s closest to what you’re looking for, or start with a layout or add your own code.
- Use the editor to upload and add photos, headings, text, links, and change colours (of backgrounds, fonts, links, etc.). Add anything that you want to keep in all of your mailers. You can add some basic text as a placeholder for text that changes for now. Our visual example below shows us editing various settings in the editor.
- Once you’re happy with your template, click ‘Save and Exit’ to go back to the dashboard.
Creating your first email campaign
Lesson 7: Planning and Creating Email Campaigns - Section 5
Mailchimp calls your promotional mailers ‘Campaigns’ (i.e. mailers that are not transactional mailers).
A campaign combines all the parts of your mailer - your template, your list, the content, settings, and scheduling and sending it.
Follow the below and create those that you’ve planned to send one at a time. You don’t need to do them all in one go, but try to prep them as far in advance as you can so that you can peacefully work on the rest of your event.
- In Mailchimp select ‘Campaigns’ from the menu bar.
- Select the ‘Create Campaign’ button.
- Give your campaign a descriptive name so that down the line when you have many campaigns sent, you’ll be able to identify which is which easily. For example, we’ve used the date we plan on sending the email, the event name, and the topic of the mailer: “20191004 - Boogie Down - Launch Mailer.”

You’ll see Mailchimp gives you several settings to confirm. We’ll walk you through each section below.
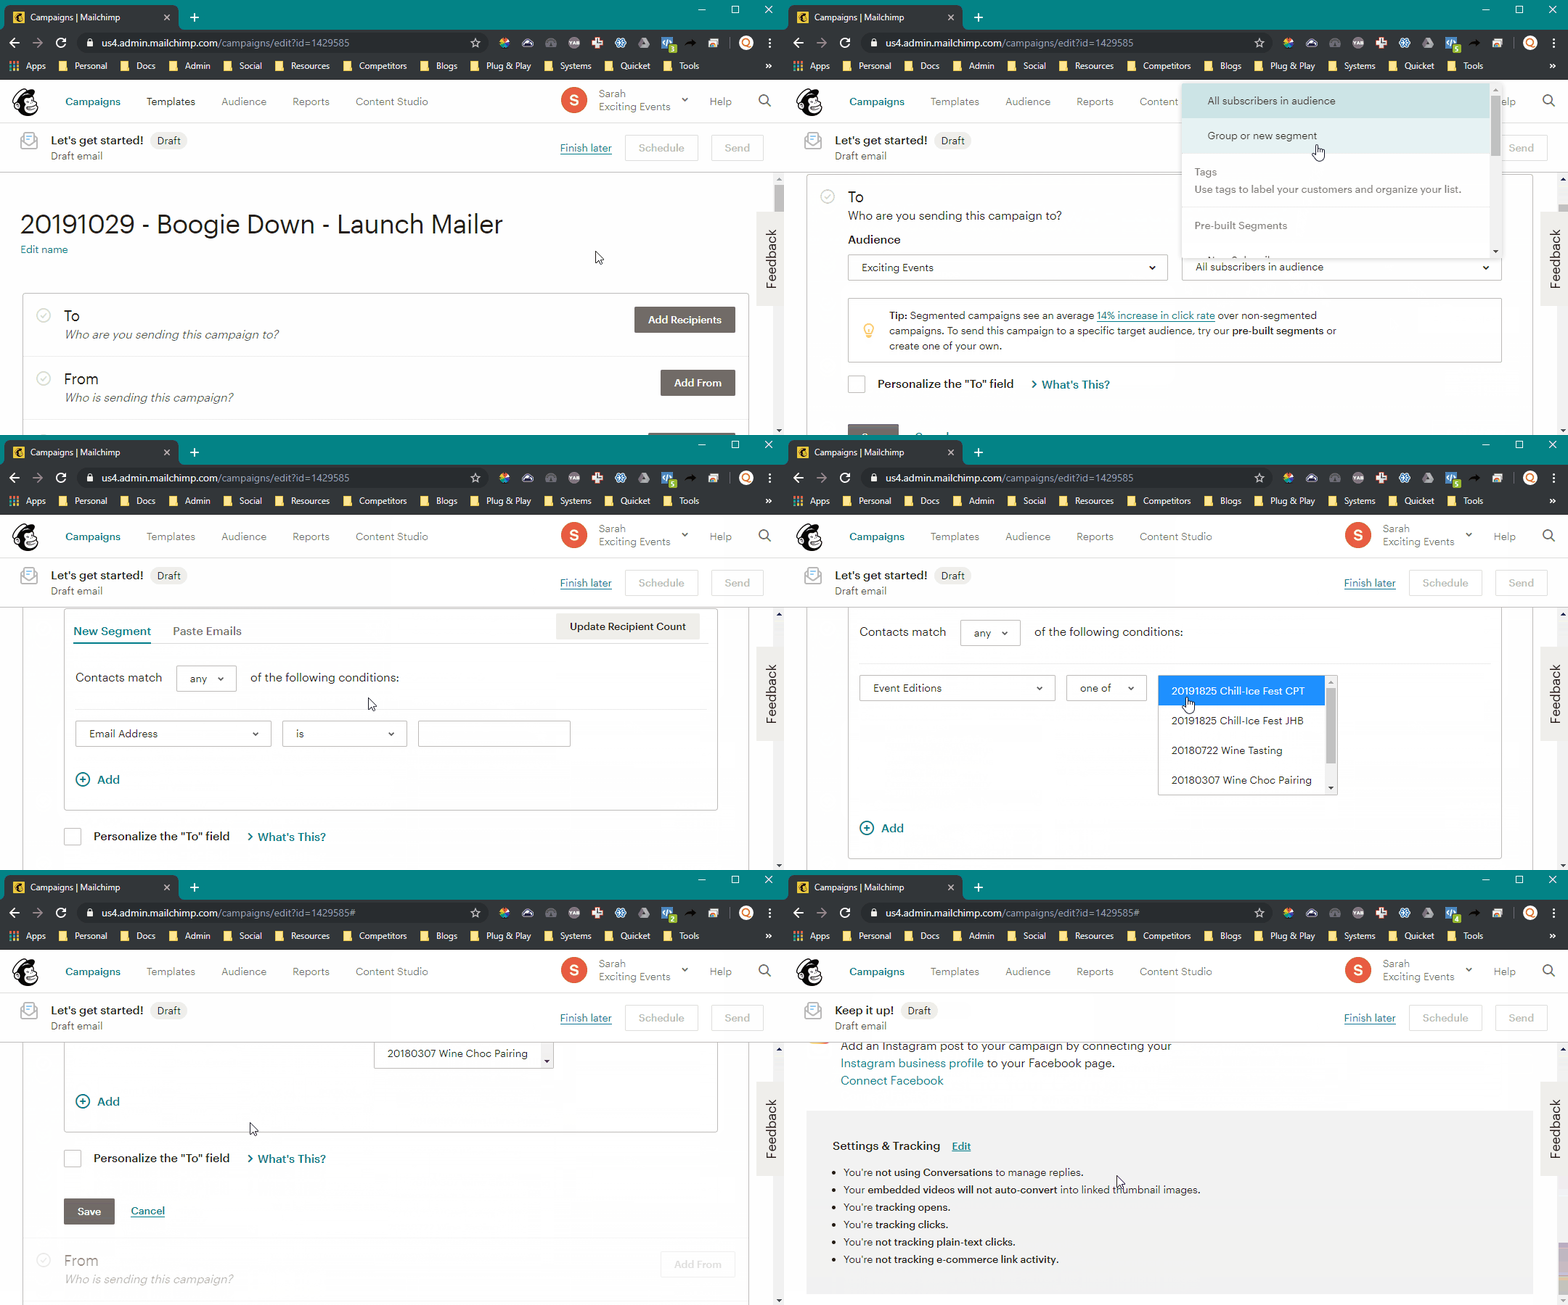
- First, select the ‘Add Recipients’ button.
- Select your audience (if you’re on the free plan, you should only have one).
- Next - and this is very important - segment your send to the groups you would like to send to.
Since this mailer is a general launch mailer, we plan on sending it to everyone in our audience that has not yet bought a ticket to the event. This means we’ll send it to our whole audience, and exclude anyone in the group for this specific event.
Select the box beneath ‘Segment or Tag’, then select ‘Group or new segment’. - From the options that are given where you’ll see the value to filter is set to ‘Email Address’ by default, click on ‘Email Address’ then select “Event Editions” (or whatever your group category is called) under the ‘Groups’ heading.
- Mailchimp will now offer you a few more settings to select. Since we want to email everyone in our audience except those who are already booked to this event, select ‘none of’.
- Lastly, select the group named for this event. In our case, it’s “20191825 Chill-Ice Fest CPT”.
Note: There are many possibilities on how you can segment and group your data to send to very specific people. You can have just one or many conditions. Take a look around to familiarise yourself with the options. - If your audience contains data for first names, you can instruct Mailchimp to personalise the ‘To’ field that displays in a recipient’s mailbox before they open the mail. Our audience has this data, so we will check the ‘Personalise the “To” field box.
- Click ‘Save’ then move on to the ‘From’ section.
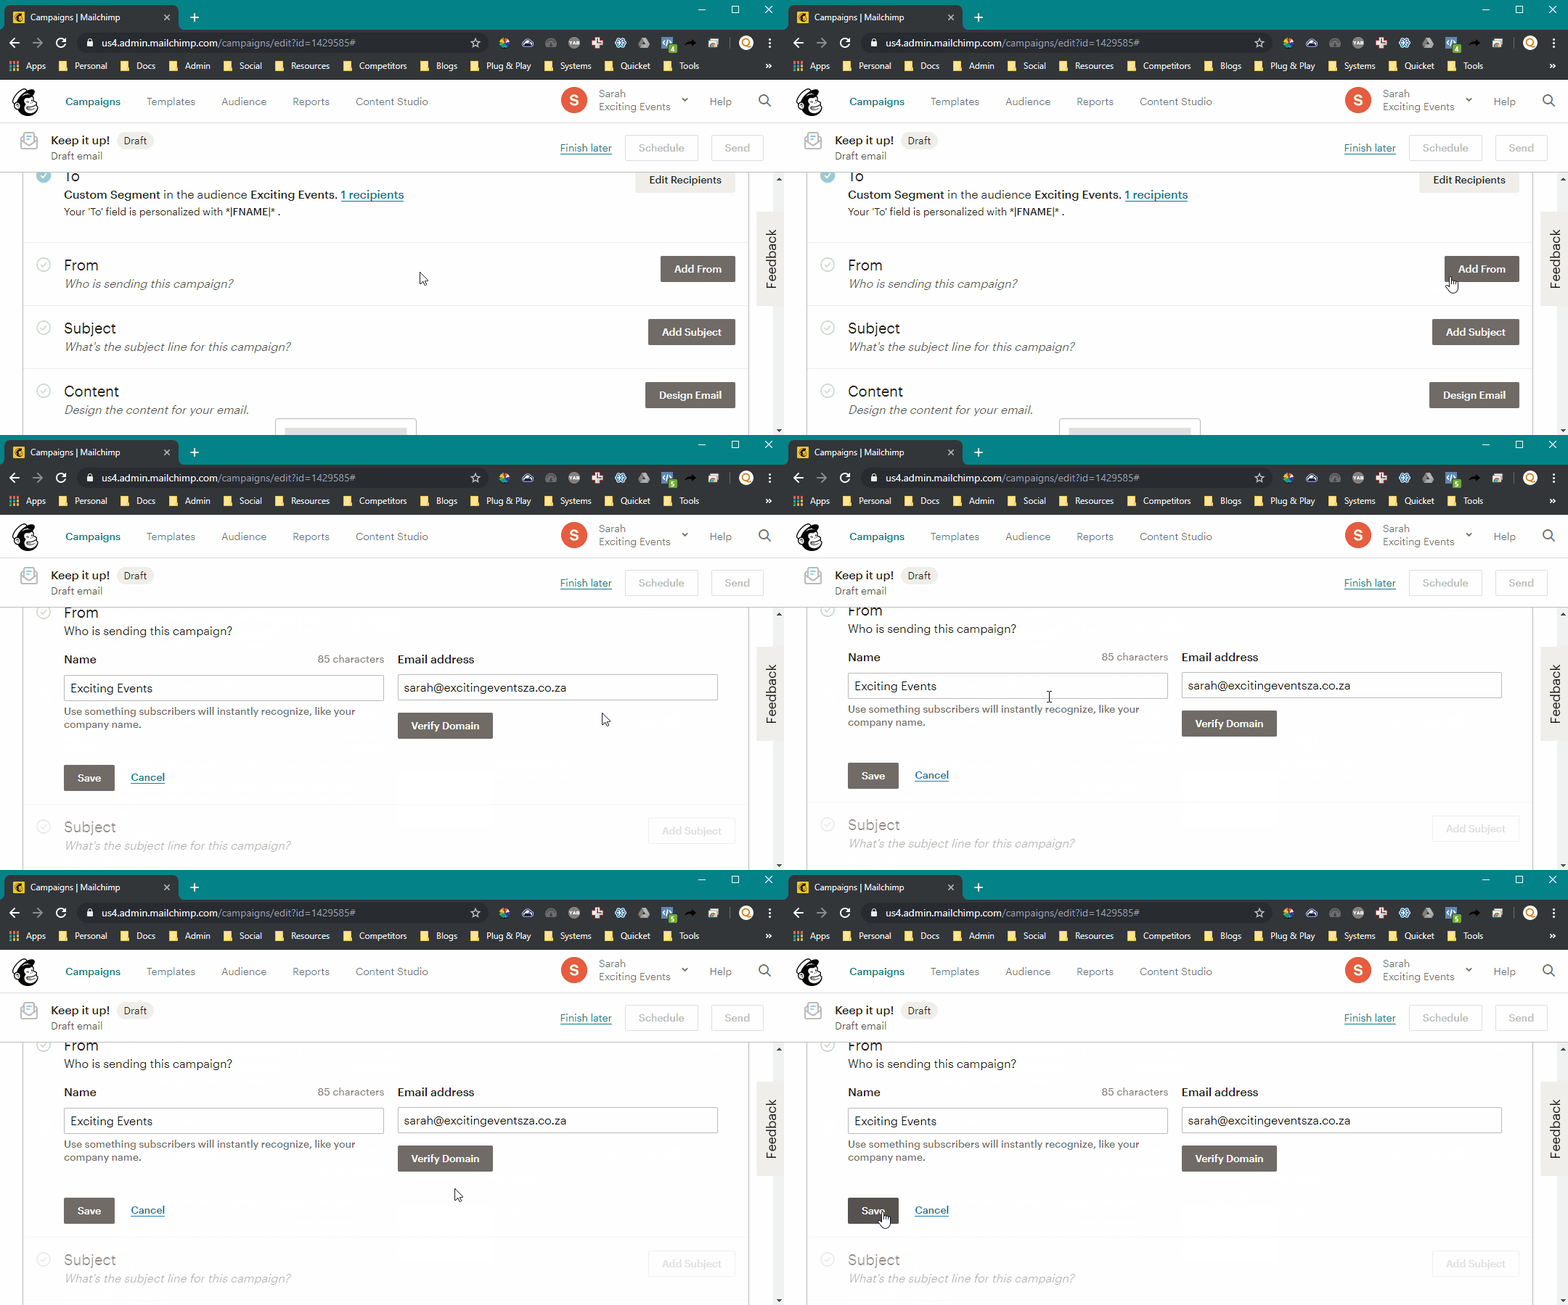
Since you selected your audience in the ‘To’ section, and you checked your settings in lesson 6, this information should be pre-populated. Double-check that you’re happy with it, and click ‘Save’.
Your web domain will need to be verified in order to use it to mailers send from.
In the ‘Subject’ field, add the subject line you've prepped for your mailer. To jump back to the guidelines on subject lines, click here.
Add the preview text for your mailer in the ‘Preview text’ field. To jump back to the section on mailer preview text, click here.
Click ‘Save’ when you're done.

- First, select the ‘Design Email’ button.
- From here, you can select and edit pre-existing layouts and templates, or code your own - just as you did when creating your template. Alternatively, you can select your own template that you created.
Click on ‘Saved templates’ then select the one you wish to use. Click ‘Next’ if you’re not automatically taken to the design page. - Edit and design your page as you like. Once you’re happy with everything, you can preview your campaign. (You’re able to test right from here, but we’ll come back here to test your mailer in the next lesson.)

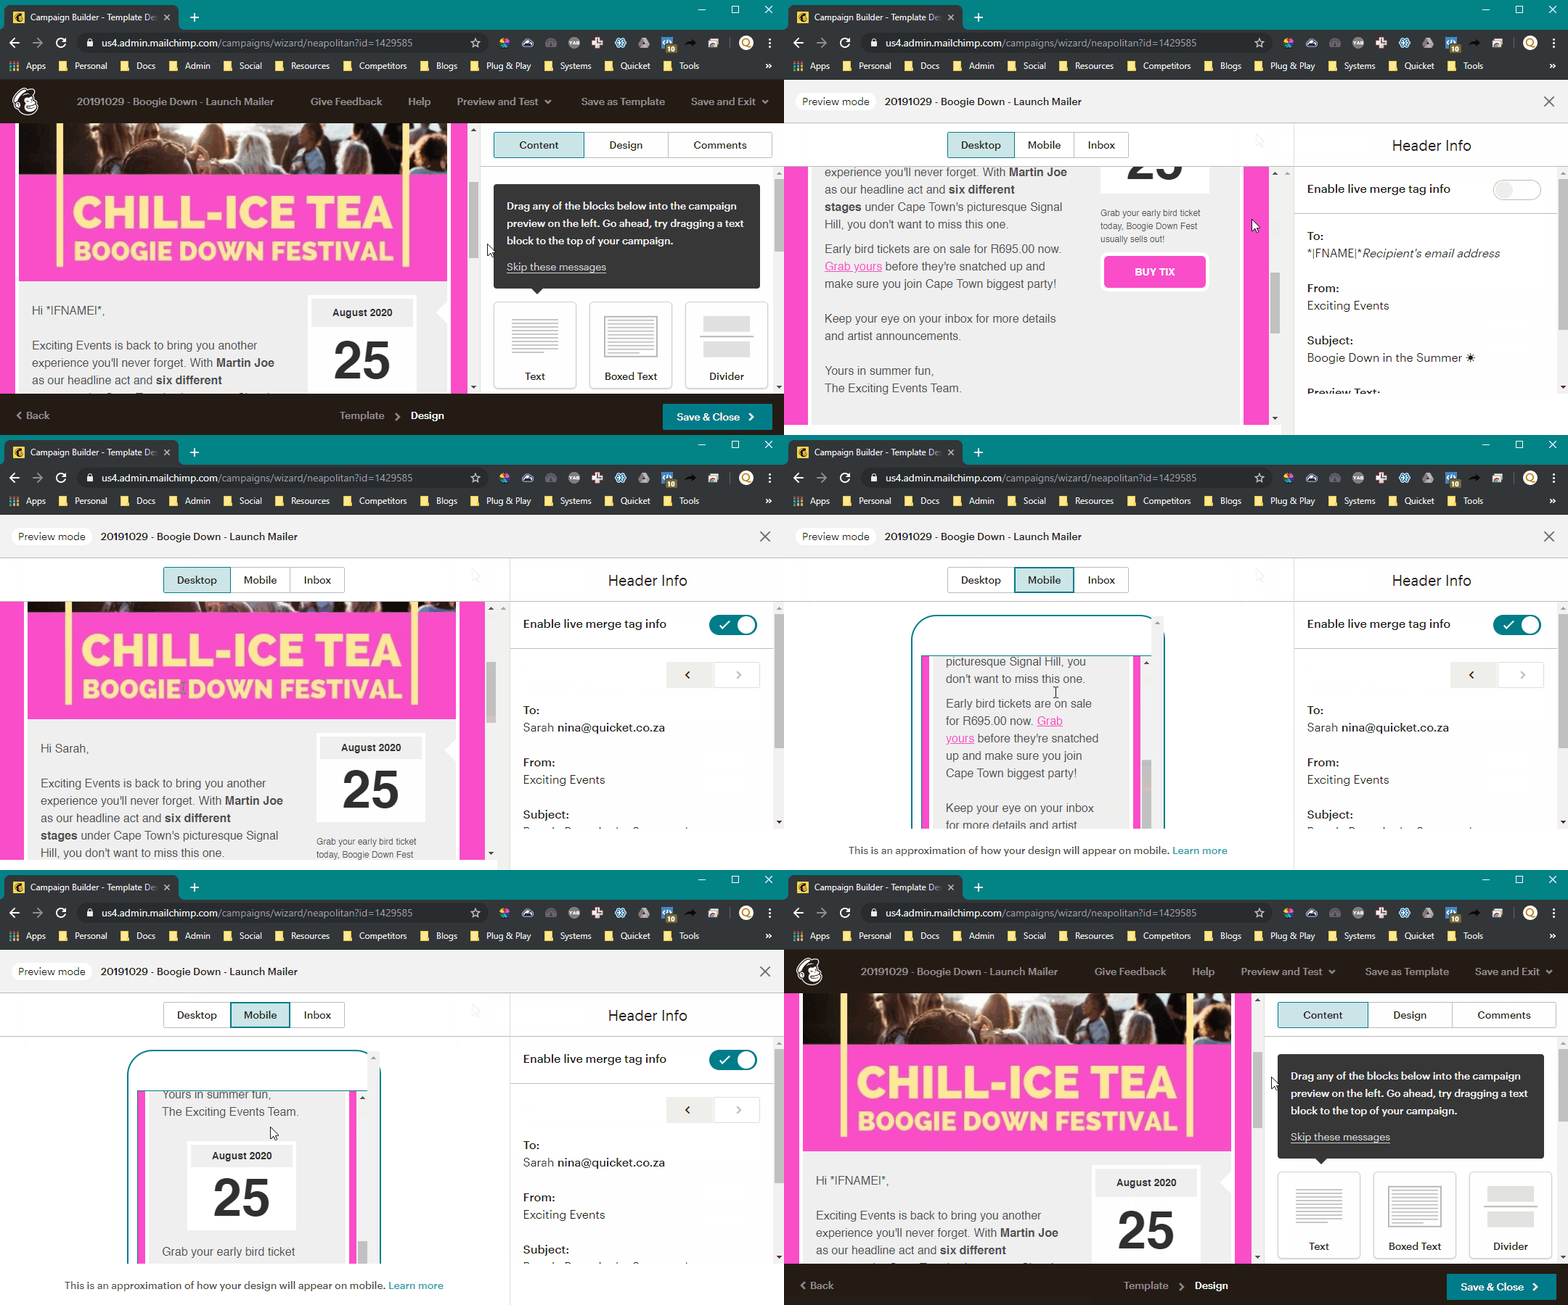
- To preview your campaign, click on ‘Preview and Test’ from the menu bar, then select ‘Enter Preview Mode’.
Preview Mode shows you if any images are broken or if your general layout is working properly. You can see how your mailer is likely to look on desktop and mobile.
The aim of preview mode is to give the best approximation of what your campaign will look like when received, so you’ll definitely need to send test emails (as covered in the next lesson) as well to get the best idea of how your campaign will look upon receipt.
You can also sign up for Litmus under the Inbox tab to see how your mailer will look on different email clients, but this is only free for 30 days. We’ll show you how to test your mailers properly on different email clients for free forever in the next lesson.
-
Note: in the visual example above, you’ll notice us using Quicket’s Link Campaigns features. We’ll cover this towards the end of this course.
- Check that all the links in your mailer are as intended and are working. To use Mailchimp’s link checker, click on ‘Preview and Test’ from the menu bar, then select ‘Link Checker’.
Your mail will display on the left, and the links from your mail on the right. Click each link to check that it works and see a preview of where it leads. If you need to change the link, click ‘Edit link’ on the ‘Link Details’ screen, located just under the link itself.
Once you’re happy, click the ‘X’ in the top right corner to return to where you were. - Lastly, you can send a test email right from the email designer. We’ll still walk you through proper testing in the next lesson, but this is a good quick check to make sure all looks good before you do all your thorough testing.
Click on ‘Preview and Test’ from the menu bar, then select ‘Send a test email’. Type in the email address(es) you want to send to, and click ‘Send test.’
Check the email in your inbox. You’ll see a text mail won’t pull through merge tags if the email address you’re using is not a contact in your Mailchimp audience.

- ‘Save & Close’ to save your mailer to make sure you don’t lose your progress.
Once you’ve done a thorough test of your new mailer and template in the next lesson, you’re likely to only need to test in the way we’ve described here - that is, if you don’t make any major changes to your template, for example, only updating text or replacing the image with one of the same dimensions, etc. It’s still best to err on the safe side though, so if you have any uncertainty, rather do more tests than less.
As you send more campaigns, you’ll want to organise them in folders. Keep it neat to make it easy for you to find your way around.
Almost there!
Lesson 7: Planning and Creating Email Campaigns - Section 6
Your mailer is all ready, which means that you can now so a thorough test of it, do some final checks and schedule it!
Ready for the next lesson of our Quicket Event Marketing Course? Click here.
Nina is the Marketing Manager for Quicket and is passionate about growing a community of event organisers into one that is empowered to create incredible experiences. An event organiser herself, she’s also worked across brand marketing, social media, and in the non-profit world. She’s a burner (AfrikaBurn) at heart, an avid baker, loves a good hug, and cooking dinner for friends over a glass of good wine.


