This is lesson 9 in the ‘Marketing your Quicket Event’ course.
Click here to go back to the previous lesson, click here to skip to the next lesson or click here to go to the start of the course.
Welcome to lesson 9 of our ‘Marketing your Quicket event’ course. At the end of this 10-part course you’ll have all the tools you need to market your event effectively, ensuring you have as many ticket sales as possible.
This lesson covers:
Over the years, we’ve built a number of features on Quicket based on the needs and feedback of event organisers such as yourselves. This lesson takes you through a few of these that you may not be aware of, but are indispensable to you in your marketing efforts. They’ll help you strategically make your marketing budget and efforts go much, much further.
Tip: If you've already used any of these features for your events on Quicket, great! The rest of this lesson has information that you may not be aware of, so we’d still recommend working through it.
The unassuming one - link campaigns
Lesson 9: Indispensable free marketing features on Quicket - Section 1
Link campaigns. We’ve mentioned them briefly earlier in this course, and you saw us using them in the lesson 7 section on creating your Mailchimp campaigns.
But what are they? And what do they do?
This section explains link campaigns and their benefits in detail, but they are super simple and only take a few seconds to create.
So let’s start with this: your event page on Facebook has its own link. Let’s use the following one as an example:
https://www.quicket.co.za/events/83616-chill-ice-tea-boogie-down-festival-ft-martin-joe/
This is the link you want to place everywhere: every post to social media, every message you send, every email campaign you run... Anywhere and everywhere you list information about your event, this link should be there.
The reason for this is as simple as the following: when it comes to the internet, people are lazy, have short attention spans, and have a million other things taking their attention away from what you want them to do - booking tickets to your event. Placing this link in many very easily accessible places means that people don’t have to spend any time looking for where to book tickets, and vastly increases the percentage of people that visit your event page.
Tracking from your event link
With every link on the internet, you’re able to track an endless number of things about people’s behaviour - given you have the right tools. On Quicket, we give you the ability to see the number of visits you receive to your event page, as well as the number of ticket sales in total to your event page - among many other stats which are fantastic, but not quite the focus here.
The problem with tracking those two stats - visits and sales - on your event page link is that if you use only one link everywhere, you’re not able to truly isolate which of these places your link is paying off. This means you could be putting huge amounts of time, energy and budget into certain marketing channels while not aware that they’re not really beneficial channels for your event and audience specifically.
This is where link campaigns come in.
Quicket has given you the ability to make unique versions of your event page link, allowing you to see exactly how many visits and sales each of your marketing efforts are bringing in.
This is done by adding a unique code to the end of your event page link, so your potential ticket buyer clicks on the link, and still goes to the same page, but you can tell exactly where they came from.
Let’s take that earlier link for example. With a link campaign added to it, it might look something like this instead:
https://www.quicket.co.za/events/83616-chill-ice-tea-boogie-down-festival-ft-martin-joe/?lc=53372864
In theory, you could create a separate unique link campaign for each and every place you place your event page link - down to every single social media post (should you wish). That is a fair bit, though. If that’s your thing - by all means, do it! It will offer you incredible insights into how the content you’re creating is performing, where people are clicking in emails, what works and what doesn’t.
A simpler approach though, would be to create a separate unique link campaign for each marketing channel you use. For example, you could create one each for your: Facebook page, Facebook event, Twitter, LinkedIn, Mailchimp, Website, direct messages you send to people, etc.
When running paid ads, however, we do recommend creating a link campaign for each separate ad. On Facebook, you’ll be able to see how many people your ad reached and how many of them clicked on your ad, but a link campaign will help you close that loop to see exactly how many of those people continued on to book tickets. So if an ad is not really serving you well and your money could be spent on a different type of ad, or an ad with different content, you’ll be able to tell.
How to create link campaigns:
Creating a link campaign will take you a few seconds:
- Log into your Quicket account.
- Under ‘My Events’ in the menu, select ‘Manage Events’.
- Select ‘Manage event’ next to the event you’re focusing on to access the event dashboard.
- From the menu, select ‘Promote’, then from the drop-down menu that appears, select ‘Link Campaigns’.
- On this page, scroll down to the bottom and select the ‘Add link campaign’ button.
-
From the box that appears, give your unique link a name that makes it very clear what you’re using for. The following are some examples of unique links you can create.
If you’re doing a simple top-level breakdown of your channels:
- Facebook page
- Facebook event
- Facebook posts
- Twitter page
- Twitter posts
- LinkedIn page
- LinkedIn posts
- Mailchimp campaigns
If you’re doing a more specific breakdown of your channels (we’ve only used Facebook, Mailchimp and a few others as examples here but the possibilities are endless):
- Facebook page call to action button
- Facebook event ticket link
- Facebook event description
- Facebook posts to page
- Facebook posts to event page
- Facebook personal posts
- Facebook direct messages
- WhatsApp direct messages
- 20191004 Mailchimp launch mailer main button
- 20191004 Mailchimp launch mailer body text link
- 20191004 Mailchimp launch mailer image header link
- 20191019 Mailchimp launch mailer main button
- 20191019 Mailchimp launch mailer body text link
- 20191019 Mailchimp launch mailer image header link
- Mailchimp footer link
- Once you’ve added your link’s name and clicked save, you’ll see it appear in your list of links. Here you can copy the link, delete it should you wish, and look at the visits, sales, and value of sales that traffic from that specific link has brought in. You can event download the whole lot into a spreadsheet.

List your event in as many places as possible
The more your event is visible everywhere, the more people will see it, talk about it, and come to your event.
How about adding your event with the link to your event page (and a link campaign!) on some events listing sites? Click here for a top 20 list of websites to get your event listed on that we put together.
The industrious one - promoter networks
Lesson 9: Indispensable free marketing features on Quicket - Section 2
Promoter networks. A way to incentivise networks of people to sell tickets on your behalf. Sound like a lot of work and admin? Think again.
In a nutshell, promoter networks allow you to recruit people to market your event on your behalf. You can incentivise these people by offering them a percentage of the tickets that they sell directly, and what impact they’re having on your actual ticket sales.
Promoter networks are a lot like link campaigns in terms of unique tracking, but with an extra layer of awesome on top of it with little extra effort on your part.
How do they work?
You start by creating the promoter network and setting the percentage of commission offered for it. You can create as many as you’d like per event, so for example:
You could have a public one that you can advertise to your social audience to join at a low commission rate of let’s say, 1%. You can then create a couple more networks that are private, each with a different commission rate. One could be at 10% for people that you know have been effective in selling your tickets in the past, and another perhaps at 5% for some people that still need to prove whether they’re effective in the volume of ticket sales they can affect.
For both public and private networks, you’re given a link that you can distribute as you wish (for example your social channels for a public one, or to a selected list of people for a private one).
People click on the link, join the network and enter their banking details. Then they’re given a unique link that they must use to market your event (think link campaigns) and off they go, marketing your event.
As they go, you can see their performance, and check all of the following on a network level:
- How many promoters are in each network
- How much traffic they have driven to your ticket sales page
- The value of ticket sales they’ve brought in
- How much commission you’ve paid to your network
- What you’ve made from that network
You can also drill down into a network to see stats for each individual promoter.
After your event when Quicket pays out your event funds and deducts the fees owed, the commission owed to your promoters based on every ticket they personally were responsible for selling will be deducted as well, and paid out to them - no need for you to manage and keep track of their relative sales at all. This also means there’s no outlay cost for you.
Creating promoter networks
A promoter network will take you less than a few minutes to create.
How to create promoter networks:
- Log into your Quicket account.
- Under ‘My Events’ in the menu, select ‘Manage Events’.
- Select ‘Manage event’ next to the event you’re focusing on to access the event dashboard.
- From the menu, select ‘Promote’, then from the drop-down menu that appears, select ‘Promoter Networks’.
-
On the next screen:
- Give your network a name. For this example, we’re creating a private network and calling it ‘Top Influencers’ - this is only seen by you.
- Set the referral amount. For this example, we’re setting it to 10%, meaning that for each ticket sold where the ticket price is R100, the promoter will receive R10.
- We’re leaving the ‘Open to the public’ toggle setting on ‘No’. If you’re creating a public network where you don’t mind if anyone and everyone joins, click this to change it to ‘Yes’.
- You also have a space for additional notes for your own reference - these are not visible to your promoters.
- Click ‘Save’
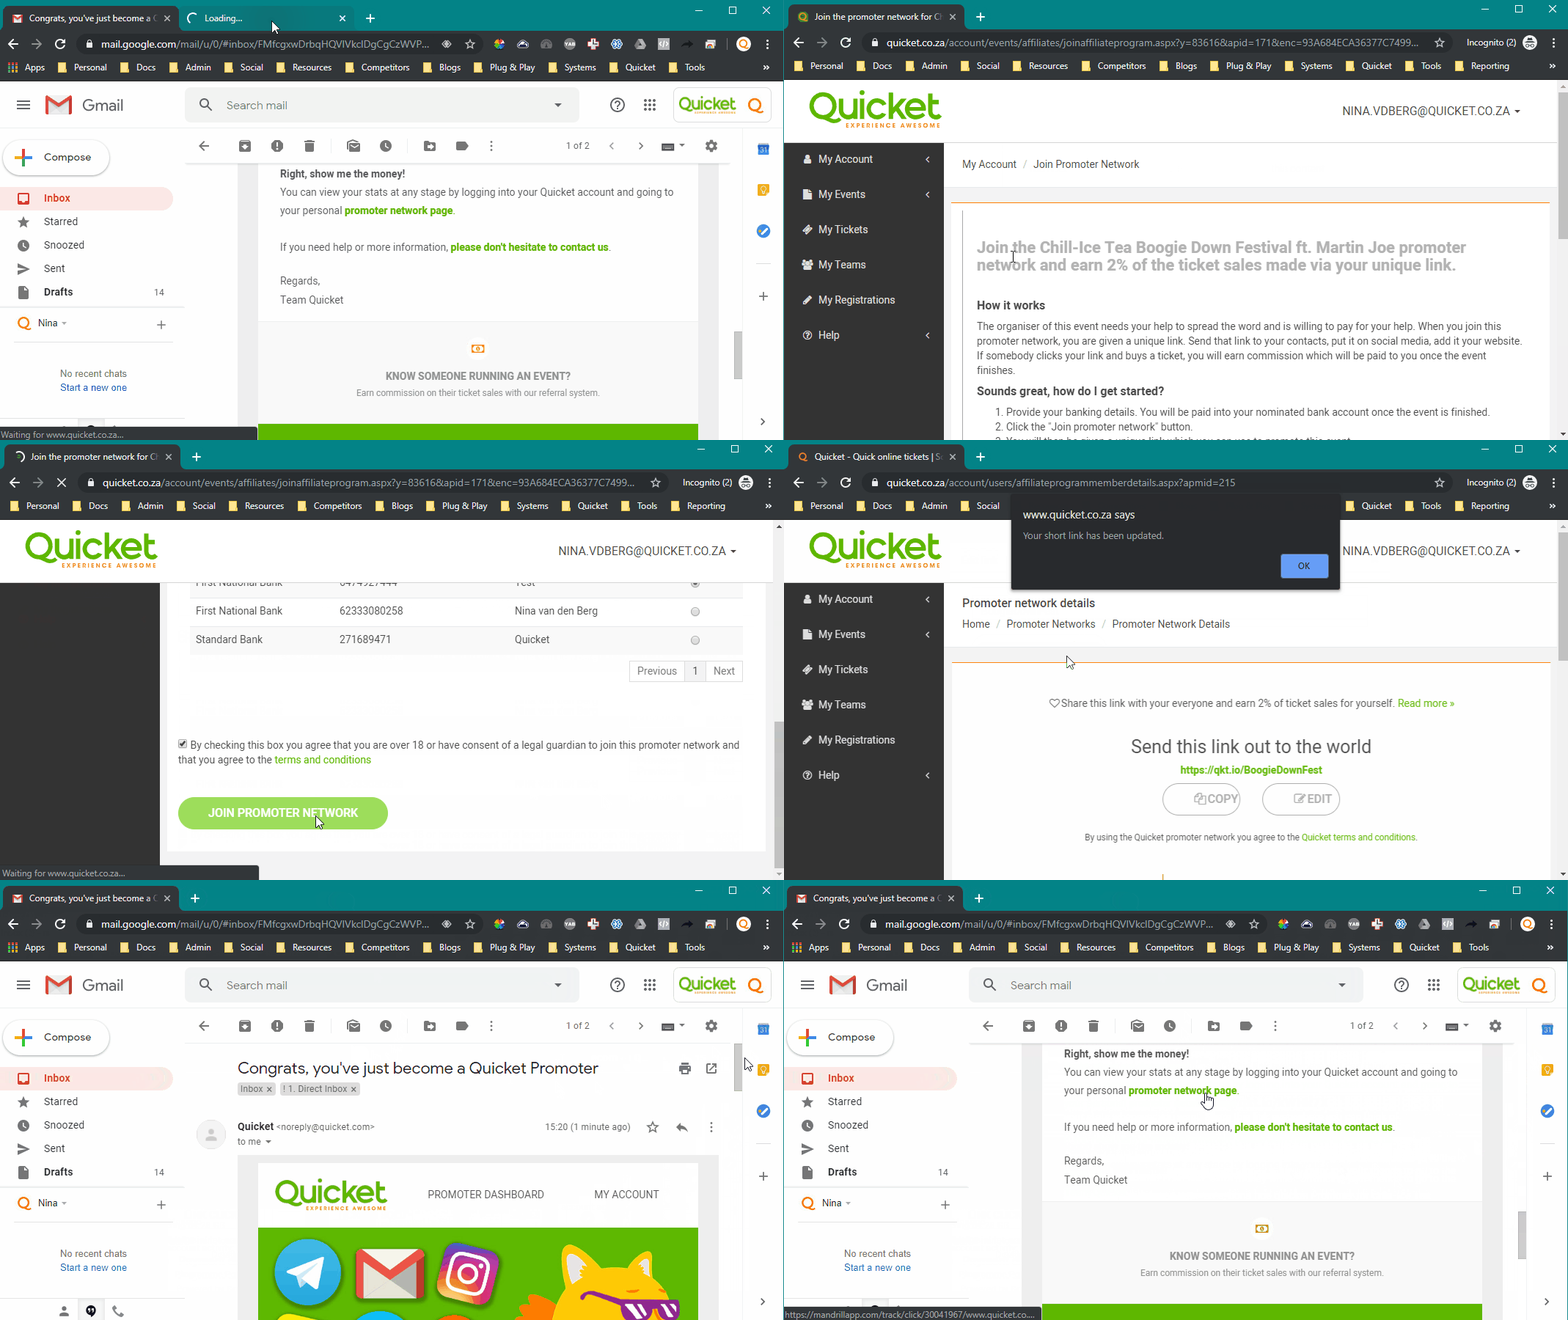
- You’ll now see your link for people to use to join the network. Copy this link and either place it in a public place if you intend it to be so, or send it directly to specific people that you would like to join and let them know that they should not share this link.

- Once they click on the link, they’ll be asked to log into their Quicket account (or create an account if they don’t yet have one).
Next, they’ll need to set their bank account for payment. If they already have a bank account listed on Quicket that they would like to use for their payment, they’ll be able to simply select it. Alternatively, they can select ‘Add a new bank account’ and follow the prompts.
They need to accept the terms and conditions, and then click ‘Join Promoter Network’. -
From the next screen, they can:
- Customise their link
- Read more about being a promoter
- Read Quicket’s terms and conditions
- Link a bank account, view the terms
Promoter networks vs promoters
You’ll also see the ‘Promoters’ menu item available to you. This is different to promoter networks: it shows you who is sharing and promoting your event if you have an incentive message turned on.
You want to encourage your guests to promote your event and get the word out to a wider network of people. All it takes is a little incentive.
How to turn on an incentive message:
- Log into your Quicket account.
- Under ‘My Events’ in the menu, select ‘Manage Events’.
- Select ‘Manage event’ next to the event you’re focusing on to access the event dashboard.
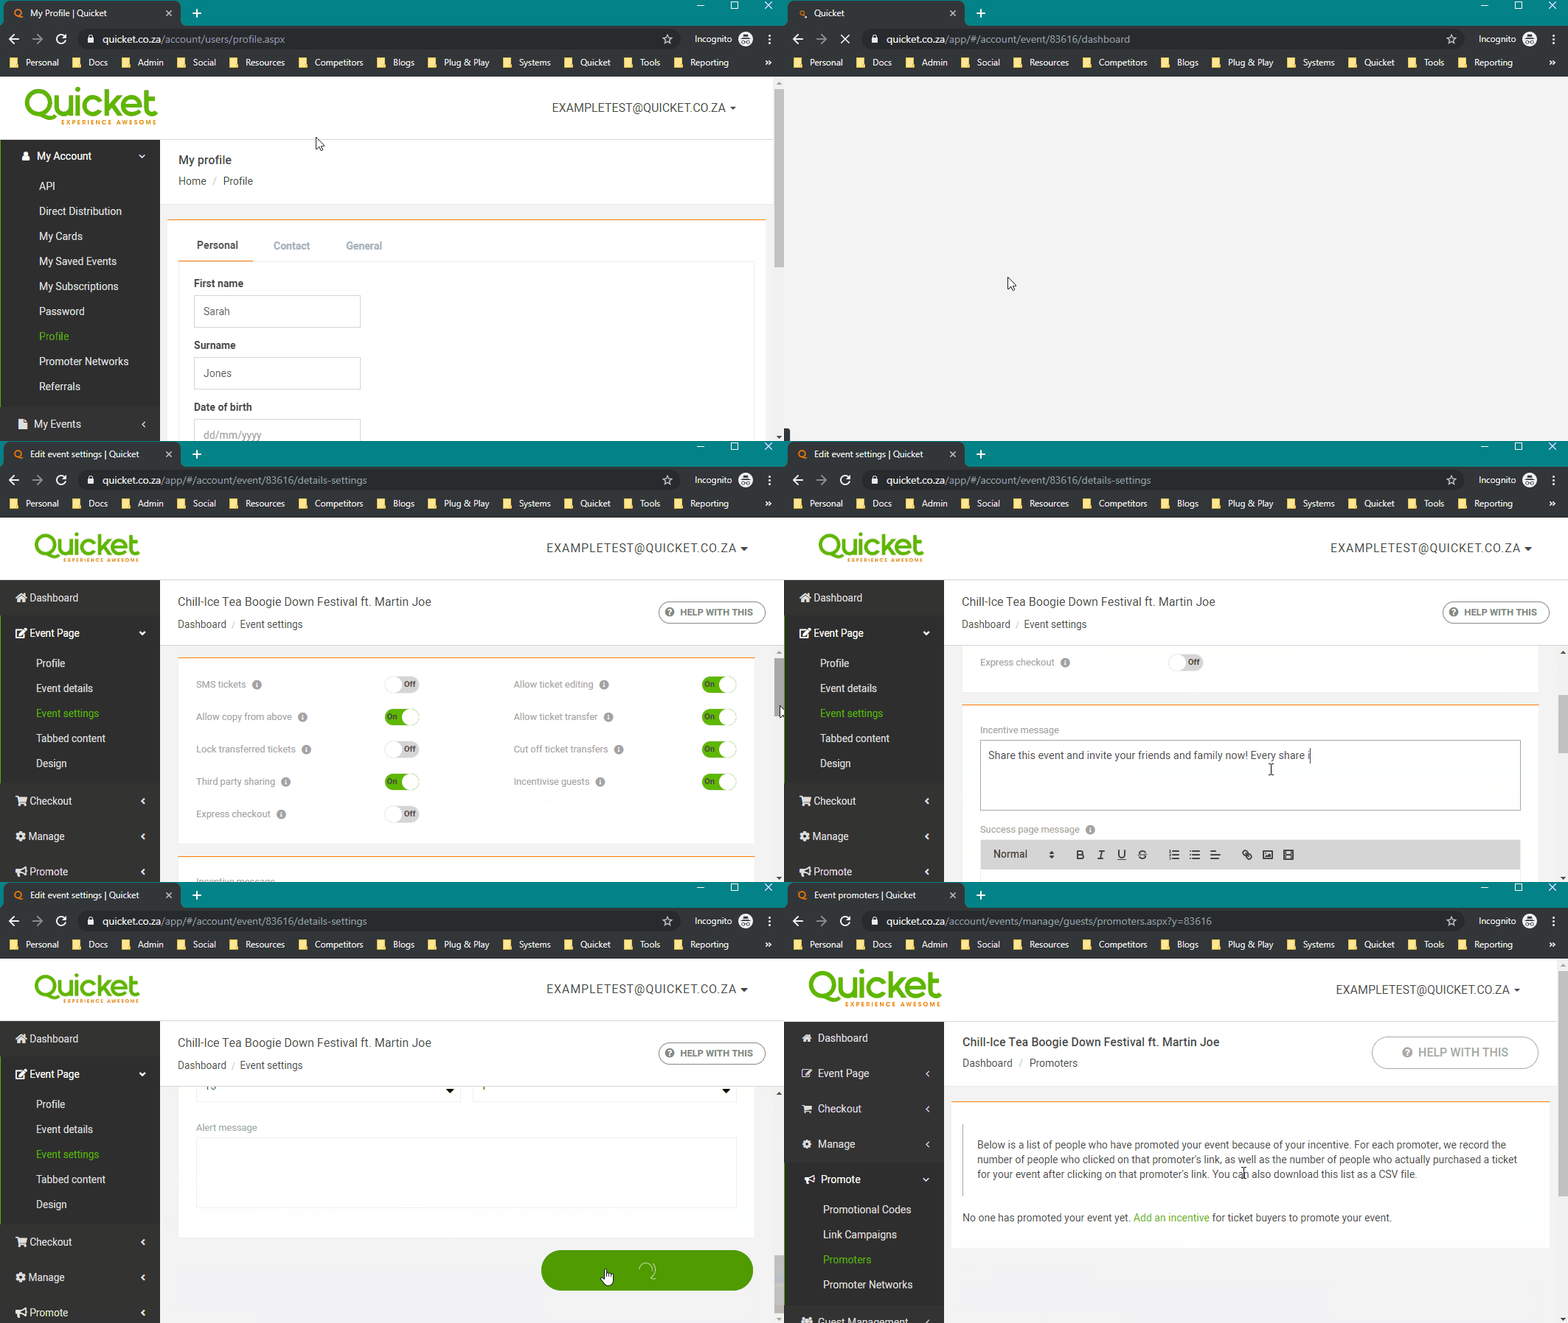
- Click on ‘Event page’ from the menu, and select ‘Event settings’.
- On this page, find the ‘Incentivise guests’ toggle and click on it to turn it to ‘ON’.
- You’ll now have a text box titled ‘Incentive message’ where you can write a message to tell guests what you’re offering in return for their help in sharing the event. This message will pop up as a person has finished paying for their tickets. The below image shows where this message will display:
- When people share your event from this message, they get added to the Promoters page. Access this by clicking on ‘Promote’ from the menu, and selecting ‘Promoters’. This shows clicks, purchases and tickets that have come from that person sharing your event.
The generous one - promotional codes
Lesson 9: Indispensable free marketing features on Quicket - Section 3
Promotional codes. What better way to spike attendance than to get a select number of people excited about your event? Running a discounted ticket special works wonders: those who book with the discounted price will inevitably market your event to their friends, as they’re likely to want their friends to join them.
You can create promotional codes for guests to reveal hidden ticket types, to apply a discount (a monetary amount or a percentage) on selected tickets, or to offer guests a special discount for buying tickets in bulk... you can even use them to run staff tickets! With a fair number of options available to you, here’s how to make use of these with a few examples.
A simple, single code
Let’s say for example you’re running a 25% off special (you can set a monetary amount for the discount instead, but for this example we’ll use a percentage). You can select which ticket types you want the code to apply to, and create one single code that will apply the 25% discount to those tickets. This code can be used multiple times, and you can set the maximum number of times that the code can be used.
How to create a single promotional code:
- Log into your Quicket account.
- Under ‘My Events’ in the menu, select ‘Manage Events’.
- Select ‘Manage event’ next to the event you’re focusing on to access the event dashboard.
- Click on ‘Promote’ from the menu, and select ‘Promotional codes’.
- On this page, click the ‘Add New Code’ button. You can create as may of these as you like.
- On the following screen, you’ll see you’re on the ‘Create single code’ tab. On this tab, set all the settings that you want to apply to this code - our example below will give you more info on these. Note that all settings apply to the code as a whole, and not to an individual use of the code.
So for example, let’s assume you have 4 ticket types at different prices:
- An early bird general access.
- A standard general access for the whole event.
- A standard general access for the Friday only.
- And a VIP ticket type.
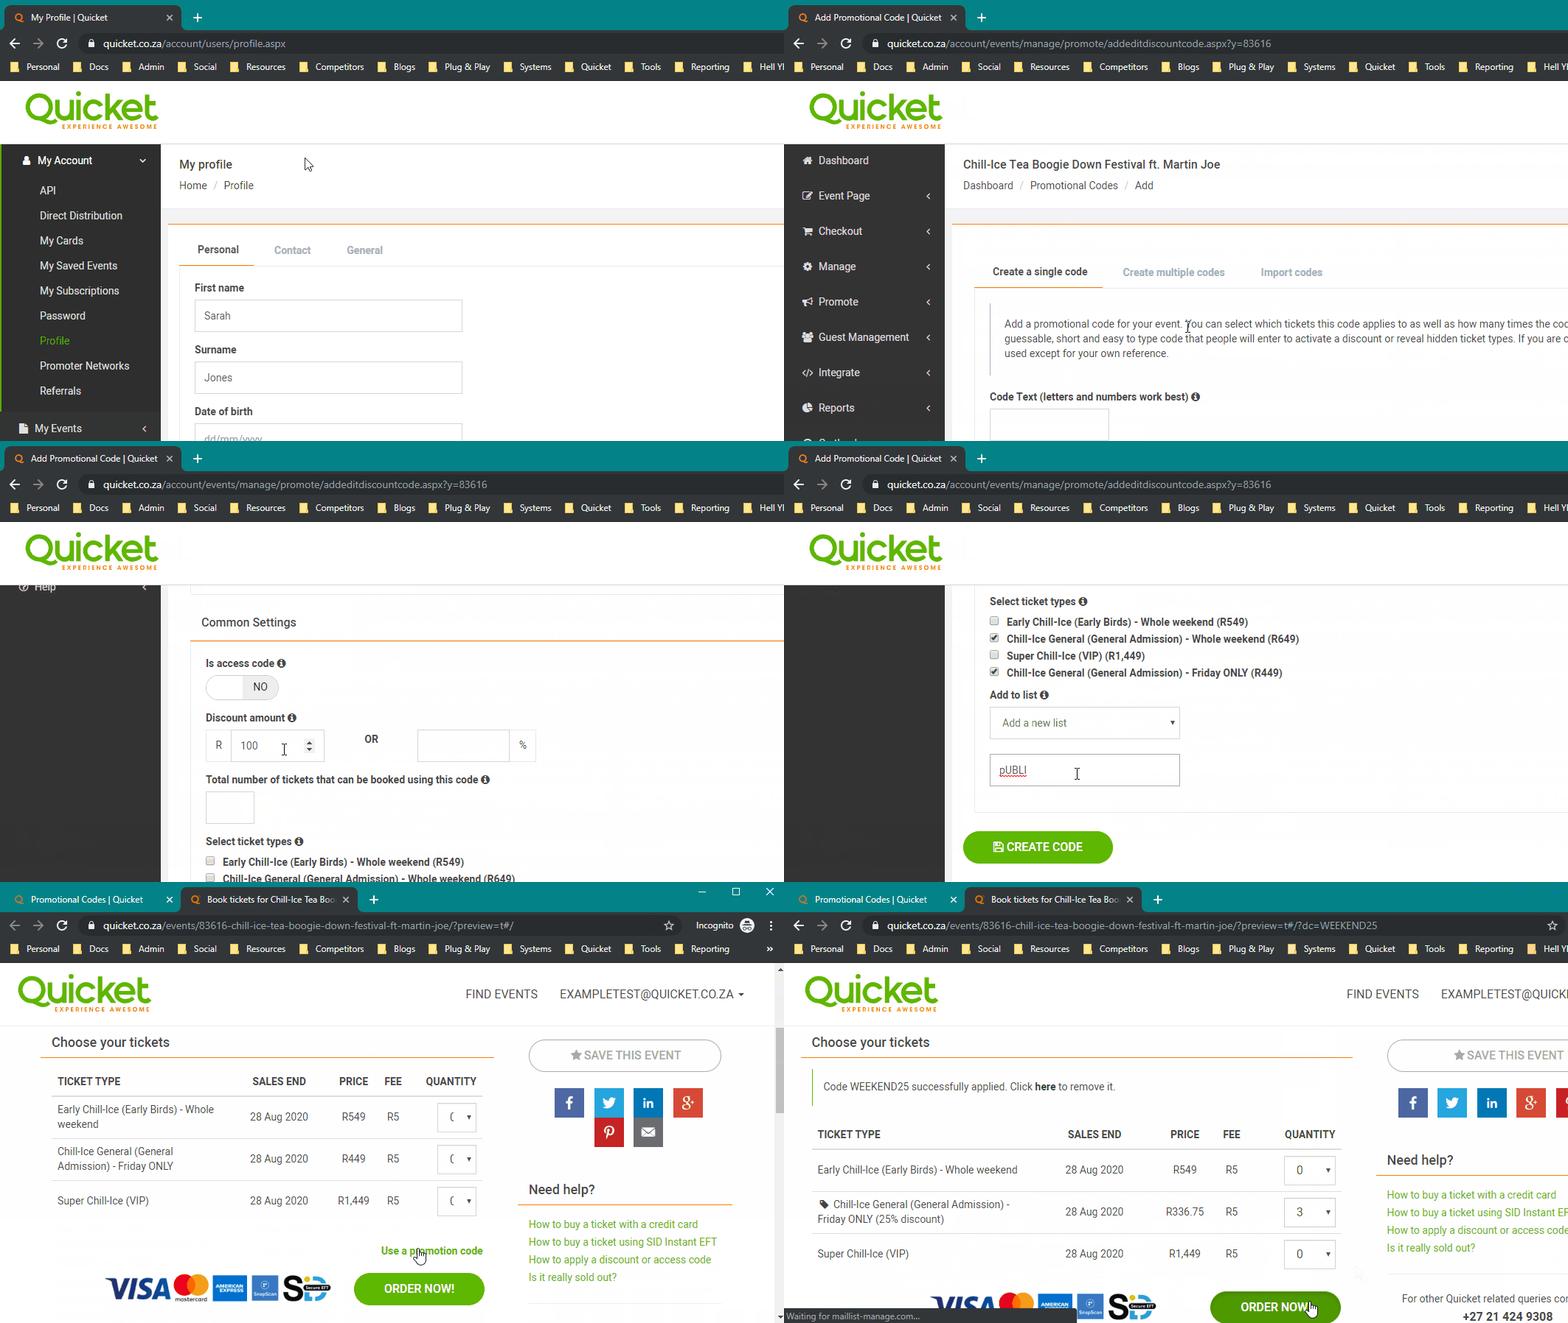
You can run a discount code special over a weekend before your event and call the code ‘WEEKEND25’.
- This can be set to give a percentage (in this case 25%) off to anyone that uses it on their ticket purchase, and make it applicable for use on the general access whole event and general access Friday tickets only (note that if you don’t select the ticket types it applies to on this page, this code will not apply a discount.)
- You have the option to make this ticket hidden by default and only accessible by using the code, but we’ll cover this in the next section.
- You’re also able to create a discount for bulk purchases, i.e. if someone buys 10 tickets they get a certain discount. You can set this here but we’ll cover this in a bit.
- You can set it to be used 100 times for example, and if the end of the weekend comes and there are still uses leftover, you can come back to edit the code and decrease the number of uses to end the special. Note that individual people are able to use this code more than once.
- You can also create lists to group your codes for ease of reference later on. For example, if you have a special discount for sponsors, you can create a Sponsors list to keep track of all the codes you have made available to sponsors.
Here’s what this will look like:
About access codes
What if you wanted certain ticket types displayed on your event page, but wanted others to be hidden by default and only shown to those who you want to access them?
For this, you would do the following.
How to create an access code:
- Log into your Quicket account.
- Under ‘My Events’ in the menu, select ‘Manage Events’.
- Select ‘Manage event’ next to the event you’re focusing on to access the event dashboard.
- Click on ‘Checkout’ from the menu, then select ‘Ticket types’
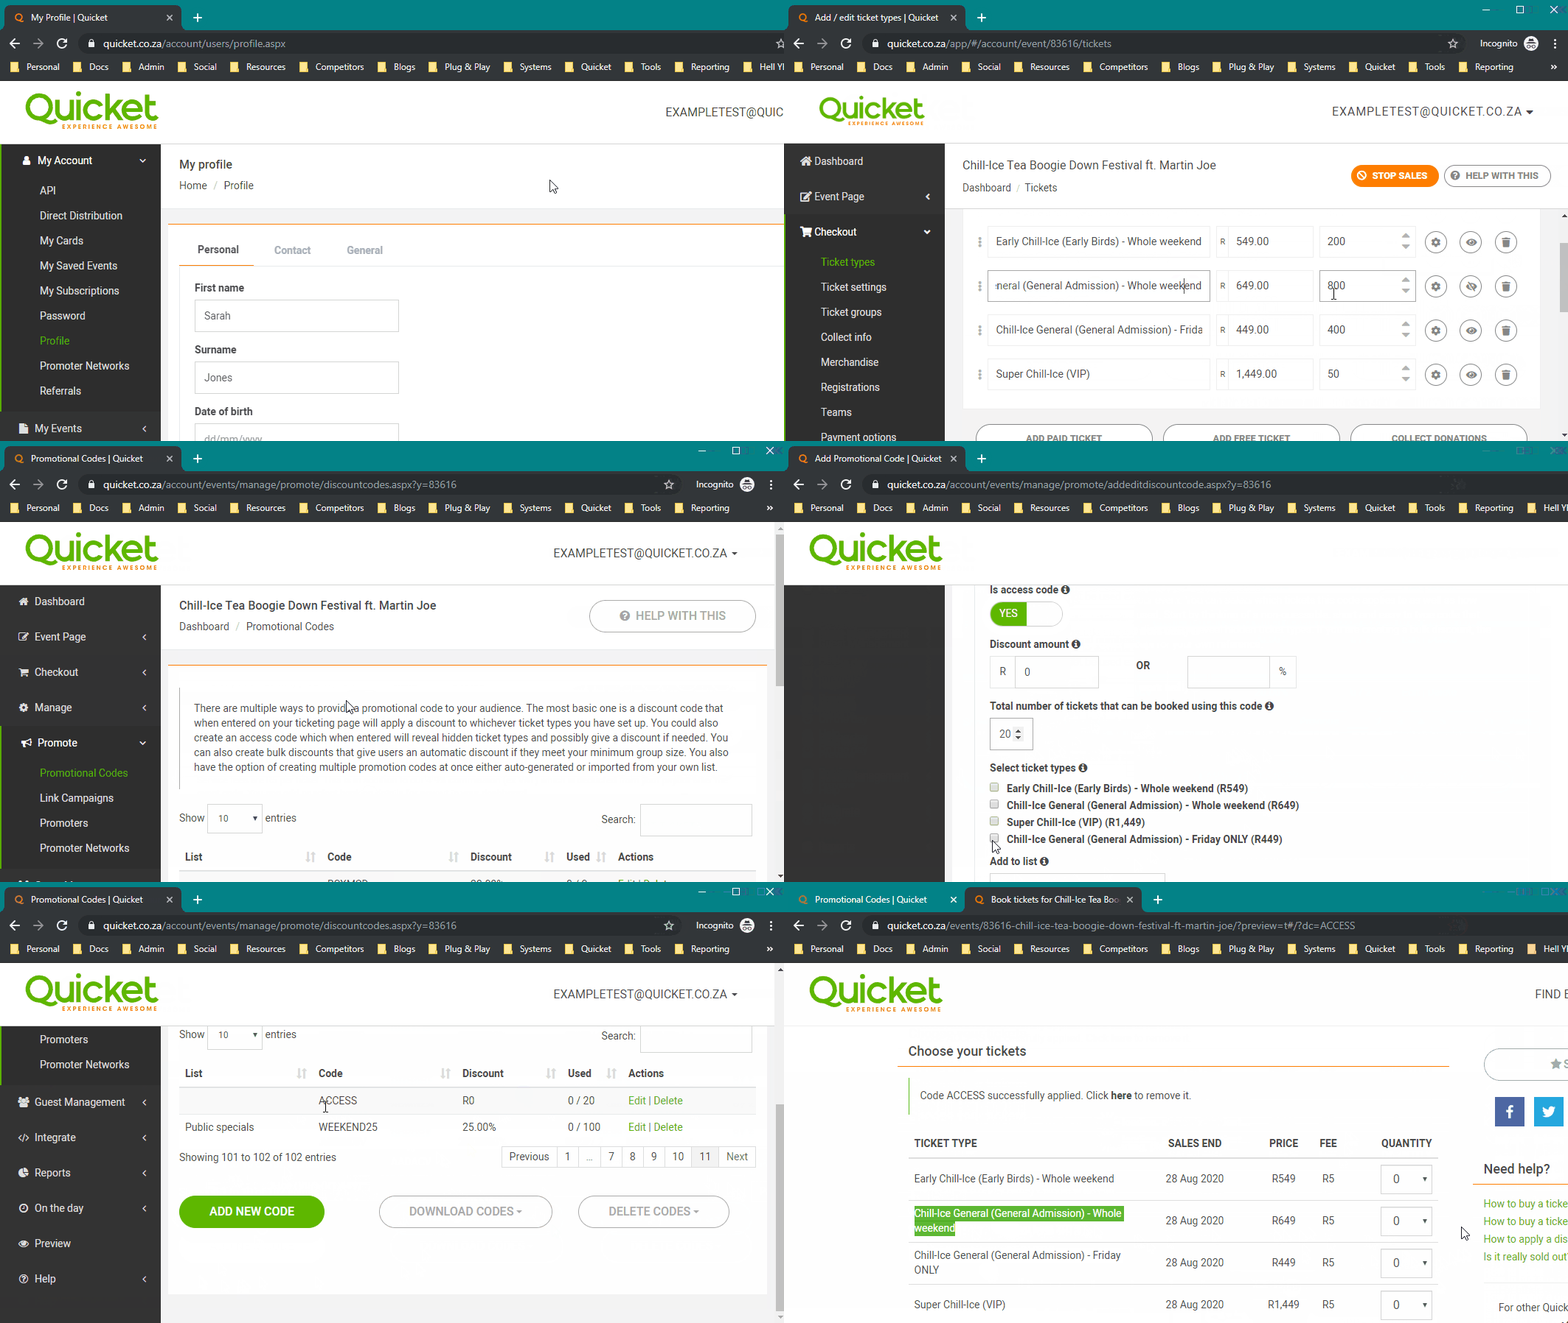
- On that page, find the ticket types you want to hide, and click on the eye icon to the right of it, then click ‘Save Event Tickets’ at the bottom of the page.
- Next, click on ‘Promote’ from the menu, and select ‘Promotional codes’.
- Create a new code with all the other settings you want for it (i.e. whether there’s a discount or not, etc.) and set ‘Is access code’ toggle to ‘YES’. Also select the hidden tickets that you want linked to this code - if you don’t, this code will not reveal hidden ticket types.
- Click ‘Create Code’ and let people know about your code!
Generate multiple codes
Let’s say for example that you wanted to limit the number of times each person can use a code to 2 times. You would need to create a code for each person, which if it’s more than just a few, will quickly add up to take a lot of your time.
Instead, you can create multiple codes by letting Quicket generate unique random codes for you.
How to generate multiple codes at once:
- Log into your Quicket account.
- Under ‘My Events’ in the menu, select ‘Manage Events’.
- Select ‘Manage event’ next to the event you’re focusing on to access the event dashboard.
- Click on ‘Promote’ from the menu, and select ‘Promotional codes’.
- On this page, click the ‘Add New Code’ button.
- On the following screen, you’ll see you’re on the ‘Create single code’ tab. Select the ‘Create multiple codes’ tab to the right of it.
- On this tab, first set how many codes you want Quicket to generate for you.
- Next, set all the ‘Common settings’ that you want to apply to these codes - whatever you set here will apply to each code. For example, if you are generating 50 codes to give to 100 people for 2 tickets each, you should enter the number 2 under ‘Total number of tickets that can be booked with this code’, as shown in our example below.
- Click ‘Create codes’ and you’re done!
Now you can send these codes to those that you want to use them. You can send these to people individually, or you could download the codes in a spreadsheet in order to send them out using merge tags in a promotional email in Mailchimp. Your options are endless here - you could even run fastest-fingers-first competition and send a code to each person who enters.

Multiple customised codes
You might not want Quicket’s auto-generated code format which results in a list of codes, each made up of a random, but unique combination of letters. What if you wanted to specify your own code? For example, SUMMERFUN138, SUMMERFUN139, etc.
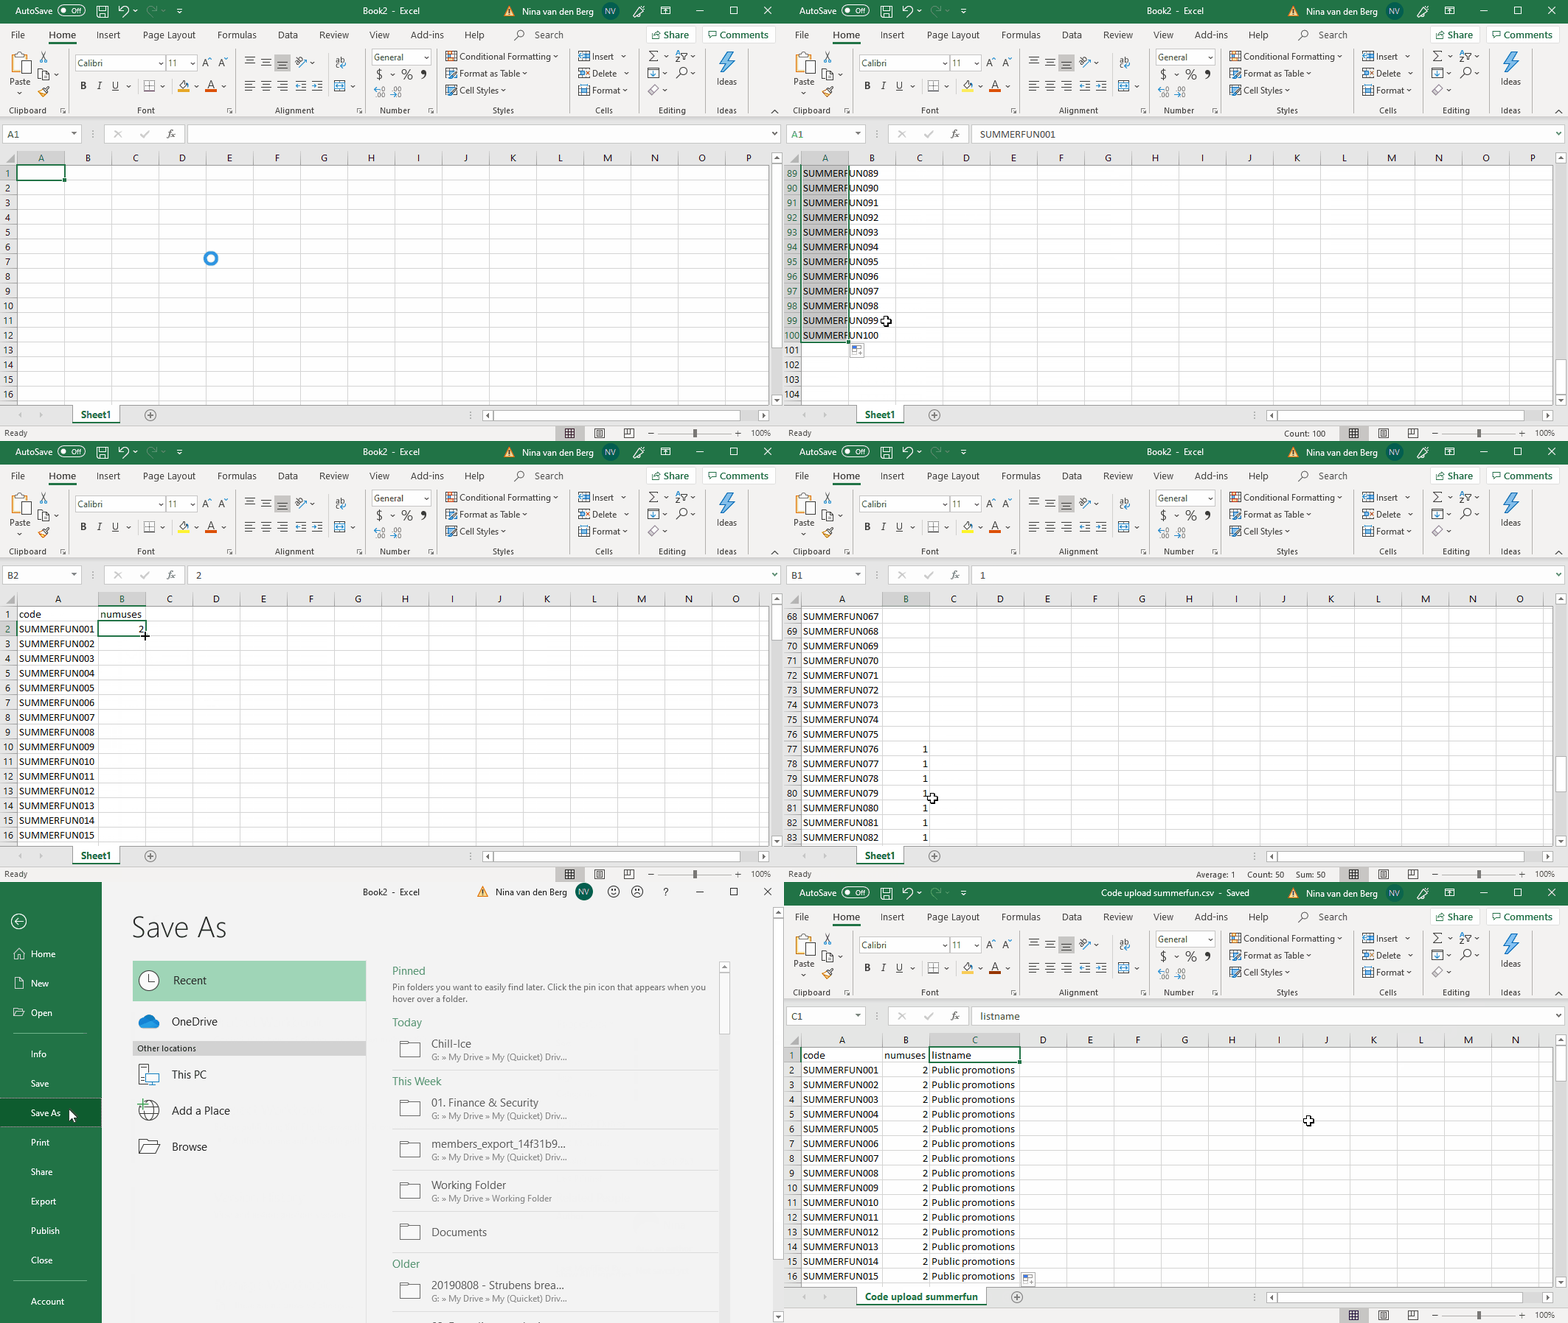
You can prep all your various codes in one spreadsheet - think everything from staff ticket allocations, to flash sales, bulk discounts, etc. - then upload it to Quicket to turn into promotional codes.
How to create multiple custom codes:
- Log into your Quicket account.
- Under ‘My Events’ in the menu, select ‘Manage Events’.
- Select ‘Manage event’ next to the event you’re focusing on to access the event dashboard.
- Click on ‘Promote’ from the menu, and select ‘Promotional codes’.
- On this page, click the ‘Add New Code’ button.
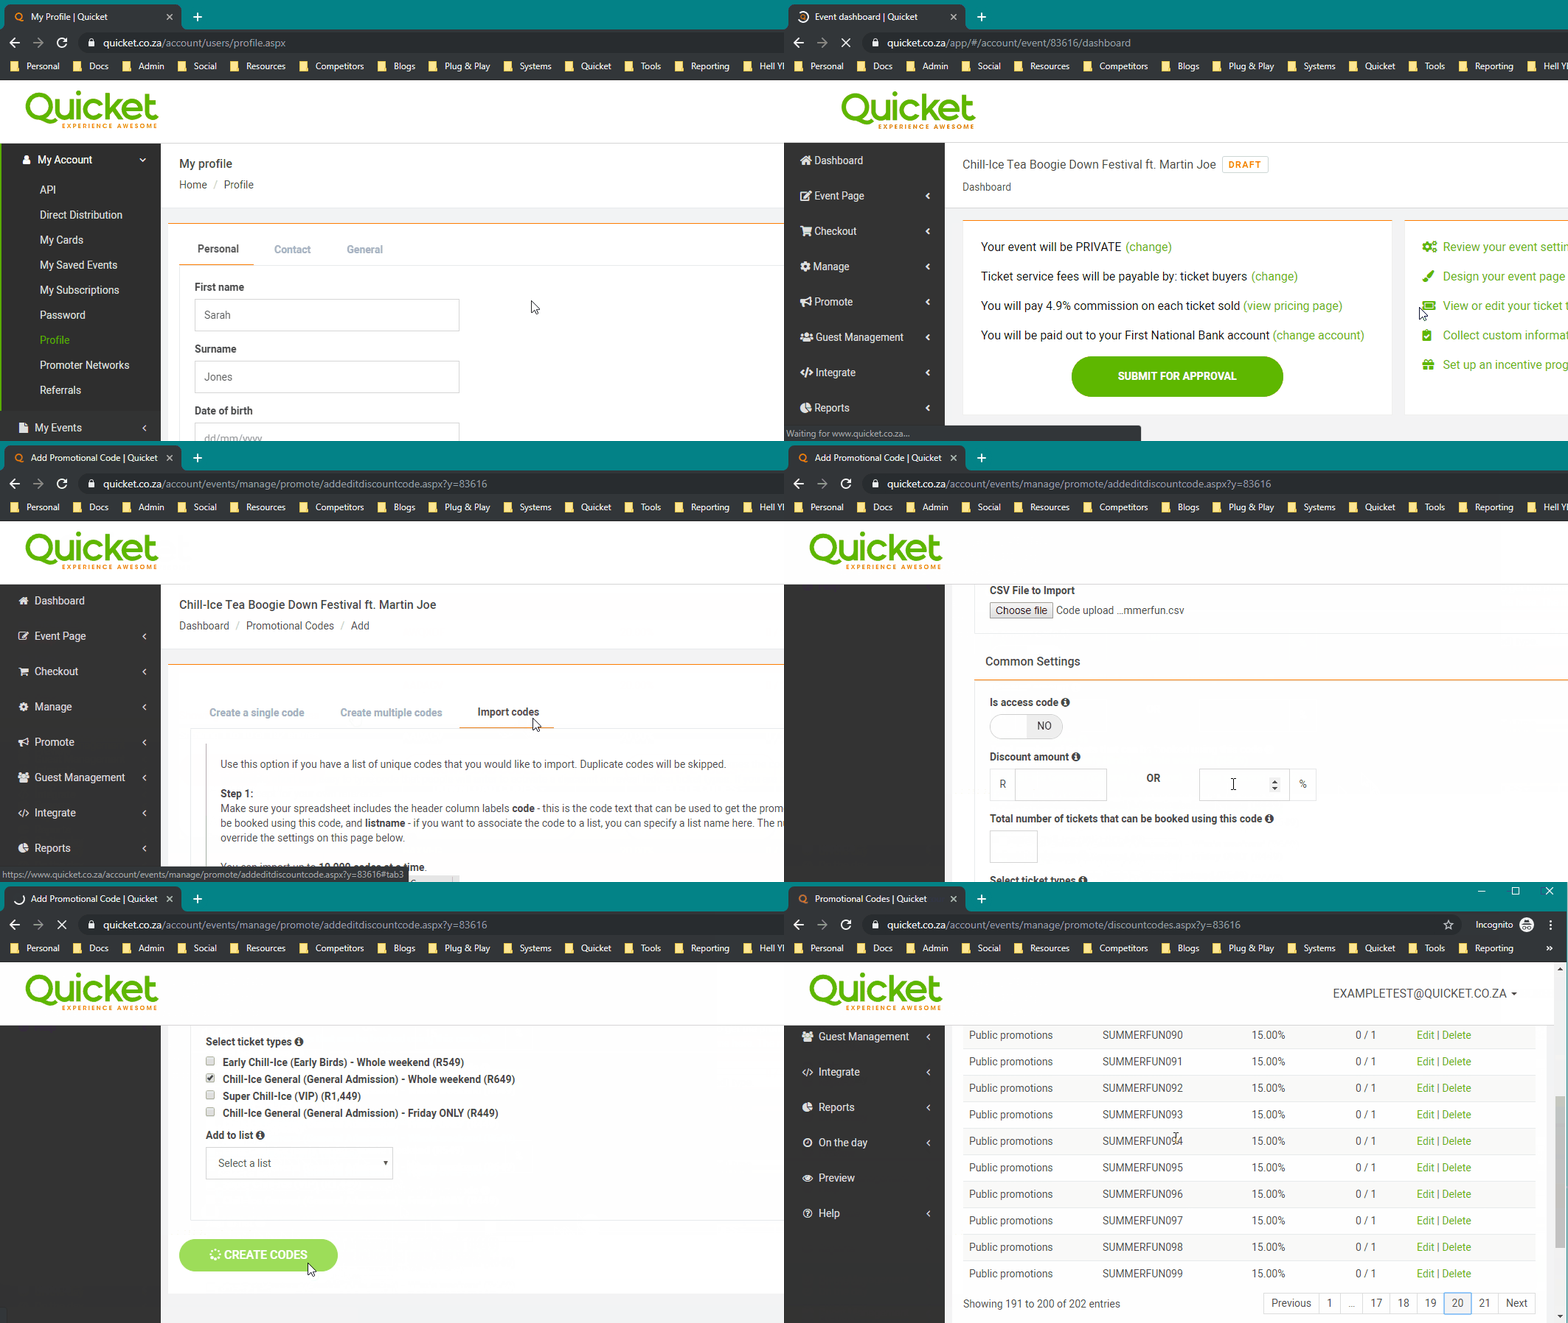
- On the following screen, you’ll see you’re on the ‘Create single code’ tab. Select the ‘Import codes’ tab to the right of it.
- First, prepare your spreadsheet according to the below.
- Next, select your spreadsheet on this tab.
- Then, set all the ‘Common settings’ that you want to apply to these codes - whatever you set here will apply to each code. For example, if you are generating 50 codes to give to 100 people for 2 tickets each, you should enter the number 2 under ‘Total number of tickets that can be booked with this code’, as shown in our example below. If you want different settings for the number of uses for each code, you can specify these in your spreadsheet as we explain below.
- Click ‘Create codes’ and you’re done!
What your spreadsheet needs:
At a basic level, your spreadsheet needs 1 column with the following heading:
- code
This is the code text that can be used to apply the promotion.
- numuses
The number of tickets that can be booked using this specific code.
Note that if you specify a number in this column next to a specific code in your spreadsheet, it will override what you have set in the ‘Total number of tickets that can be booked with this code’ field under ‘Common Settings’. - listname
If you want to associate the code to a list, you can specify a list name here.
Note that if you specify a list name in this column next to a specific code in your spreadsheet, it will override what you have set in the ‘Add to list’’ field under ‘Common Settings’.
Discounts offered for bulk bookings
These are different to the normal promotion codes we’ve mentioned above even though you set them up in the same section. A bulk discount has unlimited uses, and the customer does not need to enter the code name to receive the discount. All they must do is select the amount of tickets that you've set as the minimum ticket threshold, and a percentage will be deducted from their total order.
An example of how you can use the bulk discounts feature is as follows:
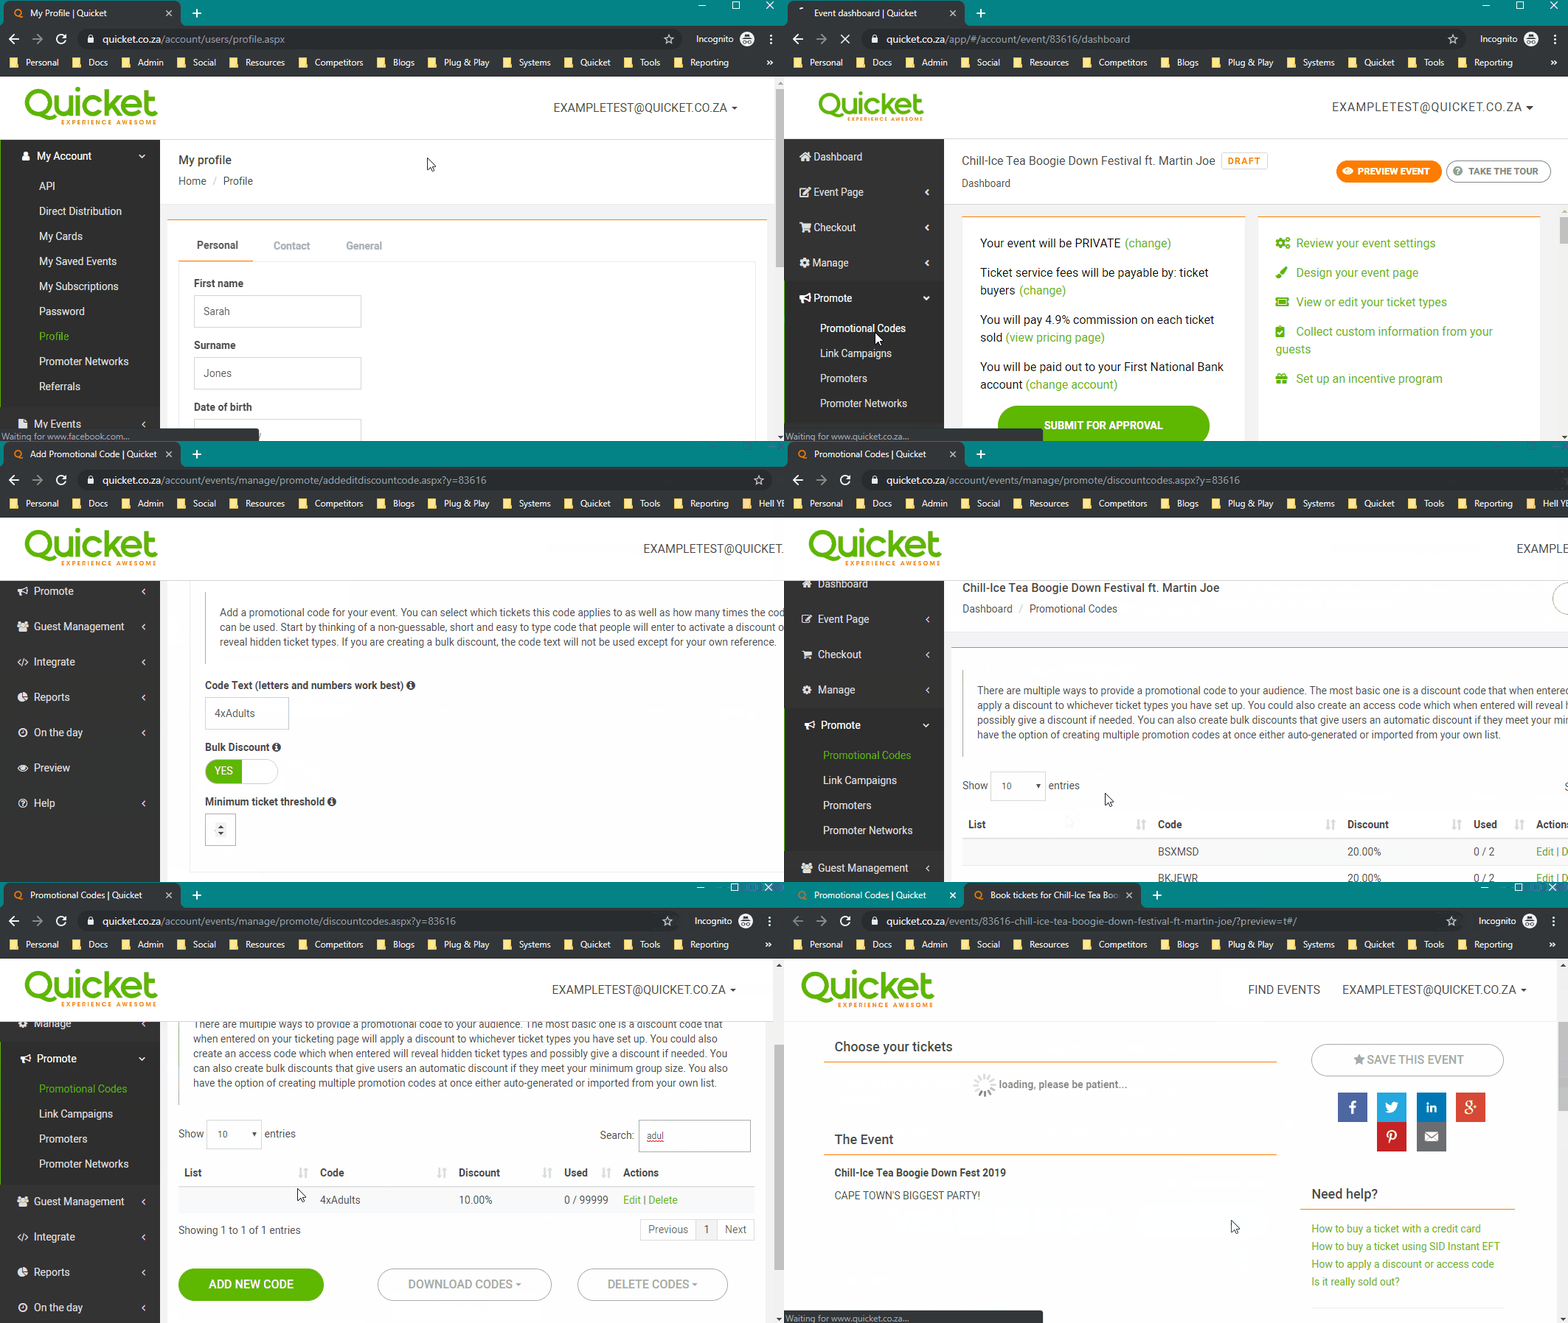
- Booking 4 or more tickets at once = 10% discount. You can create a bulk discount code for this and name it “4x Adults.”
- Booking 10 or more tickets at once = 25% discount. You can create a second bulk discount code for this and name it “10x Adults”
How to set up discounts for bulk bookings:
- Log into your Quicket account.
- Under ‘My Events’ in the menu, select ‘Manage Events’.
- Select ‘Manage event’ next to the event you’re focusing on to access the event dashboard.
- Click on ‘Promote’ from the menu, and select ‘Promotional codes’.
- On this page, click the ‘Add New Code’ button.
- On the following screen, you’ll see you’re on the ‘Create single code’ tab.
- Set your code text which is purely a name to help you remember and differentiate between your multiple codes. The ticket buyer will not have to enter this text to receive the discount.
- Set the ‘Bulk discount’ toggle to ‘YES’
- Set the minimum ticket threshold for this code, i.e. how many tickets of a certain type at a minimum people need to be booking in order for the discount to apply to their total order.
- Under ‘Common Settings’, set the discount percentage amount (note that for bulk discounts you cannot do a monetary amount as a discount).
- Set which tickets this discount will apply to.
Keep in mind that whether you select one or several ticket types that you want people to book in order to get the bulk discount, the discount will apply to the entire booking.
For example:
- You set your bulk discount to apply to an order of 4 or more of one ticket type, e.g. ‘Adults’. If someone books 4 Adult tickets but also books 2 Kids tickets in the same order, 10% will be taken off of the entire order, not just the amount owed for Adults.
- You set your bulk discount to apply to an order of 4 or more of two ticket types, e.g. ‘Adults’ or ‘VIP’. If someone books 3 Adult tickets and 1 VIP ticket, 10% will still be taken off of the entire order.
- Lastly, set if you want to add your code to a list, and which.
- Click ‘Create Code’ and let people know about your code!
Ready for ads?
Lesson 9: Indispensable free marketing features on Quicket - Section 4
The last section to cover is regarding paid ads - an incredibly worthwhile avenue to put your marketing efforts into with even a small section of your marketing budget.
Ready for the next lesson of our Quicket Event Marketing Course? Click here.
Nina is the Marketing Manager for Quicket and is passionate about growing a community of event organisers into one that is empowered to create incredible experiences. An event organiser herself, she’s also worked across brand marketing, social media, and in the non-profit world. She’s a burner (AfrikaBurn) at heart, an avid baker, loves a good hug, and cooking dinner for friends over a glass of good wine.


